banner


Tuesday, December 31, 2013

Personal Favorites

As we prepare to say good bye to 2013, I wanted to share my favorite projects from 2013...

There were quite a few different types of projects, so I will categorize them

Cards - here is a collection of some of my favorite cards!
---------------------------------------
I cannot think about my favorite cards without sharing my spooky spider card! This was such a great card, I loved everything about it.


No year is complete without remembering mom...


You can never have enough Thank You cards, and this one is so pretty


Boo! Don't let this little ghost frighten you!


Don't forget about the gift cards... as the children get older and are very unimaginative and ask for money, we may as well spruce them up in some way.


This stacked present birthday card is embellished with a multi-strip quilled element


Printables - I am truly enjoying sharing my printables, expect many more in 2014!
---------------------------------------
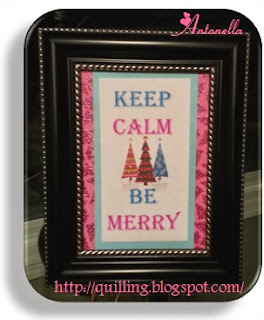
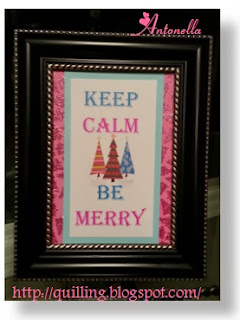
Some of my Keep Calm collection...


If you want to smile, don't forget this cutie...


Cut Files - My plan is to share more of these in 2014... time is my biggest hurdle...
---------------------------------------


As we wind down 2013 and get ready for 2014, I am grateful for my wonderful family and collection of friends like you! Thank you for your support and beautiful comments, they make the journey worthwhile!

May you and your family have a Safe and Happy New Year!

Antonella Quilling Art

Sunday, December 29, 2013

Freebie Graduation Card Printable

Antonella Graduation Free Printable for 2013, 2014, and 2015
I wanted to get this Graduation card in before the year was over... We celebrated my sister's graduation over Christmas. She graduated over the summer, but there was never any kind of celebration, so I wanted to make sure she knew how proud everyone was of her!

Antonella Graduation Free Printable for 2013, 2014, and 2015

The funny thing about this card is that I picked a green color that printed out teal on my printer, so I swapped out the green for a teal rhinestone and went with the flow. Since she is married with children, I went with a more mature look to her card and did a simple Congratulations and the year down the side. Added some glitter and rhinestones (I just love the sparkle).

If you would like to make a card of your own, please click on the appropriate link below to download a PDF file with a variety of colors (there are files for different years):

Antonella Graduation Free Printable for 2013, 2014, and 2015
Click to download the free 2013 Graudation printable PDF file
Antonella Graduation Free Printable for 2013, 2014, and 2015
Click to download the free 2014 Graudation printable PDF file

Antonella Graduation Free Printable for 2013, 2014, and 2015
Click to download the free 2015 Graudation printable PDF file


As always, I am happy to share my tutorials, freebies / printables (and now cut files) with you, I only ask that you do the following:
  • Please leave a comment if you download  freebie / printable / digi, etc, because I would love to hear from you
  • If you enjoy the things I share with you, please become a follower so that you will see all the new stuff when it is posted (no pressure, join only if you want)
  • I hope you love PINTEREST as much as I do, would love it if you would PIN this project!
  • Please do not share any of my digital images, printables, or tutorials directly with others, but please do send them on over to me so that they can peruse and collect the images themselves.
  • I would be thrilled and honored if you would send me links to any images or posts that you've done using something that I have shared with you.  If you say it is ok, I will even feature your work here!
  • If you want to recolor the images, feel free! 
  • If you have a special request, please let me know and I will see what I can do.
Most importantly be Fantastically Creative You!

I hope you have a wonderful day!
Antonella Quilling Art

Monday, December 23, 2013

Christmas Wishes Check out my featured Walkabout - My Ornament Collection

Antonella free quilling patterns printables and silhouette cut files
Antonella's collection of quilled ornaments

With Christmas literally around the corner, I wanted to share with you some of my favorite ornaments... I am sharing them with you via Pinterest in my ..... Christmas Wishes Walkabout - My Ornament Collection... I included my santa ornament above, I don't have a pattern for him at this time, but he was just so cute!

These are a few of my favorite things... 

=============================


Nativity Ornament - I used lots of my "toys" when I made this ornament. I used my cuttlebug and cut my Spellbinders ovals, I pulled out my Silhouette Cameo and cut this lovely nativity, and was able to find the perfect quilling papers to match the colors I used... a touch of glitter (of course) and some beautiful pearls...


Snowflakes on your tree... "I'm dreaming of a White Christmas..." and here is the perfect ornament for you... You can change the colors and make them all white, all pink or blue for a Baby's 1st Christmas, the possibilities are endless


Some Spreuer technique ornaments... Quilled Cross ornament with easel card, Angel, and a Spreuer Christmas Tree...


The tender singing of these sweet blue birds will brighten your day as you watch them on your tree... quilling, Memory box dies, punch, and my spellbinders all make these ornaments sing...


Poinsettia Ornaments - these are easy to make, just run a thread through one of your petals and you are ready to go. I think I would add glitter to the second poinsettia ornament. Yes, I am addicted...


=============================


I hope you have a wonderful day!
Antonella Quilling Art

Tuesday, December 17, 2013

Free Christmas Printable Keep Calm

Keep Calm Be Merry Free Printable


As I woke up to another snowfall, I really needed this printable, lol

For the one I chose for myself, I opted for non-traditional Christmas colors, but I think it works. I really love those colors together.

I thought I would share the "before" picture. At first I just matted it and that looked cute, but then I looked at it some more and thought, I didn't add any bling. So, what's a girl to do? Grab that bling! I think that little bit of sparkle adds just the right touch, especially since I finally used the paper with the sparkly pink trees. Yes, I am guilty. I collect paper that I love and then I am afraid to use it. This was a perfect match to the color scheme I was going for, and I am so glad I decided to use it.

Keep Calm Be Merry Free Printable


Here is the free printable for you:

Keep Calm Be Merry Free Printable
Keep Calm Be Merry Free Printable - click and save jpeg


Do you have this problem too? You purchase the perfect supplies (paper, fabric, tools, etc) and then you hesitate to use it on "that" project because you just know there is "another" project that you are saving it for... C'mon, admit it, share your stories...

-----------------------------------------------

As always, I am happy to share my tutorials, freebies / printables (and now cut files) with you, I only ask that you do the following:
  • Please leave a comment if you download  freebie / printable / digi, etc, because I would love to hear from you
  • If you enjoy the things I share with you, please become a follower so that you will see all the new stuff when it is posted (no pressure, join only if you want)
  • I hope you love PINTEREST as much as I do, would love it if you would PIN this project!
  • Please do not share any of my digital images, printables, or tutorials directly with others, but please do send them on over to me so that they can peruse and collect the images themselves.
  • I would be thrilled and honored if you would send me links to any images or posts that you've done using something that I have shared with you.  If you say it is ok, I will even feature your work here!
  • If you want to recolor the images, feel free! 
  • If you have a special request, please let me know and I will see what I can do.
Most importantly be Fantastically Creative You!
I hope you have a wonderful day!
Antonella Quilling Art

Saturday, December 07, 2013

Santa Gift Card Holder Tutorial

Santa Gift Card Holder Tutorial

I love gift card holders, especially for teachers as a special something extra during the holidays. This is such an easy gift card to make - it doesn't hurt that it is really cute too!

I love to get the most out of my paper, so I took a 12 x 12 sheet of paper and cut 6 gift cards, each is 4 x 6 inches (10.16 cm x 15.24 cm).  I found that it looks much prettier if you use a paper that has a bit of a pattern to it. I selected one that has a damask design.

Fold the short end 1 inch (2.54 cm), and glue or sew the outside edges only.  This creates the pocket for the gift card.

Fold the opposite short end 2.5 inches (6.35 cm), this becomes the outer jacket for Santa!

Note: .  If you have paper that has a pattern on only one side, you want to make sure that you make your folds such that the pretty red is on the outside. (check out this picture to get an idea of the pieces and the folding)

Santa Gift Card Holder Tutorial


Fur Trim:
  1. Cut a 1.75 inch (4.45 cm) strip of white paper and take out your handy dandy border punch and create a scalloped edge to give the impression of a nice fluffy trim.  I used my Martha Stewart Doily Lace Edge Punch.  I love it!
  2. Glue the white fur trim to the center of the outside of the gift card holder
To Create the Belt:

  1. Cut a strip of black paper approximately 1/2 inch (1.27 cm) wide and 7 inches (17.78 cm) long. Snip off about 1 inch (2.54 cm)
  2. Cut a yellow square approximately 1.5 inches (3.81 cm) for your Belt Buckle

To Assemble the Belt:

  1. Place your gift card in the pocket
  2. To create your Belt Buckle, take your yellow square and glue the small 1 inch (2.54 cm) piece of black paper to the center of the square.
  3. Attach your yellow Belt Buckle to the approximate center of the black strip
  4. Now take your black strip and fold it over the card holder and glue the ends together

And there you have it! This was the gift card holder I handed out last year, so I cannot give them out this year again.  This year I think I am going to make Christmas stockings (it has been a few years since I've made them, so hopefully no one will remember).


Santa Gift Card Holder Tutorial


I hope you have a wonderful day!
Antonella Quilling Art

Tuesday, December 03, 2013

Throwback Tuesday Quilled Scroll Christmas Tree


Free Quilled Scrolled Christmas Tree

I am feeling very nostalgic today, and wanted to go back in time to my first Christmas blogging and share with you my Quilled Scroll Christmas Tree.... At the time I was new to blogging and wasn't sure if I should leave the patterns up and almost took it down. I have had such enjoyment sharing with you over the years. I hope you enjoy this project as much as I do!

This is one of my favorite projects of all time! I love scrolls and find that they are so versatile and quick to pull together in a pinch.

To make this lovely little Scroll Christmas Tree....

For making this tree I used 1/8 inch (.3 cm) wide strips. For this design you will need the following number of strips:

1 Heart-T-Scroll
  • 1 - 3 inch (7.62 cm) heart scroll
  • 1 - 3 inch (7.62 cm) T-scroll
Heart T-Scroll Shape

2 Kissing scrolls (they look like a heart don't they? and shouldn't every Christmas tree have lots of love?)
  • 4 - 3 inch (7.62 cm) S-scrolls - place them touching as below to make the Kissing S-Scrolls
Kissing Scroll Shape

Remaining branches
Double Scroll with Tail Shape

Topper
  • 1 - 3 inch (7.62 cm) red diamond

Trunk
  • 1 - 3 inch (7.62 cm) red S-scroll

To put this tree together, I recommend the following:
  • Place the Heart-T-Scroll down first
  • Line up your 2 kissing scrolls next
  • To keep a straight line, it may be best to work over a piece of wax paper with graph paper underneath. Then you can use the straight lines to make sure your tree is straight.
Along the left side and then the right side, starting at the top, add the following:
  • S-scroll, pointing down
  • Double scroll, pointing up
  • S-scroll, pointing down
  • Double scroll, pointing up
  • Double scroll, pointing down
  • S-scroll, pointing down

See the picture for placement. You can then adorn the tree as in this example with pearls.
Free Quilled Scrolled Christmas Tree
Free Quilled Scrolled Christmas Tree with Pearls

I hope you have a wonderful day!
Antonella Quilling Art

LinkWithin

Related Posts with Thumbnails