Quilling Tabs

Thursday, November 30, 2006

25 Quillings 'til Christmas

25 Quilled Crafts til Christmas

I decided to try something fun this year. With the Holidays approaching I wanted to attempt to do a "Craft a Day until Christmas," a bit like an online version of an Advent Calendar where each day we open a new craft or quilling tutorial.

This is a fun activity where there will be a bit of experimentation and lots to share. How this will work is that every day between now and Christmas, I will share with each of you a quilled craft or technique. Some of the items will be standalone quilled items and other will be what I call “adornment quilling”. Adornment quilling is when take an item such as a box, ornament, or paper item and we add quilling. The quilling truly enhances the item and embellishes the item. In my opinion, this is the essence of quilling. This is my favorite way to quill, so I think you will see a lot of it over the next few weeks.

This will be a very challenging few weeks for me, since I don’t yet know what I will be crafting. I hope that my creativity finds the time to construct that which is in my mind’s eye. These are my initial thoughts about the types of projects that we will see over the next few weeks:

  • A birdhouse or two because I love them
  • Perhaps a few days of different trees and wreaths
  • I have some paper that I purchased for Christmas and weddings that has a gilded edge that I will have to incorporate in a few of the projects
  • I know that some of the projects will have fringed flowers, so I will be certain to share the instructions for how to make them with you
  • I have always wanted to try a technique called Spreuer, so I am thinking of sharing the instructions for how to do it and perhaps make an angel and a cross
  • Perhaps I will also share an origami reindeer that I made last year?
  • I am fascinated with colors, so we will have some red trees, perhaps a black and white design
  • Oh, one last thing, I have been dreaming of a white Christmas so don’t be surprised if some of the items are white with a splash of color,

Oh boy, I just cannot wait to get started! Let's have some fun!

Important note: Each day I will provide the instructions for the specific quilled item. These items will remain posted until after the holidays, at that time, I may take some of the daily quilled crafts and remove the instructions.

Technorati Tags: , , , , , ,

Copyright Antonella DeFalco

Friday, November 24, 2006

Black Friday and Quilling

For those of you who have decided to venture out and make purchases, best of luck on the busiest shopping day of the year. For those of us who have decided to stay inside and surf the net, I have a great thought.....

For those crafters on your shopping list, how about this: Quilling Pattern-A-Day 2007 calendar?


It is jam packed with free patterns for every day of the year and is perfect for anyone who loves to make cards, scrapbooks, or any of the paper crafts. The possibilities are endless.

Best of all, you get the basic slotted quilling tool and all the paper strips you need to make each project. If you are a teacher looking for ideas you have an entire year worth of ideas. Looking for something to do with the kids, quilling is an easy craft that everyone can do together.

C'mon, give it a try!
Enjoy!
Antonella
:-)

Wednesday, November 22, 2006

Happy Thanksgiving 2006

free quilling pattern thanksgiving turkey
Thanksgiving2006
Originally uploaded by AntonellaD.

For those of us in the states, I wanted to take this opportunity tp share with everyone Warm wishes for a Happy Thanksgiving!

I wanted to try something new. This was a quick and easy project for you to try. You can see that I picked a variety of colored strips to make this little guy very colorful (and I must admit, the really fun part was picking the colors) :-)

  • 10 - 24 inch (60.96 cm) strips - variety of colors
  • 1 - 12 inch (30.48 cm) brown teardrop for his head
  • 1 - 6 inch (15.24 cm) black triangle for beak
  • 1 - 3 inch (7.62 cm) red spiral for the piece that hangs down


For making the body and the feathers, I rolled all 10 strips at the same time keeping them as tight as possible.

I rolled them unti there was approximately 6 - 9 inches (15.24 - 22.86 cm) free. I glued the end and held it until it dried.

I did this so that I could then take the lose ends and create loose coils at the ends. I coiled them in various directions to fill in the "feathers".

I hope you give this a try, it was a lot of fun to make. Now I need to figure out how to do feet! :-)

Gobble, gobble!

Technorati Tags: , , , , , ,

Copyright Antonella DeFalco

Sunday, November 19, 2006

Free Quilling Pattern New Home

free quilling pattern birdhouse fringed flowers magnet
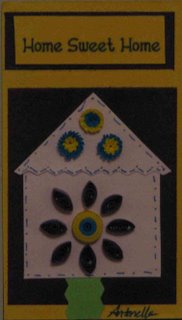
As you know, I love birdhouses. I try to come up with new ways to incorporate them into my crafts. This is a magnet that I attached to a card for my sister and her family when they moved into their new home. This is a bit of a change for me in that I haven't done too many magnets and I tried to select brighter colors.

If you would like to give this a try, here are the instructions:

I started with a 1-1/2 in (3.81 cm) square and added a triangle on top to complete the house

Regarding the quilling, I did the following:

Fringed flowers (all 3 were made the following way):

I used 1/8 in (.3cm) wide paper. For the fringing, I took small scissors and cut tiny cuts approximately 3/4 of the way through the width of the strip. It looks something like this ||||||||||||||||||||||||

  • 3 inch (7.62 cm) - center of flower
  • 4 inch (10.16 cm) - outside of flower
For each flower, I glued the 2 strips together and tightly rolled them. I glued the end. When the glue dried, I placed the fringed flower on the table and using my fingers gently spread the fringes to create the flowers shown.

For the large central flower, I did the following:
  • 8 - 4 inch (10.16 cm) marquise shapes
  • 3 inch (7.62 cm) plus 6 inch (15.24 cm) tight roll. Similar to the fringed flowers, I glued to two colored strips together before rolling them into a tight roll.
I then arranged them as shown.

I like small projects like this because it allows me to play a little with some of my smaller pieces that are left over from other projects. Experiment with your quilling because it is so much fun to do!

I hope you enjoy this little pattern and that I have inspired you to try something similar.

Love Unconditionally, Laugh Uncontrollably, and Live Unexpectedly Free!
Technorati Tags: , , , , , ,

Copyright Antonella DeFalco

Saturday, November 11, 2006

Veterans Day


Today is November 11th. In the United States this is Veterans Day. Veterans Day is always on November 11th. This day was chosen because on the 11th hour of the 11th day in the 11th month World War I ended (November 11, 1918 at 11:00 am). Every year at that time, the President of the United States places a wreath on the Tomb of the Unknowns at Arlington National Cemetery.

I did not want to let today pass without taking a moment to remember all of those men and women who have served and those who have given their lives. So many have served their country and given their lives. For those who have survived and returned I say "Welcome Home and Thank You"

For those who have given the ultimate sacrifice, I say "God Bless you and Thank You for keepting us safe."

These little Patriotic Love Birds are my very small gesture to all of you brave souls.

Technorati Tags: , , ,