Quilling Tabs

Tuesday, December 31, 2013

Personal Favorites

As we prepare to say good bye to 2013, I wanted to share my favorite projects from 2013...

There were quite a few different types of projects, so I will categorize them

Cards - here is a collection of some of my favorite cards!
---------------------------------------
I cannot think about my favorite cards without sharing my spooky spider card! This was such a great card, I loved everything about it.


No year is complete without remembering mom...


You can never have enough Thank You cards, and this one is so pretty


Boo! Don't let this little ghost frighten you!


Don't forget about the gift cards... as the children get older and are very unimaginative and ask for money, we may as well spruce them up in some way.


This stacked present birthday card is embellished with a multi-strip quilled element


Printables - I am truly enjoying sharing my printables, expect many more in 2014!
---------------------------------------
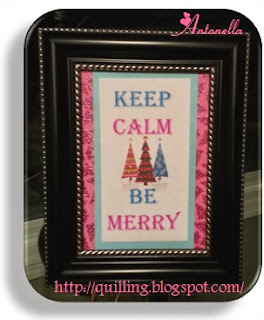
Some of my Keep Calm collection...


If you want to smile, don't forget this cutie...


Cut Files - My plan is to share more of these in 2014... time is my biggest hurdle...
---------------------------------------


As we wind down 2013 and get ready for 2014, I am grateful for my wonderful family and collection of friends like you! Thank you for your support and beautiful comments, they make the journey worthwhile!

May you and your family have a Safe and Happy New Year!

Antonella Quilling Art

Sunday, December 29, 2013

Freebie Graduation Card Printable

Antonella Graduation Free Printable for 2013, 2014, and 2015
I wanted to get this Graduation card in before the year was over... We celebrated my sister's graduation over Christmas. She graduated over the summer, but there was never any kind of celebration, so I wanted to make sure she knew how proud everyone was of her!

Antonella Graduation Free Printable for 2013, 2014, and 2015

The funny thing about this card is that I picked a green color that printed out teal on my printer, so I swapped out the green for a teal rhinestone and went with the flow. Since she is married with children, I went with a more mature look to her card and did a simple Congratulations and the year down the side. Added some glitter and rhinestones (I just love the sparkle).

If you would like to make a card of your own, please click on the appropriate link below to download a PDF file with a variety of colors (there are files for different years):

Antonella Graduation Free Printable for 2013, 2014, and 2015
Click to download the free 2013 Graudation printable PDF file
Antonella Graduation Free Printable for 2013, 2014, and 2015
Click to download the free 2014 Graudation printable PDF file

Antonella Graduation Free Printable for 2013, 2014, and 2015
Click to download the free 2015 Graudation printable PDF file


As always, I am happy to share my tutorials, freebies / printables (and now cut files) with you, I only ask that you do the following:
  • Please leave a comment if you download  freebie / printable / digi, etc, because I would love to hear from you
  • If you enjoy the things I share with you, please become a follower so that you will see all the new stuff when it is posted (no pressure, join only if you want)
  • I hope you love PINTEREST as much as I do, would love it if you would PIN this project!
  • Please do not share any of my digital images, printables, or tutorials directly with others, but please do send them on over to me so that they can peruse and collect the images themselves.
  • I would be thrilled and honored if you would send me links to any images or posts that you've done using something that I have shared with you.  If you say it is ok, I will even feature your work here!
  • If you want to recolor the images, feel free! 
  • If you have a special request, please let me know and I will see what I can do.
Most importantly be Fantastically Creative You!

I hope you have a wonderful day!
Antonella Quilling Art

Monday, December 23, 2013

Christmas Wishes Check out my featured Walkabout - My Ornament Collection

Antonella free quilling patterns printables and silhouette cut files
Antonella's collection of quilled ornaments

With Christmas literally around the corner, I wanted to share with you some of my favorite ornaments... I am sharing them with you via Pinterest in my ..... Christmas Wishes Walkabout - My Ornament Collection... I included my santa ornament above, I don't have a pattern for him at this time, but he was just so cute!

These are a few of my favorite things... 

=============================


Nativity Ornament - I used lots of my "toys" when I made this ornament. I used my cuttlebug and cut my Spellbinders ovals, I pulled out my Silhouette Cameo and cut this lovely nativity, and was able to find the perfect quilling papers to match the colors I used... a touch of glitter (of course) and some beautiful pearls...


Snowflakes on your tree... "I'm dreaming of a White Christmas..." and here is the perfect ornament for you... You can change the colors and make them all white, all pink or blue for a Baby's 1st Christmas, the possibilities are endless


Some Spreuer technique ornaments... Quilled Cross ornament with easel card, Angel, and a Spreuer Christmas Tree...


The tender singing of these sweet blue birds will brighten your day as you watch them on your tree... quilling, Memory box dies, punch, and my spellbinders all make these ornaments sing...


Poinsettia Ornaments - these are easy to make, just run a thread through one of your petals and you are ready to go. I think I would add glitter to the second poinsettia ornament. Yes, I am addicted...


=============================


I hope you have a wonderful day!
Antonella Quilling Art

Tuesday, December 17, 2013

Free Christmas Printable Keep Calm

Keep Calm Be Merry Free Printable


As I woke up to another snowfall, I really needed this printable, lol

For the one I chose for myself, I opted for non-traditional Christmas colors, but I think it works. I really love those colors together.

I thought I would share the "before" picture. At first I just matted it and that looked cute, but then I looked at it some more and thought, I didn't add any bling. So, what's a girl to do? Grab that bling! I think that little bit of sparkle adds just the right touch, especially since I finally used the paper with the sparkly pink trees. Yes, I am guilty. I collect paper that I love and then I am afraid to use it. This was a perfect match to the color scheme I was going for, and I am so glad I decided to use it.

Keep Calm Be Merry Free Printable


Here is the free printable for you:

Keep Calm Be Merry Free Printable
Keep Calm Be Merry Free Printable - click and save jpeg


Do you have this problem too? You purchase the perfect supplies (paper, fabric, tools, etc) and then you hesitate to use it on "that" project because you just know there is "another" project that you are saving it for... C'mon, admit it, share your stories...

-----------------------------------------------

As always, I am happy to share my tutorials, freebies / printables (and now cut files) with you, I only ask that you do the following:
  • Please leave a comment if you download  freebie / printable / digi, etc, because I would love to hear from you
  • If you enjoy the things I share with you, please become a follower so that you will see all the new stuff when it is posted (no pressure, join only if you want)
  • I hope you love PINTEREST as much as I do, would love it if you would PIN this project!
  • Please do not share any of my digital images, printables, or tutorials directly with others, but please do send them on over to me so that they can peruse and collect the images themselves.
  • I would be thrilled and honored if you would send me links to any images or posts that you've done using something that I have shared with you.  If you say it is ok, I will even feature your work here!
  • If you want to recolor the images, feel free! 
  • If you have a special request, please let me know and I will see what I can do.
Most importantly be Fantastically Creative You!
I hope you have a wonderful day!
Antonella Quilling Art

Saturday, December 07, 2013

Santa Gift Card Holder Tutorial

Santa Gift Card Holder Tutorial

I love gift card holders, especially for teachers as a special something extra during the holidays. This is such an easy gift card to make - it doesn't hurt that it is really cute too!

I love to get the most out of my paper, so I took a 12 x 12 sheet of paper and cut 6 gift cards, each is 4 x 6 inches (10.16 cm x 15.24 cm).  I found that it looks much prettier if you use a paper that has a bit of a pattern to it. I selected one that has a damask design.

Fold the short end 1 inch (2.54 cm), and glue or sew the outside edges only.  This creates the pocket for the gift card.

Fold the opposite short end 2.5 inches (6.35 cm), this becomes the outer jacket for Santa!

Note: .  If you have paper that has a pattern on only one side, you want to make sure that you make your folds such that the pretty red is on the outside. (check out this picture to get an idea of the pieces and the folding)

Santa Gift Card Holder Tutorial


Fur Trim:
  1. Cut a 1.75 inch (4.45 cm) strip of white paper and take out your handy dandy border punch and create a scalloped edge to give the impression of a nice fluffy trim.  I used my Martha Stewart Doily Lace Edge Punch.  I love it!
  2. Glue the white fur trim to the center of the outside of the gift card holder
To Create the Belt:

  1. Cut a strip of black paper approximately 1/2 inch (1.27 cm) wide and 7 inches (17.78 cm) long. Snip off about 1 inch (2.54 cm)
  2. Cut a yellow square approximately 1.5 inches (3.81 cm) for your Belt Buckle

To Assemble the Belt:

  1. Place your gift card in the pocket
  2. To create your Belt Buckle, take your yellow square and glue the small 1 inch (2.54 cm) piece of black paper to the center of the square.
  3. Attach your yellow Belt Buckle to the approximate center of the black strip
  4. Now take your black strip and fold it over the card holder and glue the ends together

And there you have it! This was the gift card holder I handed out last year, so I cannot give them out this year again.  This year I think I am going to make Christmas stockings (it has been a few years since I've made them, so hopefully no one will remember).


Santa Gift Card Holder Tutorial


I hope you have a wonderful day!
Antonella Quilling Art

Tuesday, December 03, 2013

Throwback Tuesday Quilled Scroll Christmas Tree


Free Quilled Scrolled Christmas Tree

I am feeling very nostalgic today, and wanted to go back in time to my first Christmas blogging and share with you my Quilled Scroll Christmas Tree.... At the time I was new to blogging and wasn't sure if I should leave the patterns up and almost took it down. I have had such enjoyment sharing with you over the years. I hope you enjoy this project as much as I do!

This is one of my favorite projects of all time! I love scrolls and find that they are so versatile and quick to pull together in a pinch.

To make this lovely little Scroll Christmas Tree....

For making this tree I used 1/8 inch (.3 cm) wide strips. For this design you will need the following number of strips:

1 Heart-T-Scroll
  • 1 - 3 inch (7.62 cm) heart scroll
  • 1 - 3 inch (7.62 cm) T-scroll
Heart T-Scroll Shape

2 Kissing scrolls (they look like a heart don't they? and shouldn't every Christmas tree have lots of love?)
  • 4 - 3 inch (7.62 cm) S-scrolls - place them touching as below to make the Kissing S-Scrolls
Kissing Scroll Shape

Remaining branches
Double Scroll with Tail Shape

Topper
  • 1 - 3 inch (7.62 cm) red diamond

Trunk
  • 1 - 3 inch (7.62 cm) red S-scroll

To put this tree together, I recommend the following:
  • Place the Heart-T-Scroll down first
  • Line up your 2 kissing scrolls next
  • To keep a straight line, it may be best to work over a piece of wax paper with graph paper underneath. Then you can use the straight lines to make sure your tree is straight.
Along the left side and then the right side, starting at the top, add the following:
  • S-scroll, pointing down
  • Double scroll, pointing up
  • S-scroll, pointing down
  • Double scroll, pointing up
  • Double scroll, pointing down
  • S-scroll, pointing down

See the picture for placement. You can then adorn the tree as in this example with pearls.
Free Quilled Scrolled Christmas Tree
Free Quilled Scrolled Christmas Tree with Pearls

I hope you have a wonderful day!
Antonella Quilling Art

Thursday, November 28, 2013

Happy Thanksgiving and a Freebie Printable Just for You

Gobble Til You Wobble free printable
Gobble Til You Wobble free printable - click and save this PNG

I wanted to extend a very Happy Thanksgiving to everyone in the US today!

I must admit, this is my favorite holiday. The gathering of friends and family enjoying good food and each other. What could be be better?

I wanted to share this cute little printable with you, in the spirit of sitting down and eating all day long, first the appetizers that will bleed into the salad and dinner and then desert and if you started eating too early in the day another round of food as a chaser before you end the day.. lol...

Gobble Til You Wobble free printable
Gobble Til You Wobble free printable - click and save this JPEG

I had grand plans to print this cute fella and frame him, however, between my computer troubles and forgetting to get more ink, I find myself without the finished project.... I am sharing this because I didn't want this cutie to be lost... I found this turkey here

Since I have been having some fun looking at turkeys, and drawing turkeys, and basically turkeys here and there, I wanted to share some some fun tutorials for making turkeys... aren't they adorable?

=============================

I love this turkey, the instructions are so clear and the site is filled with great tutorials for the kids!


Awe, what cute turkey projects and fun things to do learn and do with your children!


You get more than just instructions for drawing your very own turkey at this site.


=============================

As always, I am happy to share my tutorials, freebies / printables (and now cut files) with you, I only ask that you do the following:
  • Please leave a comment if you download  freebie / printable / digi, etc, because I would love to hear from you
  • If you enjoy the things I share with you, please become a follower so that you will see all the new stuff when it is posted (no pressure, join only if you want)
  • I hope you love PINTEREST as much as I do, would love it if you would PIN this project!
  • Please do not share any of my digital images, printables, or tutorials directly with others, but please do send them on over to me so that they can peruse and collect the images themselves.
  • I would be thrilled and honored if you would send me links to any images or posts that you've done using something that I have shared with you.  If you say it is ok, I will even feature your work here!
  • If you want to recolor the images, feel free! 
  • If you have a special request, please let me know and I will see what I can do.
Most importantly be Fantastically Creative You!

I hope you have a wonderful day!
Antonella Quilling Art

Wednesday, November 13, 2013

Thank You Card

Antonella's Thank you card
Thank You Card
It is always fun to let someone know you appreciate something they've done to help you out, don't you think? I enjoy having an opportunity to send a Thank You card to someone, because it usually means that they have gone out of their way to help me or my family.  When that happens there is a lot of love involved.

I love my paper, and I know you can understand! This card works because the paper is so pretty. I cut it to fit the front of the card and then got out my glitter to highlight that gorgeous flower, added a gem to complete the look. As you can see, I went a bit glittery on this card, I added it to my butterflies and the "Thank You" too.
Antonella's Thank you card sentiment Your Friendship has Touched my Heart
Your Friendship has Touched my Heart

For the inside, I cut out a border for the top of the card and cut around one of those pretty flowers and added my glitter to this one as well. I also used a Martha Stewart border punch.  I used my MelJen's image and Rainbow Echo Design's sentiment to complete the card.  I hope you like it!

Do you think that Thank You cards are a thing of the past? Do you still send them? When do you send them? Is it for your children's birthday gifts or perhaps you send them after opening your Christmas gifts? I'd love to hear from you.

Thank You to each of you! I wanted to extend my sincerest thanks to everyone for all your kind words and support.

I hope you have a wonderful day!
Antonella Quilling Art

Monday, November 11, 2013

Veterans Day US

Antonella's American Flag Veteran's Day photo
Veteran's Day

Today is Veterans Day for all my American friends. I salute everyone who has or is currently serving in the military, with a special shout out to my dad and my sister!  It is generally recognized that there should be a brief cessation of work at 11:00 am on Veteran's Day to remember.

I find it interesting that before there was a World War II, World War I was considered the "war to end all wars", if only that were true. World War I officially ended with the Treaty of Versailles, although it wasn't signed until June 28, 1919 there was a temporary cessation of hostilities, between the Allied nations and Germany, that went into effect on the eleventh hour of the eleventh day of the eleventh month. (November 11, 1918)

It was in 1919 that President Wilson proclaimed November 11th the commemoration of Armistice Day.  This is a quote I pulled from his speech that day:
"To us in America, the reflections of Armistice Day will be filled with solemn pride in the heroism of those who died in the country’s service and with gratitude for the victory..."

I pulled this information from the US Department of Veteran's Affairs 

The photo was one of those odd occurrences, I was driving down the road and happened upon them hoisting this flag and thought it was a great photo and quickly snapped a shot.

I hope you have a wonderful day!
Antonella Quilling Art

Friday, November 08, 2013

Freebie Quilled Autumn Flowers

Antonella's free quilled autumn flowers

I love all the fall colors that are spreading across the North East, don't you? I thought I'd share an Autumn Basket with you. This pattern creates a basket to carry your beautiful autumnal fringed flowers.

Antonella's free quilled autumn flowers

Basket

10 Brown C-scrolls (3 inch, 7.6 cm)
6 Tan Tight rolls (1.5 inch, 3.8 cm)

Using the picture as a guide, start at the bottom and work upward
Base is 1 Brown C-scroll
Then 2 Brown C-scrolls with 1 Tan Tight roll between
Then 3 Brown C-scrolls with 2 Tan Tight rolls
Finally, 4 Brown C-scrolls with 3 Tan Tight rolls

Antonella's free quilled autumn flowers

Fringed Flowers (grab your autumn colors and make 7 - 10 multi-fringed flowers to place in your basket)
Click here for fringed flower instructions

1 Fringed Yellow strip (1.5 inch, 3.8 cm) long
1 Fringed Orange strip (1.5 inch, 3.8 cm) long
1 Brown (1.5 inch, 3.8 cm) long cut to 1/16 inch, .15 cm wide
Glue and roll Brown, Orange, then Yellow tightly and glue. Then gently push out the fringes to make the flower

Make all 8 Fringed Flowers the same way, simply alternate colors

Add several Green Shaped Marquise (1.5 inch, 1.8 cm) cut to 1/16 inch, .15 cm wide
Use the photo for placement

Antonella's free quilled autumn flowers

I hope you have a wonderful day!
Antonella Quilling Art

Tuesday, November 05, 2013

Sympathy Card

Antonella's Sympathy Card
Sympathy Card

Unfortunately, I have had several occasions to create Sympathy Cards lately.

I generally keep my Sympathy cards clean and neat.  I like the simple elegance of a black and white card and that was the approach I took on this card.

I paired a photograph I had taken with several alternating layers of black and white card stock. I used one of my Martha Stewart border punches and then carried it to the inside of the card, where, in addition to the border punch I also used my butterfly punch.

The sentiment I used for the inside is
In the picture of eternity there is no death, only change. May you endure these days of loss and find a place of peace and understanding. 
Antonella's Sympathy Card
Sympathy Card

I hope you have a wonderful day!
Antonella Quilling Art

Thursday, October 31, 2013

Happy Halloween Pumpkin Walkabout

Unique Pumpkin Carvings Photo Collection
Halloween... Each of these pumpkins were showcased in town and were carved / decorated by the shop owners. They are so creative and fun.

So, where does the name Halloween come from, I found this information on the internet, 
Originally spelled Hallowe'en, it is a contraction of All Hallows Even, meaning the day before All Hallows Day (better known today as All Saints Day), a Catholic holiday commemorating Christian saints and martyrs observed since the early Middle Ages on November 1. (directly quoted from About.com)
I guess there is no definitive answer for how Halloween came about, but this is one thought.
Unique Pumpkin Carvings

Several sources say that it dates back to the Celts who believed that on October 31st the spirits of the dead walk the earth / come out of their tombs. They would do things to frighten the ghosts like wearing scary costumes and lighting fires. They also had lucky foods that they ate like apples and nuts.
Unique Pumpkin Carvings

Many of the things we associate with Halloween are from the Celts. Black is the color of winter and long nights and Orange is the color of the harvest. Black cats were thought to have special powers (makes me want to do something on superstitions).
Unique Pumpkin Carvings

This Celtic tradition was married with the Christian practices after the Romans invaded. In the Christian tradition, November 1st was All Saints' Day (All Hallows' Day). The mass that the Catholic Church celebrated on November 1st was the mass of all the hallowed (saintly people). So, this meant that October 31st was All Hallows' Eve which later became Halloween.
Unique Pumpkin Carvings

I hope you've enjoyed these pumpkins, I only wish all of my photos had come out, they were fun to see and the kids had a great time!

Happy Halloween!


Don't forget to grab your free copy of the My Memories scrapbooking and photo enhancement software!  Yes, I said FREE as long as you chose the download method!

From October 27th to November 3rd you can get a free copy of the My Memories software simply by using this code FreeTreatLL146 at the checkout!  This is really important, please copy and paste it since it has to look exactly like this  FreeTreatLL146  you will enter the code in the promo code field before checking out.  


I hope you have a wonderful day!
Antonella Quilling Art

Tuesday, October 29, 2013

Free Quilled Orange and Black Witches Hat and Broom


If the Broom Fits Ride It free printable project


I promised I would post the instructions for the 

Quilled Witches Hat and Broom 

I made in this fun project (please click here for the printable) where you can grab the funny quote I used in this project!


Ok, now onto the quilling!
Free Quilled Orange and Black Witches Hat Instructions

The hat begins very similarly to another witches hat I shared, check out the picture and link below!

Quilled Witches Hat:

  • 3 strips of black quilling paper - Rolled to create a teardrop shape
  • Tip: I wanted the hat to be denser, that is why I used so many strips
  • Tip: You can certainly use fewer strips if you'd like, that's the fun of making it yourself!

I wanted to incorporate orange, because I do love the way black and orange look, so I grabbed a few leftover orange strips from another project and, this is what I did:
  • Pulled off a piece and wrapped it around the teardrop
  • This was the fun part, I used these orange strips to create a more cone-like hat
  • They worked perfectly to keep that slightly off center, angled hat that I wanted to create
  • Tip: You can use accent colors and strips to create special shapes in your quilling as I've done here

Lastly,

  • 1 strip of black quilling paper to create a crescent shape for the brim of the hat
  • Glue this to the base of your hat
and there you have one quilled witches hat!
Free Quilled Witches Broom Instructions

The Broom was even easier! 

  • Cut off a 3/4 inch wide, by 3 inches long strip from a brown paper bag
  • Cut fringes into the strip along the 3 inch long side, making sure not to cut through the entire 3/4 inches
  • Roll it to create the bristles of the broom.  
  • The broom handle is a leftover piece of black paper
  • I added the black to the top because I love the contrast
  • Tip: Adding the black cover at the top is more than a decorative choice, it is also a great way to keep the broom together
Looking for another option for your witches hat? You can check out this project by clicking on the picture below or clicking this link.
 Check out this fun Quilling, Paper Filigree project. This cute witches hat with green hair from Antonella at www.quilling.blogspot.com


I hope you have a wonderful day!
Antonella Quilling Art