Quilling Tabs

Tuesday, October 31, 2006

Happy Halloween


Happy Halloween Everyone!

Tonight we went Trick-or-Treating. It was a great night, the weather was so mild. We went around with a few of the neighbors, left our candy out on the porch and walked around for over an hour. It was a great night!

One last thing before we part, a quick little song my son learned in school.

One Little, Two Little, Three Little Witches
Fly over haystacks, fly over ditches,
Slide down the moonbeams without any hitches
Heigh Ho! Halloween is Here!

Tricks and Treats!
Saturday, October 28, 2006

Quilled Butterfly - Free Pattern

free quilling pattern butterfly
Hello Everyone,

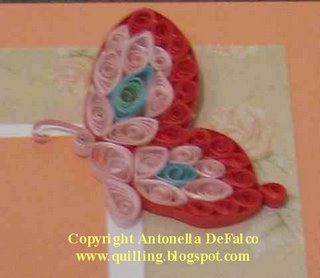
A friend of mine was asking for instructions to make a butterfly and I sent her a photo and instructions and thought that it would be a great addition to this site. Just in case you have not visited before, here are links to the Basic Coil Shapes and Spiral Shapes.

The butterfly that I have attached is red and pink - she was specifically requested. I have not identified the specific colors you would use because you can make your butterfly any colors you would like. I have used 1/8" (.3cm) width strips. Have fun with it and feel free to ask any questions you may have:

Body
  • 1 - 3" (7.62 cm) tight coil (for the head)
  • 1 - 6" (15.2 cm) Marquise (for her body)
  • 1 - 4" (10.2 cm) Teardrop (For this butterfly I made it flat on one side - I do a lot of work by "feeling" my way around, ant thought that flat looked better for this particular butterfly)
  • 1 - 1-1/2" strip cut in half for the feelers (I usually cut almost to the end and glue the end to the head)
When I refer to wings I think of the "Top" and "Bottom" of a single wing. If you look closely, you will see that I wrap a strip around each of these separately. I do this because I think it makes the final piece more finished and helps with getting the wing in the shape I want for the project.

Top Wing
  • 7 - 4" (10.2 cm) Teardrops (I make this the darker color and arrange them on the outside)
  • For the multi-colored center point I take 2 different color strips one 3", I coil this tightly with the second 6" strip glued to the end. When I coil the 3" tight coil I glue it before I continue with the outside color.
  • 5 - 6" (15.2 cm) Marquise
  • 2 - 4" (10.2 cm) Marquise
  • I may add or take away coils based on how I want it to look and how the coils fit together. As I mentioned, by adding the strip on the outside and gluing it, it gives me another opportunity to get the wing shape better.
Bottom Wing
  • 7 - 4" (10.2 cm) Teardrops (I make this the darker color and arrange them on the outside)
  • I added a little more color by adding a 4" marquise in a different color
  • 2 - 6" (15.2 cm) Marquise
  • 1 - 6" (15.2 cm) Triangle (to get the wing shape - you may not need this)
  • 2 - 4" (10.2 cm) Marquise
  • Again, I may add or take away coils based on how I want it to look and how the coils fit together. By adding the strip on the outside and gluing it, it gives me another opportunity to get the wing shape better.
  • One final thing on this bottom wing, I added a 4" (10.2 cm) Teardrop to the outside. Many of the pictures of butterflies show that they have what I refer to as a little extra wing. I do not know what to call it, but they have such beautiful shapes to their wings and this was an attempt to capture some of that.
You can take this picture, print it out and place wax paper over it. You can then quill directly over the wax paper for placement of the coils. You can either make 2 of each of the wings and arrange a butterfly in flight, or you can do what I have done here which is use a coil (in this case I used a 4" / 10.2 cm tight coil) and placed it behind the top wing to lift it off the page thereby adding dimension.

I hope that you have enjoyed this butterfly.

Technorati Tags: , , , , , ,

Copyright Antonella DeFalco