Quilling Tabs

Tuesday, April 24, 2007

Tea Bag Folding - Kite Fold Examples


I have been having a lot of fun with the Kite Fold... If you are not sure how to make this fold, please click here for the Kite Fold.


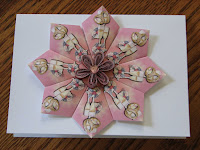
Here are some examples of cards I have made using tiles from Derek's online site (please check out all the easy to print tiles he has made). All of these medallions were made with designs from Derek's site.


These are a variation of a wedding or anniversary card theme with quilling added to the center.

Enjoy!
Copyright Antonella DeFalco

Technorati Tags: , ,

Tea Bag Folding - Kite Fold

Instructions for making the Kite Fold

I started with a 2 inch x 2 inch (5.08 cm x 5.08 cm) tile. Tiles can be any size you need, as long as they are square (although there are new designs with oval and cutout tiles, but we won't worry about them right now). Often times, the standard tile size is 1.5 inch x 1.5 inch (3.81 cm x 3.81 cm).

tea bag tile

tea bag tile
Place the tile in a diamond shape and fold it in half (looks like a trianlge on its side).
Open up the paper, place the patterned side down on your worksurface
Fold both of the sides in toward the center fold line you just created


Turn it over and you have a Kite Fold. Congratulations!


You can use low tack tape like masking tape or a re-positionable tape. The idea is to have something that will hold your medallion together until you position them and can glue them together. I use masking tape, I have plenty of that around the house.


Enjoy!
Copyright Antonella DeFalco


Technorati Tags: , ,

Tea Bag Folding - Kite Fold

Teabag folding is a fun craft to do and has a fun history. A woman from Holland had a dilemma, she did not have a birthday card for her sister. The story goes, as she sat down with a cup of tea pondering her dilemma, she started folding her tea bag envelope and this is how the craft of tea bag folding began.

Here are some fun and easy projects, please check them out:


Enjoy!
Copyright Antonella DeFalco

Technorati Tags: , , ,

Sunday, April 15, 2007

Tea Bag Folding - Small Kite Fold

Tea Bag folding - the Small Kite Fold.

When I tell you that this is the basic fold, I cannot stress to you how much this fold is used. Every site that I have ever visited or book that I have read that talks about tea bag folding will generally start with this fold. So, that is where I will start.

I want to thank Bronwyn for encouraging me to venture out a bit beyond quilling.

First, I will tell you that I was at a bit of a disadvantage when I put these instructions together. The computer I am using is not connected to a printer at the moment and I was limited with the paper I have access to, so I was in a bit of a conundrum. I mean, how can I demonstrate tea bag folding if I do not have the ability to print any of the wonderful tile patterns that you can find on the internet? I decided to take a different approach and grabbed a sheet of scrapbooking paper and cut my tiles from the paper that I had.

This of course did not address all of my issues, since the squares are not "exactly" the same design, but they are close. I have to try this more often, because I know that I can develop a sense of what papers would work out better than others.

Since the purpose of this post is to be a high-level, instructional post to walk you through the basics of tea bag folding the paper that I have selected works quite well for that purpose. I have taken pictures of the folds along the way.

tea bag tile
I started with a 2 inch x 2 inch (5.08 cm x 5.08 cm) tile. Tiles can be any size you need, as long as they are square (although there are new designs with oval and cutout tiles, but we won't worry about them right now). Often times, the standard tile size is 1.5 inch x 1.5 inch (3.81 cm x 3.81 cm).
tea bag tile
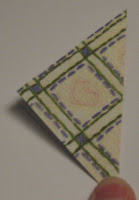
Place the tile in a diamond shape and fold it in half (looks like a trianlge on its side).
Open up the paper, place the patterned side down on your worksurface
Fold both of the sides in toward the center fold line you just created
Once both sides are folded, this is your Kite shape!
Congratulations, you did it!


If you take this shape and fold it in half again along the center line, you now have the small kite shape
Make 8 of these small kites for the project today.

See, and you thought that this was going to be difficult.

You can use low tack tape like masking tape or a repositionable tape. The idea is to have something that will hold your medallion together until you position them and can glue them together. I use masking tape, I have plenty of that around the house.

These 2 half medallions are basically the same Fan shape, the difference is in how I arranged them.

small kite fold medallion
In this first picture, I have placed each subsequent small kite into the center of the previous small kite. So, where the fold is open in the center, I placed the folded edge of the small kite to the left inside. This creates a more compact fan. I like this look and it reminds me more of a ladies fan.

small kite fold medallion
In this second picture, I arranged the small kites so that as I added the next small kite (to the left) I placed it on top of the previous small kites left most point (the top of the triangle). This is more the look of a fan that has been opened fully. If you made 16 of these small kites, you can complete the medallion and create a complete circle. Looks great if you wanted to add a small circular picture or a Monogrammed accent.

I hope you have enjoyed this!

Enjoy!
Copyright Antonella DeFalco

Technorati Tags: , , ,

Tea Bag Folding - History

Tea Bag Folding, this is a departure from the norm for me. Tea bag folding is one of those crafts that provides you with a quiet meditation that you can enjoy simply in the folding and creasing of the tiles that you use.

So, what is tea bag folding you may ask? Tea bag folding is truly a craft that was based on the motto that "Necessity is the mother of invention." This is the story as it has been shared with me:

A woman from Holland was in need of a birthday card for her sister. As she sat down with a cup of tea pondering her dilemma, she started folding the tea bag envelope and thus created the craft of tea bag folding. You can imagine, the tea bag envelopes were much more attractive than the ones we have today. Today, there are numerous resources on the internet that have free tea bag tiles. We are also fortunate to have a plenitude of decorative papers and wrapping paper that we can use for our tiles. Pretty much anything goes. Oh, a tile is the word used to describe your square of paper that you fold to make the medallions.

Some key tips about tea bag folding:
  • The paper that you use should be a perfect square
  • All the tiles should have the same pattern (note: this is not required, just generally practiced)
  • The folding that you do is similar to origami

Tea Bag or teabag? I really don't know which is the correct way to write it. However, the first site that I was introduced to with tea bag folding wrote it this way. You will see that I will write it both ways, I don't know if there is an official, single way to write it.

Here are some excellent links for you:

What I love about paper crafts is that most of them are relatively easy to learn and can be managed on a budget. This is for those who exhibit the self control that is necessary to keep from spending money on all that beautiful paper out there.

In my next post, I will share the basic kite fold and a quick "Fan Card" using this fold.


Enjoy!
Copyright Antonella DeFalco

Technorati Tags: , , ,

Sunday, April 08, 2007

Quilled Cross for Easter

easter card
For those of you who celebrate Easter, I wish you and your family a very blessed day.
I selected the following Bible verse to accompany this simple design:

"I am the resurrection and the life:
he that believeth in me, though he were dead, yet he shall live.
And whoever liveth and believeth in me shall never die."
John, 11.25

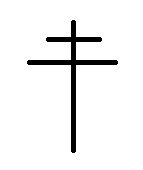
I was doing some research on crosses on the internet because I wanted to use this opportunity to depict a different type of cross than the one that is traditionally quilled. I have depicted what is called the Patriarchal Cross.

patriarchal cross
Here is a closeup of the cross I made using the Spreuer technique. Once created, I simply "scattered" roses about the cross. In keeping with doing something a bit different, I opted not to use the standard white in making the cross and instead went with a regal purple. I opted for a pastel color palette on this item.
quilled cross

Many happy wishes to everyone.

Enjoy!
Copyright Antonella DeFalco

Technorati Tags: , , , , , , , ,

Thursday, April 05, 2007

Gerbera Daisy Quilling Pattern

quilled gerbera daisy

A splash of color in every Gerbera Daisy...

Do you ever like to challenge yourself? Sometimes I think it is a lot of fun, so I limited myself to the following and decided to see what I could come up with:
  • Black card blank
  • Pink and Turquoise quilling strips
  • Pink, green, and yellow squares
  • White rectangle
  • Rhinestones

For each Daisy:
  • 5 - 6 inch (15.24 cm) Teardrops
  • Place all teardrops with the points touching in the center and glue
  • 1 - rhinestone (placed in the center)

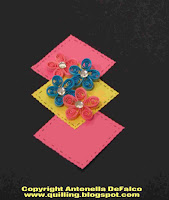
The original card that I wanted to make was this simple color blocked design. I have deliberately included 2 versions of this card to show you how a simple scrapbooking/cardmaking ink drawn stitching can make a world of difference on your finished product.

You can see that these cards are the same except for the added "stitching" on the second card. This very easy to do pattern of "dot dash dot dash dot" (. _ . _ . _ . _) really adds a finishing touch to this card. Where as the first card looks ok, you realize when you see the second card that it could be that much better.

I think my favorite thing about this card is the rhinestones. I have come to appreciate rhinestones and that special something that they add to your projects. I challenge you to take some simple products and come up with your own designs.

Stay tuned tomorrow for a whole slew of cards that I made with these same supplies. Here is my favorite card of all the ones I made.

quilled gerbera daisy


Enjoy!
Copyright Antonella DeFalco

Technorati Tags: , , , , , , , ,

Wednesday, April 04, 2007

Quilled Daisy Pattern

Spring is here and everything is coming up Daisies. Well, it is a bit cold outside where I live, so not much is growing, but I know that soon the weather will become warmer.

I so much love daisies - especially the quilled ones. They are a perfect addition to a card or scrapbook page and you can always arrange them around a photograph. They are perfect for almost anything. My research says that we get the name daisy from the English translation of "daes eage" or "days eye." They symbolize "Innocence and joy," what a great Title for your scrapbook page.

I love the simplicity and all the vibrant colors that a daisy can be... especially with the Gerbera daisies. How much fun to be able to make a rainbow with your daisies?

I have had a lot of fun making daisies. Today I will post the basic daisy and tomorrow I will share with you my experiments with the Gerbera daisy.

Quilled Daisy

To make the basic 7-Petal Daisy you need the following:
7 - 12 inch (30.48 cm) Teardrops
1 - 24 inch (60.96 cm) grape roll
2 - 12 inch (30.48 cm) Teardrops
1 - strip of green for the stem

Note: When making flowers I tend to use an odd-number of petals. This is a common thing to do in design and is ultimately more pleasing.

Enjoy!
Copyright Antonella DeFalco

Technorati Tags: , , , , , , , ,

Sunday, April 01, 2007

Shared Quilling

Quilled Butterfly magnet
Hello and Happy April!

I wanted to share a special quilled magnet that a friend of mine Lynn Smith made. She sent me a picture and has graciously allowed me to post it here.

Lynn took a piece of chipboard and covered it with paper that has the look of linen. Then she distressed it before adding the quilled pieces on top. You will see that she has created the most precious punched roses. No easy task to make them look like real roses, they provide me with lots of grief when I try to shape the paper. :-)

Lynn really did a great job on this, don't you think?

I was so excited because she used the Spreuer Butterfly pattern previously posted here to make her butterfly. I hope that everyone tries to use some of the patterns you find here and include them in a design of your choice. If you want to send them to me I will gladly share them here.

Remember, I am sharing these patterns and instructions with everyone so that you try them out and use them on your projects, all I ask is that you mention where you got the pattern and send people back here.