banner


Showing posts with label quilled snowflake. Show all posts

Sunday, December 13, 2009

Free Quilled Snowflake Ornament Pattern

It is that time of the year... the cold weather has rolled in, we have had 2 winter storms and I have gotten stuck in the snow already and it is only December... lol

quilled quilling red snowflake ornament


I hope you enjoy this Red and White snowflake ornament. This is a 6-pointed snowflake for you to enjoy.


1 - 12 in (30.5 cm) White Tight Roll. This is for the center of the ornament.


6 - 2 in (5 cm) Red Tight Rolls. They will go all around the center white tight roll.


6 - 6 in (15.2 cm) White Teardrops. Glue the point of the teardrop between the 2 inch red tight rolls.


6 - 4 in (10.2 cm) Red Tight Rolls. Glue to the rounded white teardrop.


6 - 6 in (15.2 cm) White Teardrops. Glue the rounded part of the teardrop to the red tight rolls.


Add a jump ring to one of the points with a ribbon to hang from the tree.

Once the ribbon is attached you can enjoy the movement of the snowflake on a variety of places. You can add this ornament to a card and turn your card into a gift as well. If you are working on a winter scrapbook page, you can make one of these to adorn your page.


Or you can just hang it from your tree!

Enjoy!
Copyright for Personal Use Antonella DeFalco

Technorati Tags: , , , , , , ,

Thursday, January 01, 2009

Free Quilling Snowflake Card Pattern

quilled snowflake ornament card


Here it is, the first quilling pattern of 2009! This is a quilled snowflake ornament that is attached to a card. This card doubles as an ornament for a really special treat for the recipient.

quilled snowflake ornament

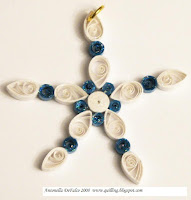
Let's begin with the snowflake ornament measurements:
  • 1 - 12 inch (30.5 cm) White Tight Roll for the center of the snowflake

  • 5 - 3 inch (7.6 cm) Blue Tight Roll (will go around the center tight roll)

  • 5 - 6 inch (15.2 cm) White Teardrop (this will alternate with the blue tight roll around the center tight roll. The point of the teardrop will be glued to the center tight roll. See photo for placement)

  • 5 - 6 inch (15.2 cm) Blue Tight Roll (will be glued to the top / rounded portion of the white teardrop)

  • 5 - 6 inch (15.2 cm) White Teardrop (will be glued to the blue tight roll along the rounded end)

To make this snowflake sparkle, I used a glitter glue on both the front and back of the snowflake. I applied the glitter to one side at a time and allowed it to dry before turning it over and glittering the opposite side.

All that is left is the find a jump ring and attach it to one of your points and then tie a string to complete the ornament.

Making the Card

  • Start with Blue cardstock (this is a quarter fold size card)

  • Using various sizes of snowflake stamps, stamp snowflakes on card. I used the Tsukineko Silver which gives the card a glittering look.

  • Tear a piece of white glitter paper and attach to bottom of the card to give the appearance of snow.

  • Stamp "Merry Christmas" or "Let it Snow" or some other sentiment.

  • Apply snowflake and snowman punches (or brads if you have them) to give the card a layered look.

  • Attach the snowflake ornament from above and you are finished.

There you have it. A cute snowflake ornament and card, the winter theme can be used for any occasion during the winter months.

LinkWithin

Related Posts with Thumbnails