banner


Showing posts with label filigrana. Show all posts

Wednesday, February 04, 2015

Heart ATC Throwback #tbt


Heart and Love ATC from Antonella at www.quilling.blogspot.com

It has been quite a while since my last Throwback Thursday post. I am happy to share this lovely ATC from 2008 on Bibiana's Throwback Thursday.

Heart ATC Throwback #tbt

I love looking back at my older posts, because they invariably bring back memories. Sometimes when I am playing with my quilling, shapes line up and create fun shapes. In this case, the double scrolls formed many of the hearts on this trading card.  If you want a brief tutorial click here to go to the original post.

It would be fun if you joined in here.

I hope you have a wonderful day!
Antonella Quilling Art

Wednesday, December 31, 2014

Favorites of 2014


Thank you for all your support over the years. 2014 was a lot of fun, and I hope that you had a great year. I wanted to share with you my favorite posts from 2014, and what a fun and varied year it was.

Let's start with a project that was featured on the Inspire Us Thursday Link Party
This super cute Quilled Christmas Tree ornament is easy to make. The pattern is versatile enough that you could wear it as a necklace or earrings if you wanted to.  Hop over to see what Antonella has for you at www.quilling.blogspot.com. #quilling #ornament

Here is a free printable that is perfect for remembering as we move into 2015. Only associate with great people, because life is too short to waste it on anyone of lesser value. The original post is here, but you can also find more of my printables here.
"Associate yourself with people of good quality, for it is better to be alone than in bad company"  Booker T. Washington
"Associate yourself with people of good quality, for it is better to be alone than in bad company" Free Printable from Antonella at www.quilling.blogspot.com

I love my quilling, and no yearly review would be complete without a quilling project. This card features reverse roses, and a really cute butterfly.


This is a fun printable for your next Birthday Card, look for a few more variations of this printable in 2015.

Perfect "Happy Birthday" printable that you can use for men, women, and children from Antonella at www.quilling.blogspot.com

I love, love, love this snowman, is there really anything more to say about it? One of my all-time favorites, had to add it again!
Lovely Quilled Blue Snowman card from Antonella at www.quilling.blogspot.com

Another fun printable, be yourself because there isn't anyone who can be you better! 

Two Inspirational printables: Be Unique, Be Awesome, Be You! and Weird is a side effect of awesome from Antonella www.quilling.blogspot.com


Finally, wrapping up the year with lots of Christmas projects as shared in the 12 Days of Christmas series! Lots of gift tags, ornaments, and gift cards.

The 12 Days of Christmas Project Collection. A wonderful collection of DIY projects, gift cards, gift tags, quilling and more from Antonella at www.quilling.blogspot.com


Here is wishing you a wonderful 2015!

Antonella Quilling Art

Wednesday, November 12, 2014

Blue Snowman Throwback Thursday

Lovely Quilled Blue Snowman Birthday Card from Antonella at www.quilling.blogspot.com

Throwback Thursday Blue Snowman Birthday Card

I am so very sad, this is the last Throwback Thursday of 2014. If you are thinking of joining in on the fun, please hurry, I am a little late with my post (just pretend you didn't notice I should have posted this last Thursday or you may think I am early, lol). If you are looking for the original post, you can find it here.


Lovely Quilled Blue Snowman Birthday Card from Antonella at www.quilling.blogspot.com


Are there some cards you come back to over and over again? This is one of those for me because I absolutely love the way this snowman turned out.  The snowman was one of those pleasant surprises, I was given short notice of the birthday celebration and my son asked for a snowman on his cousin's birthday card.  So, what's a person to do?  At the time I was experimenting with a style of quilling made popular by Yulia Brodskaya and this little guy appeared from my strips of paper.  Have you ever had something emerge out of what you were creating that was unexpected? I'd love to hear your story.

I hope you enjoy my Blue Snowman, have a wonderful day!


Antonella Quilling Art

Thursday, October 30, 2014

Free Printable and Quilled Hat and Broom


Are you enjoying this walk down memory lane and this fun printable? This is definitely one that you print with a tongue in cheek chuckle.  This year, I placed this near the front door so that you see it when you enter our home. It causes quite a few chuckles and comments, so it is definitely doing what I intended. 


Click here to download this free pdf printable


For the quilled pieces, I have the instructions for quilling those too, just click on the pictures to be taken to the instructions.


Looking for that quilled witches hat? Check out these instructions to make this quick and easy quilled witches hat by Antonella at www.quilling.blogspot.com #quilling #filigrana #free #witch #Halloween


 Looking for that quilled witches hat? Check out these instructions to make this quick and easy quilled witches hat by Antonella at www.quilling.blogspot.com #quilling #filigrana #free #witch #Halloween"


I hope you have a wonderful day!
Antonella Quilling Art

Tuesday, October 28, 2014

Free Quilled Ghost Pattern #tbt

Halloween is approaching, and this
Throwback Quilled Ghost is just what you need, lol


Super cute (I mean scary) quilled ghost... this free quilling pattern is shared by Antonella at www.quilling.blogspot.com #quilling #quilled #filigrana #paper-filigree #ghost #halloween
I wanted to fill this week with as many fun, last minute Halloween projects I could find.

This ghost can be as small or as big as you want him to be. The key is in how many quilling strips you use. Since I needed him to fit on this card, I only needed one strip, but you can use 2 or 3 or even more if you have a larger space to fill.

Super cute (I mean scary) quilled ghost... this free quilling pattern is shared by Antonella at www.quilling.blogspot.com #quilling #quilled #filigrana #paper-filigree #ghost #halloween

Free Quilled Ghost Pattern

  •  Take 1 strip of White quilling paper, create a loose coil (click here if you don't remember how to make a loose coil)
  • Place a dab of glue on the end, and pinch the paper where the glue was applied
  • This will make your coil look like a teardrop, but we want a ghost shape, so let's keep pinching, lol
  • Take your quilled shape and pinch the paper on either side and you will know have the ghost shape.  Tip: To make the bottom more uniform, I will squeeze the bottom together to make sure that that zig zag on the bottom has crisp folds.
  • For the eyes and mouth, I took a 1/16 inch punch and punched out his eyes and mouth, hmmmm, that doesn't sound very nice does it. I promise, this was created in only the most non-violent way... lol
 I hope you are enjoying your week and have a wonderful day!
Antonella Quilling Art

Monday, December 23, 2013

Christmas Wishes Check out my featured Walkabout - My Ornament Collection

Antonella free quilling patterns printables and silhouette cut files
Antonella's collection of quilled ornaments

With Christmas literally around the corner, I wanted to share with you some of my favorite ornaments... I am sharing them with you via Pinterest in my ..... Christmas Wishes Walkabout - My Ornament Collection... I included my santa ornament above, I don't have a pattern for him at this time, but he was just so cute!

These are a few of my favorite things... 

=============================


Nativity Ornament - I used lots of my "toys" when I made this ornament. I used my cuttlebug and cut my Spellbinders ovals, I pulled out my Silhouette Cameo and cut this lovely nativity, and was able to find the perfect quilling papers to match the colors I used... a touch of glitter (of course) and some beautiful pearls...


Snowflakes on your tree... "I'm dreaming of a White Christmas..." and here is the perfect ornament for you... You can change the colors and make them all white, all pink or blue for a Baby's 1st Christmas, the possibilities are endless


Some Spreuer technique ornaments... Quilled Cross ornament with easel card, Angel, and a Spreuer Christmas Tree...


The tender singing of these sweet blue birds will brighten your day as you watch them on your tree... quilling, Memory box dies, punch, and my spellbinders all make these ornaments sing...


Poinsettia Ornaments - these are easy to make, just run a thread through one of your petals and you are ready to go. I think I would add glitter to the second poinsettia ornament. Yes, I am addicted...


=============================


I hope you have a wonderful day!
Antonella Quilling Art

Tuesday, December 03, 2013

Throwback Tuesday Quilled Scroll Christmas Tree


Free Quilled Scrolled Christmas Tree

I am feeling very nostalgic today, and wanted to go back in time to my first Christmas blogging and share with you my Quilled Scroll Christmas Tree.... At the time I was new to blogging and wasn't sure if I should leave the patterns up and almost took it down. I have had such enjoyment sharing with you over the years. I hope you enjoy this project as much as I do!

This is one of my favorite projects of all time! I love scrolls and find that they are so versatile and quick to pull together in a pinch.

To make this lovely little Scroll Christmas Tree....

For making this tree I used 1/8 inch (.3 cm) wide strips. For this design you will need the following number of strips:

1 Heart-T-Scroll
  • 1 - 3 inch (7.62 cm) heart scroll
  • 1 - 3 inch (7.62 cm) T-scroll
Heart T-Scroll Shape

2 Kissing scrolls (they look like a heart don't they? and shouldn't every Christmas tree have lots of love?)
  • 4 - 3 inch (7.62 cm) S-scrolls - place them touching as below to make the Kissing S-Scrolls
Kissing Scroll Shape

Remaining branches
Double Scroll with Tail Shape

Topper
  • 1 - 3 inch (7.62 cm) red diamond

Trunk
  • 1 - 3 inch (7.62 cm) red S-scroll

To put this tree together, I recommend the following:
  • Place the Heart-T-Scroll down first
  • Line up your 2 kissing scrolls next
  • To keep a straight line, it may be best to work over a piece of wax paper with graph paper underneath. Then you can use the straight lines to make sure your tree is straight.
Along the left side and then the right side, starting at the top, add the following:
  • S-scroll, pointing down
  • Double scroll, pointing up
  • S-scroll, pointing down
  • Double scroll, pointing up
  • Double scroll, pointing down
  • S-scroll, pointing down

See the picture for placement. You can then adorn the tree as in this example with pearls.
Free Quilled Scrolled Christmas Tree
Free Quilled Scrolled Christmas Tree with Pearls

I hope you have a wonderful day!
Antonella Quilling Art

Saturday, December 31, 2011

Happy New Year - Good Bye 2011, Hello 2012!!!

WOW!!! Can you believe that today is the last day of 2011? I know it is true, but am aware of all that has happened this year and hoping that 2012 will be a fantastic year!

I thought it would be fitting to take a look at some of my favorite projects from 2011...

A Year in Review if you will... It was difficult to settle on just these ten, but I had to put some parameters around what I would share, or I would still be writing this - lol.  I have linked each picture to the original post that will show the technique, digi, printable, and/or tutorial.

I have included some quilled items... yeah, well, most of them are quilled projects... what can I say? I love to look at the quilling.  It actually makes me realize that I haven't done as much quilling as I would have liked, but something that hopefully I can make up for in 2012 :-)

I've also included some of the printables from the year, I am working on my tabs across the top to make things like the printables easier to find... look for some blog updates in 2012 :-)

And then I had to share the winter snowstorm before Halloween - I am still cold remembering that one!

I hope that each of you has a SAFE and HAPPY New Year!!!

quilling quilled snowman
Ahh, my Blue Quilled Snowman.

I absolutely love his scrolls, and the open quilling!
Don't you?
quilling quilled flower
Birthday Cake Card.

I had lots of fun making this card and trying a new technique too!  I even got to play with a cuttlebug, neat.

quilling quilled horse atc
Spirit ATC

This is my all time favorite ATC, probably because I love horses.
quilling quilled angel ornament

Christmas Angel

Who can resist this sweet little angel ornament?

hug birthday gift card holder greeting card

A Hug Card

This is one of my favorite style of cards... and works so well with those gift cards.

snowy picture
Our Halloween snowfall and a week with no power - Brrrrr...

free fathers day printable card

Father's Day printable

I had lots of fun with making printables this year.


quilling quilled folk art bird
Folk Art Bird

I love folk art and this was inspired by that tradition.

quilling quilled spreuer cross ornament

A Cross Ornament

I find that I make a lot of spreuer designs, and this is no different!

free patriotic printable flag pledge of allegiance

Flag printable

Thought this was a nice way to end my year in review with a patriotic printable!

May 2012 bring you lots of inspiration and joy!

Enjoy! Copyright for Personal Use Antonella DeFalco

Friday, December 02, 2011

Filigree Friday Cross Ornament

Happy Filigree Friday Everyone!!

quilling quilled spreuer cross dove christmas ornament
I hope that you are enjoying your day! It is too early to know for certain, but I am hopeful today will be nice and sunny (a bit on the colder side, but the sun will definitely go a long way to making it a beautiful day!)

Wow! The holidays are here!!! I cannot believe it, last week was Thanksgiving (for those of you who live in the states) and ourselves with lots of food and goodies... I personally love the goodies - lol!  And now we are almost a week into Advent! Christmas is just around the corner for us!!

I am way, way, way behind in my Christmas ornaments... I am definitely starting to feel worried, because every time I think that I have set aside time to work on them something comes up!! I actually took off yesterday and today (now I didn't have the whole day planned to work on them, but you would think I would have found at least an hour yesterday - nope, didn't happen!) Between running to do something in the morning with my stepdaughter (that was supposed to be 3 hours and ended up being 5 hours - travel time included) and then regular afters school stuff and dinner and yeah, let's not forget the long phone conversation with a friend who moved to Florida, I kinda didn't get anything done... but today will be different... Positive Thinking!!!  and for extra motivation, my friend Lucy will continue to provide the necessary positive reinforcement as she continues to design her awesome Christmas cards this year!!

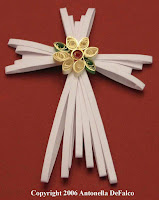
So, because I have been so bad, I decided I'd share an ornament I made a few years ago.  This is a cross ornament with a sweet dove in the center, the ornament is hanging from an easel card so it could be easily removed or the card itself could be where the ornament was displayed.

quilling quilled spreuer cross dove christmas ornament
Here are some links to similar projects that have more details about the techniques used, if you want specific instructions for this cross, please let me know and I will post them....
Easel Cards and Spreuer Crosses (click on the pictures to go to those posts)
quilling quilled easel card graduation
Easel Card - Graduation

quilling quilled easel card snowman
Easel Card - Snowman

quilling quilled spreuer cross christmas ornament
Quilled Spreuer Cross - Christmas

quilling quilled spreuer cross christmas ornament
Spreuer Cross - Communion

Have a wonderful day and may it be super productive!!!

Hey, I've linked up to this wonderful 26 Day Christmas Craft Marathon Linky Party - http://lisascraftblog.blogspot.com/2011/11/christmas-craft-marathon-linky-party.html

and The Winter Holiday Craft Party - http://www.craftsunleashed.com/index.php/seasonal/holidays/winter-holiday-linky-party/  

Enjoy! Copyright for Personal Use Antonella DeFalco

Saturday, June 25, 2011

Filigree Friday Free Quilled Dress

Time for another Fabulous Filigree Friday
Update:  I've linked to Top Tip Tuesday, and my T's are Twirled Paper, Two arms, and Two legs - TOO Fun!

This little girl is crafted in the school colors from my niece's school.

Bodice:
  • 1 - 6 inch (15.2 cm) White plus 6 inch (15.2 cm) Navy Blue coil them together and make a Coil Heart shape
  • 1 - 6 inch (15.2 cm) Flattened V-Scroll
  • Tip: I love using a heart as the bodice of my dresses, I started doing this many years ago and adding the V-scroll as the sleeves also helps finish the neckline.  I refer to it as flattened because it will only follow the shape of your heart.  The deeper the top "V" of your heart, the deeper the v-scroll.
  • See the photos


Skirt:
  • 2 - White 6 inch (15.2 cm) Marquise
  • 1 - Navy Blue 6 inch (15.2 cm) Marquise
  • I made both of these very loose so that they would be longer
  • Glue at tip, place Blue in the center
  • I then created a top layer for dimension to the skirt
  • 2 - 4 inch (10.2 cm) Marquise
  • Take a piece of they Navy Blue quilling paper and go around the white
  • Glue these on top of the larger Marquise made previously

  • Face: a 4 inch (10.2 cm) Loose Coil in White
  • Arms/Hands: 2 - 2 inch (5.1 cm) strip, coil only one end 3 - 4 times to make the hands
  • Legs/Feet: 2 - 2 inch (5.1 cm)  strip, attach a small Navy Blue coil for her shoes :-can use )
  • Use Photo for placement

This is similar to my "Flower Power Girl" these are a lot of fun to make and perfect for a little girl, young woman, mom, sister, best friend. The possibilities are endless as are the color combinations and styles.


UPDATE:  WINNER Announced... Giveaway closed - check out who won!!


Please check out my sidebar for the Link Parties that I link up to! :-)

Enjoy! Copyright for Personal Use Antonella DeFalco

Friday, June 17, 2011

Filigree Friday Summer Flowers Tutorial

Fabulous Filigree Friday


UPDATE:  WINNER Announced... Giveaway closed - check out who won!!


It is raining here today, hopefully these will add a splash of color to brighten your day!

These are very simple daisies... If you have ever done quilling you have made a few daisies... If you have never tried quilling, this is your chance... They are super easy and sturdy!

In keeping with my bright, upbeat feel, I have pinks, greens, yellows, and blues... for that added "pop" everything is on a black background.

I don't go far without some sparkle and bling, so the centers are rhinestones and there is just a light covering of paper glaze (next time I will add more - it gives the quilling that glass-like look)

As I said, this is really easy, each of the flowers is the same pattern:


  • 5 - 6 inch (15.24 cm) Teardrops
  • Place all teardrops with the points touching in the center and glue
  • lightly coat with Alene's Paper Glaze, let dry
  • Top it off with a rhinestone in the center

For the paper squares I added what you can think of as marker stiching... the "stitching" is a pattern of "dot dash dot dash dot" (. _ . _ . _ . _) with my marker - because you see, I cannot sew, this is about as close I get really... it is fun and I thin adds a finishing touch to the card.

All of these photos use the same type of flowers and squares, they are only different in their composition.


P.S. I hope this posts, I used the schedule feature :-)

Update, I've linked to:
Make it Monday (link on my sidebar) 

Enjoy!

Copyright for Personal Use Antonella DeFalco

LinkWithin

Related Posts with Thumbnails