Hello Everyone,
A friend of mine was asking for instructions to make a butterfly and I sent her a photo and instructions and thought that it would be a great addition to this site. Just in case you have not visited before, here are links to the Basic Coil Shapes and Spiral Shapes.
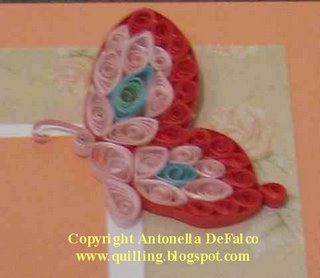
The butterfly that I have attached is red and pink - she was specifically requested. I have not identified the specific colors you would use because you can make your butterfly any colors you would like. I have used 1/8" (.3cm) width strips. Have fun with it and feel free to ask any questions you may have:
Body
- 1 - 3" (7.62 cm) tight coil (for the head)
- 1 - 6" (15.2 cm) Marquise (for her body)
- 1 - 4" (10.2 cm) Teardrop (For this butterfly I made it flat on one side - I do a lot of work by "feeling" my way around, ant thought that flat looked better for this particular butterfly)
- 1 - 1-1/2" strip cut in half for the feelers (I usually cut almost to the end and glue the end to the head)
Top Wing
- 7 - 4" (10.2 cm) Teardrops (I make this the darker color and arrange them on the outside)
- For the multi-colored center point I take 2 different color strips one 3", I coil this tightly with the second 6" strip glued to the end. When I coil the 3" tight coil I glue it before I continue with the outside color.
- 5 - 6" (15.2 cm) Marquise
- 2 - 4" (10.2 cm) Marquise
- I may add or take away coils based on how I want it to look and how the coils fit together. As I mentioned, by adding the strip on the outside and gluing it, it gives me another opportunity to get the wing shape better.
- 7 - 4" (10.2 cm) Teardrops (I make this the darker color and arrange them on the outside)
- I added a little more color by adding a 4" marquise in a different color
- 2 - 6" (15.2 cm) Marquise
- 1 - 6" (15.2 cm) Triangle (to get the wing shape - you may not need this)
- 2 - 4" (10.2 cm) Marquise
- Again, I may add or take away coils based on how I want it to look and how the coils fit together. By adding the strip on the outside and gluing it, it gives me another opportunity to get the wing shape better.
- One final thing on this bottom wing, I added a 4" (10.2 cm) Teardrop to the outside. Many of the pictures of butterflies show that they have what I refer to as a little extra wing. I do not know what to call it, but they have such beautiful shapes to their wings and this was an attempt to capture some of that.
I hope that you have enjoyed this butterfly.
Technorati Tags: quilling, paper filigree, filigrana, free quilling pattern, free pattern, naqg, butterfly
Copyright Antonella DeFalco
9 comments:
wow! your projects are beautiful! I will make this butterfly to put in my daughter's room. I call her my little butterfly and this is just perfect! Thank you
You are so welcome! Please let me know what yours looks like.
You are so tallanted and i absoulutly love this Butterfly.
I am going to use it to create my mums birthday card
Thanks
:) ;) :) ;)
Thankyou so much!
I've been looking everywhere for a design for my Mums Card for Mothers Day! It's just perfect, exactly what i'm looking for thankyou so much!
I hope everyone has enjoyed this butterfly... I am so looking to share more butterflies in the future. Hugs, antonella :-)
I would so love to do this butterfly but can't see the picture ? would you mind sending it to me please.
cheers,
Joanne
joannerancourt@yahoo.com
Very pretty butterfly.
Joanne and MarliLynn,
Thanks so much for your comments... Joanne, I sent the butterfly picture to you :-)
Hugs,
Antonella :-)
When I initially commented I clicked the -Notify me when new comments are added- checkbox and now each time a remark is added I get four emails with the same comment. Is there any means you possibly can remove me from that service? Thanks! online casino slots
Post a Comment