banner


Saturday, December 15, 2007

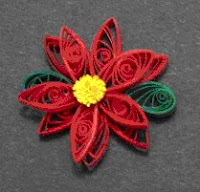
Free Quilled Christmas Poinsettia

quilled christmas poinsettia
Here is a simple Quilled Christmas Poinsettia project. This is a classic that is perfect to add a string and make an ornament to hang on your tree!


Bottom Layer

  • 6 - 6 inch (15.2 cm) Red Marquise for petals
  • 2 - 6 inch (15.2 cm) Green Teardrop for leaves
  • Arrange 3 red petals then the green leaves and complete with the remaining 3 red petals

Top Layer

  • 5 - 6 inch (15.2 cm) Red Marquise for petals
  • 1 - 3 inch (7.6 cm) Yellow fringed flower
  • Place the fringed flower in the center and glue the red petals around the flower
***UPDATED July 2010:  I am updating this post to address a question I had from one of my blog readers who was having difficulty getting the bottom petals to line up, so I am adding this tip:  Since the top layer covers the bottom layer, you don't have to get the points of the bottom layer to meet exactly in the center.  This is especially true with this flower because the top has the fringed center.  This gives you some play with the actual petals and gives you room to arrange it so that it looks the way you want it.  You will then cover the "hole" with the top layer and no one will ever know.  I hope that this tip helps you, remember, you can use this on any layered flower and no one will ever know!

Have fun with this project. You can replace the red with White and create a white poinsettia, or mix the white and red together to make a nice hybrid.


Tuesday, November 06, 2007

Free Quilled Turkey Pattern

quilled turkey pattern
Gobble, Gobble!

With Thanksgiving on the way I thought it would be fun to post a slightly revised Turkey pattern. This is done in the style of "Creative Quilling Traditional and Modern Designs" By Trees Tra and Pieter Van Der Wolk

I used full-length strips, in this case they were 24 inch (60.96 cm) strips. You can use any manufacturer and they don't have to be this long.
For the Turkey's body and curled "feather" tail:
  • 10 - 24 inch (60.96 cm) strips, rolled into a tight coil. Roll all strips together. I took the strips and slightly offset them to make it easier to start the coil.Do not roll all the way to the end of the strips. Leave approximately 6 in (15.24 cm) free.
  • Glue all the strips at this point to keep the body tightly coiled while leaving the ends loose.
  • Take the free ends and create loose open coils, coiling them in different directions as the "feathers" of your turkey.
For the head:
  • 1 - 12 in (30.48 cm) brown teardrop for the head
  • 1 - 6 in (15.24 cm) black triangle for the beak
  • 1 - 6 in (15.34 cm) modified red teardrop, with a dangling spiral. This is made by curling the first half of the strip into a teardrop and glueing it where you pinch it to make the teardrop. Then take the remaining strip and create a spiral. This is for the fleshy carbuncle that hangs from the beak, called a snood.
To make the eye:

  • Take Black, White, and Black strips glued together and roll together to make the eye.
I hope you enjoy this little fella!

Thursday, September 20, 2007

Slotted or Needle Quilling Tool

slotted quilling tool
Slotted or Needle Quilling Tool

I found that when I first started quilling I used the “Slotted” tool. This is a metal or plastic instrument with a tiny slit or slot at the top. The slit is where you place the paper. When I started quilling this was my favorite tool because I found it easier to turn the paper. This was more of a coordination thing, and as I became more comfortable with making my coils and working with the thin paper I relied on it less and less. Today I use the slotted tool when I make my folded roses and sometimes when working with fringed paper. I have found that using the slotted tool will give a larger hole in the center. Please note: For some quillers and projects, you want this look, so don’t discount this tool for that reason.

As my quilling skills improved, I began using the “Needle” tool, mine has a wooden handle with a long, thin piece of metal that looks like a needle sticking out the top. I have actually used this tool for things that it may not have been designed for, such as pricking or piercing my paper and to place glue on my projects. Strictly speaking, using the tool for glue placement is not recommended because it can cause your needle to rust (so don’t tell anyone).

Along the lines of the needle tool, I find that I use a corsage pin or any pin for that matter for much of my quilling today. I have even been known to use office supplies, primarily the T-pins that many people use to hold paper to their cube walls. I find that my control over my paper is better and I am able to get a tighter center to my coils this way.

When I teach classes or give people a pattern that I have made, I will provide round toothpicks. I do this because I worry that someone might stick themselves with a pin if one were supplied. We don’t want any DNA for the CSI team to find 

Perhaps the most common tool that most of us have readily available is our hands. That’s right, it is called finger rolling, and you roll the strips of paper in your fingers. This tool is particularly useful because you never leave it at home!

Enjoy!
Copyright for Personal Use, Antonella DeFalco

Technorati Tags: , , , , ,

Sunday, September 09, 2007

Quilled Bridal Shower Card - Wedding

Showers, Quilling and Love! A quilled bridal shower card that I made recently. This pattern is more of a guide than a step by step pattern. This is an example of using quilling to accent patterned paper.

  • I love square cards, so I started with a 6x6 square white blank.


  • Selected patterned scrapbook paper with a large floral patterned design.


  • Printed "Love Unconditionally, Laugh Uncontrollably, and Live Unexpectedly Free!" and attach at a diagonal.


  • Affix a tag to the phrase, and place a 4 inch (10.2 cm) Coil Heart to the tag.


  • Using white and gray quilling strips create quilled patterns to place over the patterned design on the paper.

I found a quote that I particularly liked and printed on the inside of the card:
"Love does not consist in gazing at each other, but in looking together in the same direction." - Antoine de Saint-Exupery

I really love to make cards like this. They are quite elegant in their simplicity, and can be quite effective in a pinch.

Love is in the air!

Enjoy!
Copyright Personal Use - Antonella DeFalco

Technorati Tags:
, , , , , ,

Tuesday, September 04, 2007

Quilling Strips - Should I Cut My Own Strips?

Quilling Strips - Should I Cut My Own Strips?

So many people ask about quilling strips and if they should cut their own papers. This is such a personal choice, but I will provide some information for those of you who decide to cut your own paper.

For those of you brave enough to cut your own paper here is some information that may help you when selecting the paper. Not to be cheeky, but you don’t want your paper to be too thick or too light. If it is too thick or heavy it is harder to roll, and if it is too light it will not keep the coil shape as well. A good weight that has been recommended to me is the 65 to 80 pound text paper. I have used the better quality printer paper and the light weight scrapbook paper that is available. I know that many of my quilling friends like to use envelopes as this is generally a good weight and has the advantage of recycling the mail. Included in this is the inside of the business envelopes - the pattern on the paper makes for really neat fringed flowers.

You want to make sure that the paper you are using has a good “color fastness” The best way I can explain this is that you do not want your paper to “bleed” when you glue it as this can damage or ruin your project. The bleeding can happen because the glue contains water that can cause the bleeding. Always test any paper you want to use before you get too far into your project, you would hate to ruin all that hard work.

Some people will use a manual paper cutter and use the ruler as a guide for the thickness of the paper strip. You must be very careful to keep the paper from moving while cutting so that it is the same width along the length of the strip.

There are those who will use a shredder to cut their paper instead of manually using a paper cutter to cut their strips. There are many shredders that cut paper into 1/8” strips. A word of caution, you need to be careful with the shredders, because many cut with jagged edges that are not the best for use with quilling. If you decide to attempt this, please test the shredder in the store before purchasing it to make sure it is what you need.

The advantage of cutting your own paper is that you can more easily match the color of your pattern to the background paper you are using on your project. This can be helpful for scrapbooking or for card making where you can use your scraps to create the embellishments or decoration.

The disadvantage is that it can be difficult to get all your strips the same width and if you are like me, cutting a straight line can be challenging – lol.

I have found that many people who teach classes cut their own paper for their students to use when first learning the basic shapes. This is done so that they do not use the real strips until they feel more comfortable with making the shapes. There has been a lot of information posted about shredders, if there is interest I can track it down for you.

As a side note: I prefer to buy my paper. I don’t have the time to cut it myself, and if I did, my ability to cut a straight line (even with a paper cutter) is not my forte. One exception, because there is always an exception, is when it comes to fringed flowers and some of the roses that I make. Some of the color variations in the scrapbook paper makes for great flowers!

I hope that you have found this helpful.

Enjoy!
Copyright (personal use) by Antonella DeFalco

Technorati Tags: , , , ,

Friday, July 13, 2007

Free Quilled Pink Flamingo Pattern

quilled pink flamingo


This sweet little lady is hanging out waiting to bring a smile to your face. She is made out of folded roses instead of regular quilled shapes.


Pink Flamingo Body:


  • 6 - 6 in (15.2 cm) pink folded roses


  • Notice that the body is slightly rounded. There are a few ways to accomplish this.


  • Take a large glue dot, and place the pink roses on top of and around the glue dot OR


  • Take 3 - 4 in (10.2 cm) pink tight rolls/coils, and place the pink roses on top of the rolls OR


  • Instead of a glue dot use a dab of silicon or rubber cement OR


  • Glue the roses themselves together such that they form the rounded state


  • The choice is yours


Pink Flamingo Head and Neck:


  • 1 - 6 in (15.2 cm) pink folded rose for the head


  • 1 - 6 in (15.2 cm) black teardrop - note flatten one side so that the rounded part gives the shape a more "beak-like" look


  • 1 - 4 in (10.2 cm) pink strip that has been shaped into an "S" shape. This was done by conditioning the strip. Take the needle tool or fingernail and run it along the strip to make the strip curl in opposite directions to make an "S" shape.


  • To attach the neck, glue the top of the "S" to the rose that will be the head


  • Attach the bottom of the "S" and glue it to the body


  • Add a pearl for the eye


  • 2 - 1.5 in (3.8 cm) strips for her legs


TIP: Arrange the shapes to create a natural looking neck and bird.


This little lady is mounted on a magnet, the size of a business card. The photograph is one that I took at a local reservoir. I thought it looked like a place flamingos might hang out. If interested in the photograph, let me know.


As my friend Lynn suggested you can use this same pattern/idea for a stork or an egret and possibly even an ostrich or some similar type bird. Change the colors and the background and you can create anything you like.


Sunburst Flower with Ladybug


One of the great things about quilling is that you can combine your quilled items to make an even more spectacular arrangement. Here is an example of combining two elements. You can click to get the instructions for how to make each of the elements:


Change the colors and see how much you can do and how quickly you can become enchanted with your creations.


Thursday, July 12, 2007

Quilling Shape - Grape Roll


The Grape Roll is based on the Tight Coil/Tight Roll/Peg shape.


I will repeat those instructions here briefly, select the link above if you require more information.


  • Take the quilling strip and begin rolling it, keeping the paper tight and a nice even tension.

  • Keep the edges straight so that a belly or tornado effect is not created.

  • Carefully pull the paper off the tool and glue the end. Keeping the tight shape.

  • After the glue has dried, gently push the center of the coil outward.

  • Refer to the picture for reference.

  • Various items can be used to push the center out. A pencil, pen cap, your fingers. The key is to keep the shape as even as possible.
Here is a link to the Free Shape Instructions that I have posted.
Here is a link to the Free Quilling Patterns that I have posted.

Quilling Shape - Tight Roll, Coil, Peg

This shape has many names; Tight Roll, Tight Coil, Peg, etc.


This is one of the basic quilled shapes. I find that I use this a lot for the center of my flowers as well as creating a border around pictures, in addition to many other uses.


  • Begin by conditioning the quilling strip. This is done by running your fingernail or needle tool along the end of the strip. The paper will begin to curl as the fibers in the paper are broken down.

  • Place the quilling paper in the slotted tool (at the very tip of the slot) or at the tip of your needle tool.

  • Holding the paper in one hand and your tool in the other hand, begin turning your tool.

  • The paper will begin turning as the tool grabs the paper.

  • Try to keep the edges of the paper as even as possible - otherwise, you will find that your finished coil will have what I like to refer to as a little belly or a tornado effect.

  • Keep an even tension and keep the paper as tight as possible.

  • When you get to the end of the strip of paper, pull the paper off of the tool. If using the slotted tool, while holding the end tight slightly turn the slotted tool in the opposite direction so that the paper releases from the slot.

  • Carefully glue the end of the paper. Remember, just a dab of glue.
Here is a link to all of the free shape instructions that I have posted.

Saturday, July 07, 2007

Free Spreuer Patterns


To help you find the Spreuer patterns more easily, I have created this post with links to the patterns.

  • Christmas Angel - This Angel is red and green and has curly hair. She also wears her heart on her sleeve. You can use this basic pattern for so many things including a baby announcement or any religious event.
  • Christmas Cross - A sweet Christmas cross with a flower in the center. This is a traditional cross shape.
  • Easter Cross - This is a Spreuer Cross using the Patriarchal Cross design. It is augmented with delicate roses. Perfect design for Baptism, Weddings, Communions, Confirmations, Sympathy, or any religious gift or event.
  • Spreuer Christmas Tree - A simple tree decorated with christmas lights.
  • Spreuer Flower - A yellow and orange subburst spreuer flower.
I hope that you enjoy these patterns. Remember, they are free for personal use!

Enjoy!
Copyright (personal use) Antonella DeFalco

Technorati Tags: , , , , , , , ,

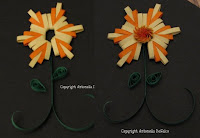
Free Spreuer Flower Pattern

Spreuer Flower Pattern
This is a neat flower I made using 2 strips of coordinating quilling strips. The pictures have instructions for each of the steps in creating the Spreuer Flower Petals.

Follow these instructions and make 6 flower petals.

Spreuer Flower Instructions
Step 1: Take 2 strips of 1.8 in (.3 cm) quilling strips. I selected Yellow and Orange for this project. I then glued the bottom of the strips together. I placed the yellow against the back of the Onion Holder Tool (refer to picture).

Step 2: Take the Yellow and go up to prong #5 and wrap the Yellow around the front and down to the starting point and glue at the bottom.

Step 3: Take the Orange and go up to prong #4, bringing it around the front and down to the starting point and glue at the bottom.

Speruer Flower Instructions
Step 4: Continue with the Orange and on the opposite side go up to prong #4, bringing it around the front and down to the starting point. Before you glue it at the bottom, cut or tear the orange near where it will be glued.

Step 5: Take the Yellow and go up to prong #3, bringing it around the front and down to the starting point and glue at the bottom.

Step 6: Continue with the Yellow and on the opposite side go up to prong #3, bringing it around the front and down to the starting point. Before you glue it at the bottom, cut or tear the Yellow near where it will be glued.

Repeat Steps 1 - 6 for each of the 6 Flower Petals.

Next, make the STEM:
  • Take an approximate 8 in (20.3 cm) length of 1/8 in (.3 cm) Green quilling strip.
  • Fold it in Half, gluing at the top where the strip is folded.
  • Take the strip and condition the ends so that they curl slightly, you can do this by running your fingernail over the end of the strip to create the curl.
  • TIP: Cut the ends at a slight angle, it makes the strip more delicate.
Finally the LEAVES:
  • 2 - 6 in (15.2 cm) 1/8 in (.3 cm) Green Teardrops
Arrange the Flower Petals into a circle (looks like the sun). Arrange the Stem and Leaves as shown in the photograph. The Fringed Flower is made with Yellow and Orange 1/4 in (.6 cm) wide quilling paper.

Enjoy!
Copyright Antonella DeFalco

Technorati Tags: ,, , , , , ,

Tuesday, July 03, 2007

Free Quilled Spinning Top

quilled spinning top


This is a fun project for the whole family... A Quilled Spinning Top!

This pattern is created using a round toothpick to wind your quilling paper around.

Take a round toothpick as your starting point.

  • Begin approximately 1 inch (2.54 cm) from the bottom

  • 1 - 48 in (121.92 cm) Blue tight roll. Glue the beginning of the strip directly to the toothpick.

  • 1 - 24 in (60.96 cm) White tight roll. Glue the beginning of the strip directly to the toothpick directly under the blue roll.

  • 1 - 12 in (30.48 cm) Red tight roll. Glue the beginning of the strip directly to the toothpick directly under the white roll.
In order to achieve the correct balance and allow your Spinning Top to spin, you must cut the toothpick to approximately 2 inches (5.08 cm) in length.


quilled spinning top
Now you can begin spinning your top!


Quilled Patriotic Ladybug


Some Patriotic posts today...

This is a patriotic ladybug who is spending some time checking out my quilled flowers. She is not your traditional red and black ladybug, she is Red, White, and Blue.

Begin by creating her body using 1/16 in (0.16 cm) wide paper


  • 1 - 48 in (121.92 cm) tight roll

  • This is the base of the ladybug.

You will add all other pieces on top of this base.


  • 1 - 3 in (7.62 cm) White, Half moon coil for the head. Place this on top of the blue body with the rounded part placed at the top.

  • 2 - 6 in (15.24 cm) Red, Teardrops for the wings. Place with the rounded side positioned just near the flat part of the head.

  • 4 - 1.5 in (3.81 cm) White, tight rolls for the ladybug's spots. Place these on top of her red wings.

Now you have a very happy ladybug. :-)

Enjoy!
Copyright Antonella DeFalco

Technorati Tags: , , , , , , ,

Saturday, June 02, 2007

Free Quilled Flower Girl Dress Pattern


June is the month for weddings so in keeping with that tradition today's pattern is a pretty little girl's dress. Perfect for the flower girl, this pattern is appropriate for your scrapbook page or a card. The possibilities are endless.


To make this cute dress I used white, 1/8 in (.3 cm) wide quilling paper and made the following:

Dress Bodice:
1 - 6 in (15.2 cm) Heart Coil
1 - 4 in (10.2 cm) V-Scroll flattened to give shape to the neckline by following the top of the heart with the scrolls adding sleeves to the dress

Dress - Skirt:
3 - 6 in (15.2 cm) Teardrops
3 - 3 in (7.6 cm) S-scrolls for the bottom of the dress (they add interest and give form to the bottom of the dress)

Arrange the Teardrops so that they touch at the waist-line. I flattened the center teardrop a bit to make the dress keep a more natural curve at the bottom.

The S-Scrolls then run along the bottom of dress.

Bouquet:
1 - Green 1.5 in (3.8 cm) C-scroll
7 - Pink 1 in (2.5 cm) Loose coils
2 - Green 2 in (5.1 cm) Teardrop for leaves

For the Bouquet I used 1/16 in (.15 cm) wide paper for a more delicate look and also to keep the piece from becoming too bulky.

Place the C-Scroll at the top of the bouquet
Place 1 - loose coil in the center of the C-scroll (see picture)
Then add a row of 3 loose coils, 2 loose coils and end with 1 loose coil
Add 2 Green leaves to complete the bouquet


Your dress is now ready for that scrapbook page!

If you do not add the bouquet, you can use the same pattern for a communion or christening dress as well.


Enjoy!
Copyright Antonella DeFalco

Technorati Tags: , , , , , , , ,

Tuesday, April 24, 2007

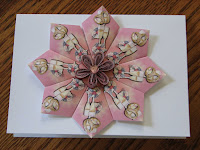
Tea Bag Folding - Kite Fold Examples


I have been having a lot of fun with the Kite Fold... If you are not sure how to make this fold, please click here for the Kite Fold.


Here are some examples of cards I have made using tiles from Derek's online site (please check out all the easy to print tiles he has made). All of these medallions were made with designs from Derek's site.


These are a variation of a wedding or anniversary card theme with quilling added to the center.

Enjoy!
Copyright Antonella DeFalco

Technorati Tags: , ,

Tea Bag Folding - Kite Fold

Instructions for making the Kite Fold

I started with a 2 inch x 2 inch (5.08 cm x 5.08 cm) tile. Tiles can be any size you need, as long as they are square (although there are new designs with oval and cutout tiles, but we won't worry about them right now). Often times, the standard tile size is 1.5 inch x 1.5 inch (3.81 cm x 3.81 cm).

tea bag tile

tea bag tile
Place the tile in a diamond shape and fold it in half (looks like a trianlge on its side).
Open up the paper, place the patterned side down on your worksurface
Fold both of the sides in toward the center fold line you just created


Turn it over and you have a Kite Fold. Congratulations!


You can use low tack tape like masking tape or a re-positionable tape. The idea is to have something that will hold your medallion together until you position them and can glue them together. I use masking tape, I have plenty of that around the house.


Enjoy!
Copyright Antonella DeFalco


Technorati Tags: , ,

Tea Bag Folding - Kite Fold

Teabag folding is a fun craft to do and has a fun history. A woman from Holland had a dilemma, she did not have a birthday card for her sister. The story goes, as she sat down with a cup of tea pondering her dilemma, she started folding her tea bag envelope and this is how the craft of tea bag folding began.

Here are some fun and easy projects, please check them out:


Enjoy!
Copyright Antonella DeFalco

Technorati Tags: , , ,

Sunday, April 15, 2007

Tea Bag Folding - Small Kite Fold

Tea Bag folding - the Small Kite Fold.

When I tell you that this is the basic fold, I cannot stress to you how much this fold is used. Every site that I have ever visited or book that I have read that talks about tea bag folding will generally start with this fold. So, that is where I will start.

I want to thank Bronwyn for encouraging me to venture out a bit beyond quilling.

First, I will tell you that I was at a bit of a disadvantage when I put these instructions together. The computer I am using is not connected to a printer at the moment and I was limited with the paper I have access to, so I was in a bit of a conundrum. I mean, how can I demonstrate tea bag folding if I do not have the ability to print any of the wonderful tile patterns that you can find on the internet? I decided to take a different approach and grabbed a sheet of scrapbooking paper and cut my tiles from the paper that I had.

This of course did not address all of my issues, since the squares are not "exactly" the same design, but they are close. I have to try this more often, because I know that I can develop a sense of what papers would work out better than others.

Since the purpose of this post is to be a high-level, instructional post to walk you through the basics of tea bag folding the paper that I have selected works quite well for that purpose. I have taken pictures of the folds along the way.

tea bag tile
I started with a 2 inch x 2 inch (5.08 cm x 5.08 cm) tile. Tiles can be any size you need, as long as they are square (although there are new designs with oval and cutout tiles, but we won't worry about them right now). Often times, the standard tile size is 1.5 inch x 1.5 inch (3.81 cm x 3.81 cm).
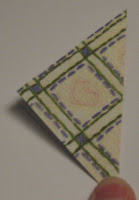
tea bag tile
Place the tile in a diamond shape and fold it in half (looks like a trianlge on its side).
Open up the paper, place the patterned side down on your worksurface
Fold both of the sides in toward the center fold line you just created
Once both sides are folded, this is your Kite shape!
Congratulations, you did it!


If you take this shape and fold it in half again along the center line, you now have the small kite shape
Make 8 of these small kites for the project today.

See, and you thought that this was going to be difficult.

You can use low tack tape like masking tape or a repositionable tape. The idea is to have something that will hold your medallion together until you position them and can glue them together. I use masking tape, I have plenty of that around the house.

These 2 half medallions are basically the same Fan shape, the difference is in how I arranged them.

small kite fold medallion
In this first picture, I have placed each subsequent small kite into the center of the previous small kite. So, where the fold is open in the center, I placed the folded edge of the small kite to the left inside. This creates a more compact fan. I like this look and it reminds me more of a ladies fan.

small kite fold medallion
In this second picture, I arranged the small kites so that as I added the next small kite (to the left) I placed it on top of the previous small kites left most point (the top of the triangle). This is more the look of a fan that has been opened fully. If you made 16 of these small kites, you can complete the medallion and create a complete circle. Looks great if you wanted to add a small circular picture or a Monogrammed accent.

I hope you have enjoyed this!

Enjoy!
Copyright Antonella DeFalco

Technorati Tags: , , ,

Tea Bag Folding - History

Tea Bag Folding, this is a departure from the norm for me. Tea bag folding is one of those crafts that provides you with a quiet meditation that you can enjoy simply in the folding and creasing of the tiles that you use.

So, what is tea bag folding you may ask? Tea bag folding is truly a craft that was based on the motto that "Necessity is the mother of invention." This is the story as it has been shared with me:

A woman from Holland was in need of a birthday card for her sister. As she sat down with a cup of tea pondering her dilemma, she started folding the tea bag envelope and thus created the craft of tea bag folding. You can imagine, the tea bag envelopes were much more attractive than the ones we have today. Today, there are numerous resources on the internet that have free tea bag tiles. We are also fortunate to have a plenitude of decorative papers and wrapping paper that we can use for our tiles. Pretty much anything goes. Oh, a tile is the word used to describe your square of paper that you fold to make the medallions.

Some key tips about tea bag folding:
  • The paper that you use should be a perfect square
  • All the tiles should have the same pattern (note: this is not required, just generally practiced)
  • The folding that you do is similar to origami

Tea Bag or teabag? I really don't know which is the correct way to write it. However, the first site that I was introduced to with tea bag folding wrote it this way. You will see that I will write it both ways, I don't know if there is an official, single way to write it.

Here are some excellent links for you:

What I love about paper crafts is that most of them are relatively easy to learn and can be managed on a budget. This is for those who exhibit the self control that is necessary to keep from spending money on all that beautiful paper out there.

In my next post, I will share the basic kite fold and a quick "Fan Card" using this fold.


Enjoy!
Copyright Antonella DeFalco

Technorati Tags: , , ,

Sunday, April 08, 2007

Quilled Cross for Easter

easter card
For those of you who celebrate Easter, I wish you and your family a very blessed day.
I selected the following Bible verse to accompany this simple design:

"I am the resurrection and the life:
he that believeth in me, though he were dead, yet he shall live.
And whoever liveth and believeth in me shall never die."
John, 11.25

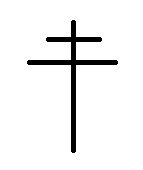
I was doing some research on crosses on the internet because I wanted to use this opportunity to depict a different type of cross than the one that is traditionally quilled. I have depicted what is called the Patriarchal Cross.

patriarchal cross
Here is a closeup of the cross I made using the Spreuer technique. Once created, I simply "scattered" roses about the cross. In keeping with doing something a bit different, I opted not to use the standard white in making the cross and instead went with a regal purple. I opted for a pastel color palette on this item.
quilled cross

Many happy wishes to everyone.

Enjoy!
Copyright Antonella DeFalco

Technorati Tags: , , , , , , , ,

Thursday, April 05, 2007

Gerbera Daisy Quilling Pattern

quilled gerbera daisy

A splash of color in every Gerbera Daisy...

Do you ever like to challenge yourself? Sometimes I think it is a lot of fun, so I limited myself to the following and decided to see what I could come up with:
  • Black card blank
  • Pink and Turquoise quilling strips
  • Pink, green, and yellow squares
  • White rectangle
  • Rhinestones

For each Daisy:
  • 5 - 6 inch (15.24 cm) Teardrops
  • Place all teardrops with the points touching in the center and glue
  • 1 - rhinestone (placed in the center)

The original card that I wanted to make was this simple color blocked design. I have deliberately included 2 versions of this card to show you how a simple scrapbooking/cardmaking ink drawn stitching can make a world of difference on your finished product.

You can see that these cards are the same except for the added "stitching" on the second card. This very easy to do pattern of "dot dash dot dash dot" (. _ . _ . _ . _) really adds a finishing touch to this card. Where as the first card looks ok, you realize when you see the second card that it could be that much better.

I think my favorite thing about this card is the rhinestones. I have come to appreciate rhinestones and that special something that they add to your projects. I challenge you to take some simple products and come up with your own designs.

Stay tuned tomorrow for a whole slew of cards that I made with these same supplies. Here is my favorite card of all the ones I made.

quilled gerbera daisy


Enjoy!
Copyright Antonella DeFalco

Technorati Tags: , , , , , , , ,

Wednesday, April 04, 2007

Quilled Daisy Pattern

Spring is here and everything is coming up Daisies. Well, it is a bit cold outside where I live, so not much is growing, but I know that soon the weather will become warmer.

I so much love daisies - especially the quilled ones. They are a perfect addition to a card or scrapbook page and you can always arrange them around a photograph. They are perfect for almost anything. My research says that we get the name daisy from the English translation of "daes eage" or "days eye." They symbolize "Innocence and joy," what a great Title for your scrapbook page.

I love the simplicity and all the vibrant colors that a daisy can be... especially with the Gerbera daisies. How much fun to be able to make a rainbow with your daisies?

I have had a lot of fun making daisies. Today I will post the basic daisy and tomorrow I will share with you my experiments with the Gerbera daisy.

Quilled Daisy

To make the basic 7-Petal Daisy you need the following:
7 - 12 inch (30.48 cm) Teardrops
1 - 24 inch (60.96 cm) grape roll
2 - 12 inch (30.48 cm) Teardrops
1 - strip of green for the stem

Note: When making flowers I tend to use an odd-number of petals. This is a common thing to do in design and is ultimately more pleasing.

Enjoy!
Copyright Antonella DeFalco

Technorati Tags: , , , , , , , ,

Sunday, April 01, 2007

Shared Quilling

Quilled Butterfly magnet
Hello and Happy April!

I wanted to share a special quilled magnet that a friend of mine Lynn Smith made. She sent me a picture and has graciously allowed me to post it here.

Lynn took a piece of chipboard and covered it with paper that has the look of linen. Then she distressed it before adding the quilled pieces on top. You will see that she has created the most precious punched roses. No easy task to make them look like real roses, they provide me with lots of grief when I try to shape the paper. :-)

Lynn really did a great job on this, don't you think?

I was so excited because she used the Spreuer Butterfly pattern previously posted here to make her butterfly. I hope that everyone tries to use some of the patterns you find here and include them in a design of your choice. If you want to send them to me I will gladly share them here.

Remember, I am sharing these patterns and instructions with everyone so that you try them out and use them on your projects, all I ask is that you mention where you got the pattern and send people back here.

Tuesday, March 20, 2007

Free 3D Quilling Pattern Spinning Top

quilled 3d spinning top

Do you remember those Spinning Tops from when you were a child? They are a perrenial favorite. I can attest to this based on the fact that after I completed my current project the spinning top was quickly taken away. Unfortunately, somehow it has managed to get lost, but I am hopeful that it will show up soon. Luckily, they are not difficult to make so I can always make another one!

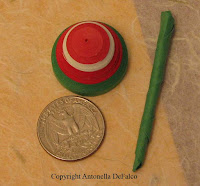
Several of my quilling friends have made these spinning tops in the past and the following is my interpretation. I have elected to use 6 full-length strips to make the spinning top that you see here (I have included a quarter in the picture for reference to the size). Note: you can use as many or as few strips as you would like. The fewer strips the smaller the spinning top.

quilled 3d spinning top
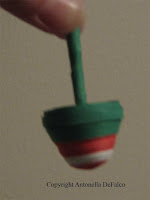
quilled 3d spinning top To make the base:

Take 6 strips, glued end-to-end, and roll a tight roll
Gently push the center out, creating a cup-like shape
Glue the inside to maintain the shape
Tip: You do not need to glue all 6 strips together at the same time. It is easier to glue them as you approach the end of your current strip.

One more tip: If you notice the basic shape of the base, you will see that it could easily become a skirt for a doll, or if you place 2 together you can make an egg-like shape... hmmm, think Easter!

Make a Spinning Stick (now, I do not know if this is the "official" name for this, but I didn't know what else to call it):
Take a 3 inch ( cm) square and cut it in half at an angle creating 2 triangles
Take one triangle and roll it to create the stick-shape

quilled 3d spinning top

To complete the top:
Place one end of the stick in the base of the top
Do this to position where you want to begin creating the top
Use the same number of strips as for the base
Continue to roll until you create a tight coil top
Glue the top to the base
Take a strip of paper and glue it around the seam of the top and bottom
Go around once or twice

Once everything is dry... spin your top!

Happy Spinning!
Copyright Antonella DeFalco

Technorati Tags: , , , , , , , ,

Did you know that today is the First Day of Spring? Today is one of those pivotal days where there is an equal amount of day as there is night. Of course, that does not mean that it is warm, but those days are around the corner (for us at least).

The official term for the first day of Spring is the "vernal equinox". As the Earth make its journey around the sun, this is the time where the Northern Hemisphere is tilted more towards the sun. So, for those of us in the Northern Hemisphere it is spring, for those of you in the Southern Hemisphere it is fall. On this day (generally around the 20th or 21st of March each year), sunrise and sunset are approximately 12 hours apart. Those scientific sites tell me that the day is actually a little bit longer, so it isn't quite equal, but that is ok with me.

Ok - let's debunk a myth.... Rumor has it that you can balance a raw egg on the first day of spring. In fact, there were some 100 egg-crazy New Yorkers who got together in 1983 to balance eggs, and in 1984 the number grew to about 5,000 to try this again. The theory goes that on this day, the pull of gravity is more equal because the sun is more directly overhead. Truth is there is no scientific evidence to prove this. So, although this may be something fun to try, if you can balance a raw egg today, you can balance one any day of the year.

But, go ahead and try, why not?

Some websites with family friendly crafts and information:


Happy Spring!
Copyright Antonella DeFalco

Technorati Tags: , ,

Sunday, March 18, 2007

Corned Beef and Cabbage - Fact or Fiction?

So, you think that Corned Beef and Cabage is the traditional Irish meal at St. Patrick's day? I have it on good authority that this just is not true. Corned Beef is apparently more of an English meal, not Irish. A meal that is eaten in Ireland is boiled bacon and cabbage.

So there you have it, and lest you forget, here is a funny poem by Frances Shilliday to help us remember:

GOOD GRIEF - NOT BEEF!
I just want to put something straight
About what should be on your plate,
If it's corned beef you're makin'
You're sadly mistaken,
That isn't what Irishmen ate.

If you ever go over the pond
You'll find it's of bacon they're fond,
All crispy and fried,
With some cabbage beside,
And a big scoop of praties beyond.

Your average Pat was a peasant
Who could not afford beef or pheasant.
On the end of his fork
Was a bit of salt pork,
As a change from potatoes 'twas pleasant.

This custom the Yanks have invented,
Is an error they've never repented,
But bacon's the stuff
That all Irishmen scoff,
With fried cabbage it is supplemented.

So please get it right this St. Paddy's.
Don't feed this old beef to your daddies.
It may be much flasher,
But a simple old rasher,
Is what you should eat with your tatties.

©Frances Shilliday 2004, please visit her website which debunks other myths including this little ditty.

Although it may not be the traditional meal, I must admit to you that I had Corned Beef and Cabbage on St. Patrick's day. Yes, it is true. I was first introduced to this meal by my husband and I have to say that I truly enjoy it with a nice side of spicy brown mustard. Shhh, don't tell, lest someone be angry, but I think that we will have some again next year.

Cheers!
Copyright Antonella DeFalco

Technorati Tags: , , , ,

Saturday, March 17, 2007

Happy St. Patrick's Day

Happy St. Patrick's Day!!!

I was interested in doing a bit of research into this green, shamrock filled day! So, here are the results.... some fun, interesting facts about this holiday.

St. Patrick's day is a day filled with the "luck of the Irish" and much green. Saint Patrick was the patron saint of Ireland who is credited with bringing Christianity to Ireland.

Would you like to hear some folklore? This is one of the most well know (at least I have heard of this before). The story goes that Saint Patrick Patrick stood on a hilltop (Croagh Patrick), and with only a wooden staff, drove all the snakes from Ireland. Apparently, no snakes were ever native to Ireland so this could not have happened, but it does make for a fun story. Many people believe this story is a a metaphor for the conversion of the pagans to Christianity.

The shamrock is one of the most identifiable Irish symbols. The shamrock, which was also called the "seamroy" by the Celts, was a sacred plant in ancient Ireland because it symbolized the rebirth of spring. It is believed that Saint Patrick used the three-leafed shamrock to explain the Trinity. The shamrock represented how the Father, the Son, and the Holy Spirit could all exist as separate elements of the same entity.

Have you heard what they do in Chigago? They dye the Chicago River green every year on St. Patrick's day. The first time they did this was in 1962. They used enough green vegetable dye to dye the river green for a week! Today, for environmental reasons, they only put enough in to keep it green for a few hours.

Some good Irish sayings while you make a toast today:

May you live to be a hundred years, with one extra year to repent.

As you slide down the banisters of life may the splinters never point the wrong way.

May your blessings outnumber the shamrocks that grow,
And may trouble avoid you wherever you go.

May you have warm words on a cold evening,
A full moon on a dark night,
And the road downhill all the way to your door.

May your neighbors respect you,
Troubles neglect you,
The angels protect you,
And Heaven accept you.

An old Irish recipe for longevity:
Leave the table hungry.
Leave the bed sleepy.
Leave the bar thirsty.

Green may be the color of the day, but did you know that blue was once the color associated with this day?

I hope you have found this entertaining.

This information was found on many websites by performing a search for "st patrick's day", including: www.history.com, wilstar.com/holidays/patrick.htm, http://www.st-patricks-day.com/index.asp, and wiki-pedia to name a few.

Enjoy!
Copyright Antonella DeFalco

Technorati Tags: , , ,

LinkWithin

Related Posts with Thumbnails