banner


Showing posts with label christmas quilling. Show all posts

Monday, December 23, 2013

Christmas Wishes Check out my featured Walkabout - My Ornament Collection

Antonella free quilling patterns printables and silhouette cut files
Antonella's collection of quilled ornaments

With Christmas literally around the corner, I wanted to share with you some of my favorite ornaments... I am sharing them with you via Pinterest in my ..... Christmas Wishes Walkabout - My Ornament Collection... I included my santa ornament above, I don't have a pattern for him at this time, but he was just so cute!

These are a few of my favorite things... 

=============================


Nativity Ornament - I used lots of my "toys" when I made this ornament. I used my cuttlebug and cut my Spellbinders ovals, I pulled out my Silhouette Cameo and cut this lovely nativity, and was able to find the perfect quilling papers to match the colors I used... a touch of glitter (of course) and some beautiful pearls...


Snowflakes on your tree... "I'm dreaming of a White Christmas..." and here is the perfect ornament for you... You can change the colors and make them all white, all pink or blue for a Baby's 1st Christmas, the possibilities are endless


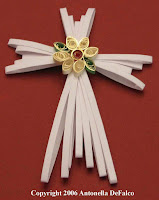
Some Spreuer technique ornaments... Quilled Cross ornament with easel card, Angel, and a Spreuer Christmas Tree...


The tender singing of these sweet blue birds will brighten your day as you watch them on your tree... quilling, Memory box dies, punch, and my spellbinders all make these ornaments sing...


Poinsettia Ornaments - these are easy to make, just run a thread through one of your petals and you are ready to go. I think I would add glitter to the second poinsettia ornament. Yes, I am addicted...


=============================


I hope you have a wonderful day!
Antonella Quilling Art

Tuesday, December 03, 2013

Throwback Tuesday Quilled Scroll Christmas Tree


Free Quilled Scrolled Christmas Tree

I am feeling very nostalgic today, and wanted to go back in time to my first Christmas blogging and share with you my Quilled Scroll Christmas Tree.... At the time I was new to blogging and wasn't sure if I should leave the patterns up and almost took it down. I have had such enjoyment sharing with you over the years. I hope you enjoy this project as much as I do!

This is one of my favorite projects of all time! I love scrolls and find that they are so versatile and quick to pull together in a pinch.

To make this lovely little Scroll Christmas Tree....

For making this tree I used 1/8 inch (.3 cm) wide strips. For this design you will need the following number of strips:

1 Heart-T-Scroll
  • 1 - 3 inch (7.62 cm) heart scroll
  • 1 - 3 inch (7.62 cm) T-scroll
Heart T-Scroll Shape

2 Kissing scrolls (they look like a heart don't they? and shouldn't every Christmas tree have lots of love?)
  • 4 - 3 inch (7.62 cm) S-scrolls - place them touching as below to make the Kissing S-Scrolls
Kissing Scroll Shape

Remaining branches
Double Scroll with Tail Shape

Topper
  • 1 - 3 inch (7.62 cm) red diamond

Trunk
  • 1 - 3 inch (7.62 cm) red S-scroll

To put this tree together, I recommend the following:
  • Place the Heart-T-Scroll down first
  • Line up your 2 kissing scrolls next
  • To keep a straight line, it may be best to work over a piece of wax paper with graph paper underneath. Then you can use the straight lines to make sure your tree is straight.
Along the left side and then the right side, starting at the top, add the following:
  • S-scroll, pointing down
  • Double scroll, pointing up
  • S-scroll, pointing down
  • Double scroll, pointing up
  • Double scroll, pointing down
  • S-scroll, pointing down

See the picture for placement. You can then adorn the tree as in this example with pearls.
Free Quilled Scrolled Christmas Tree
Free Quilled Scrolled Christmas Tree with Pearls

I hope you have a wonderful day!
Antonella Quilling Art

Saturday, December 22, 2012

Quilled Nativity Ornament and Snowflakes for Newton

quilled quilling nativity ornament
Good Morning Everyone!

Today I am going to share with you one of the new ornaments that I made this year... I usually share ornaments from prior years (lest someone get a sneak peak and ruin the surprise - lol)... I made an exception this year, because I think this ornament is perfect to go with the "Snowflakes for Newton" request I have included today.

I made this ornament (and have hand delivered it) to my friend Lucy.  I cut the nativity from my Silhouette Cameo cutting machine (yes, it is all Lucy's fault - lol)... The image is one I purchased during a sale they had recently... I am getting used to the cutting machine, and am still in the learning process...

I don't know how it works with you, but I truly believe that I am an "accidental" creator... Here is why... I cut the image from a few different colors, and as I peeled them off I placed them on the table I was working on, as luck would have it, I happened to place this one on a purple piece of scrap paper. As I laid it down, I was struck by the color combination and said that's it (see what I mean by "accidental")!

I have a cuttlebug (and you know how much I love my dies) so I whipped out my Spellbinders dies and tracked down my purple paper and cut an Oval and then layered that over a double sided paper that had that antiqued cream look to tie back in the image that I cut with the largest Lacy Oval die.

No project is complete without glitter, so I added glitter to the purple oval and then glued down the nativity.  I had my quilling supplies out and added a quick quilled element (we can call it a flower maybe - lol)... pulled out some pearls and added them as well.

Before I leave you today, I wanted to let you know about a special project I learned about from several online friends and bloggers.  This is for those affected by the recent tragedy in Connecticut.  If you are like me, every time you think about it your heart breaks.  So many lives and families hurt by the actions of one.  I have a young son, and cannot imagine him not returning from school one day.  That is why I selected the ornament above, it is through His mercy that these families will get through each day!

Snowflakes for Newtown
When school resumes for Sandy Hook, it will be in a new building.  There are many parent-volunteers who are working to ensure that the students are welcomed back by a winter wonderland.  They are doing this by decorating the new school with as many unique snowflakes as possible.  This is how you can help, and get everyone in the family involved young and old alike.

From the organizers: 
"We encourage senders to be as creative as possible, remembering that no two snowflakes are alike. Please make and send snowflakes by January 12, 2013 to the Connecticut PTSA"

Here is the Address for those wishing to contribute:
Connecticut PTSA
60 Connolly Parkway
Building 12, Suite 103
Hamden, CT 06514

I know it is a small thing, and hope that those who return find some wonder and awe in the snowflakes that will surround them.

I am joining these linky parties:
One Stop Craft Challenge - A Christmas Carol - mine is "Silent Night" inspired
The Answer is Chocolate - Link Party #84 - anything crafty
Alderberry Hill - Tis the Season 2012 Holiday Link Party

I hope you have a wonderful day!
Antonella Quilling Art

Lovely Quilled Winter Wreath Tutorial

quilled quilling winter wreath
Happy Wednesday Saturday! (as you may have guessed, I forgot to publish this post... you know what they say, the first thing to go is the memory... sheepish smile... but as a bonus, there will be 2 posts today :-)

It is a brisk day filled with sunshine today (it was, hope today will be too)! So nice to have the sun out and no rain in the forecast for the day :-)

I wanted to share with you a Winter Wreath project I did - this is one of my old ones... I used fringed flowers that create the wreath (this is an oldie but a goodie and there are lots of possibilities)

Wreaths are a lot of fun to make and use on your cards or as ornaments.  Or, if you go on a bigger scale, you can use them around your home...

The fringed flower at the top of the wreath is made in the following way:
  • 1 - 3 inch (7.62 cm) tight coil
  • 1 - 3 inch (7.62 cm) White fringed strip
  • 1 - 4 inch (10.16 cm) Green fringed strip
  • Glue the white and green fringed strips together at one end. At the end that is glued together, glue it to the red strip. Beginning with the red, roll the paper, keeping it tight and gluing it together.
  • After the glue has dried, place the flower on a hard surface and gently push down on the fringe so that the fringes are spread apart.  A tip is to take your needle tool or a pin and curl the edges as this will add a little extra to the fringes (you can do this if you haven't fringed a very dense flower).

The remaining 5 flowers are arranged around the wreath and are made in the following way:
  • 1 - 3 inch (7.62 cm) tight coil
  • 1 - 2 inch (5.08 cm) White fringed strip
  • 1 - 3 inch (7.62 cm) Green fringed strip
  • Glue the red, white and green strips together end-to-end Beginning with the red, roll the paper, keeping it tight and gluing it together.
  • After the glue has dried, place the flower on a hard surface and gently push down on the fringe so that they are spread out as shown.

To fill in the wreath, I did the following:
  • 8 or more - 3 inch (7.62 cm) teardrops that are placed between the fringed flowers to fill in the design.
  • 1 - 3 inch (7.62 cm) heart, see photo for placement
  • 2 - 3 inch (7.62 cm) curled strips (see photo). Cut the ends at an angle, and weave through the wreath for added color

I hope you have a wonderful day!
Antonella Quilling Art

Friday, December 07, 2012

Filigree Friday Christmas Card

Merry Christmas! 

filigree quilling quilled christmas card

I love making homemade cards, don't you? C'mon, admit it. I mean, how else are we going to attempt to use up all that lovely paper that is starting to take over your home one room at a time?

I love the crisp white and green against the red background.  The flowers are made using alternate side looping.  Alternate side looping is a technique where you don't use a tool, instead you fold your quilling paper  and wrap it to create the flowers.

I was going for a more modern look to this card, and placed a less traditional butterfly on the large flower... and let's not forget my scrolls, they are simple and easy to make and are so pretty.

The red card base is one that I bought at Michaels (a few years ago, when their $1 bin was actually a dollar).. yeah, what were they thinking when they made them $1.50? The cards were purchased embossed.

As I searched for a project to post, I selected this one because I really like these types of flowers and scrolls too :-)  I have to admit that this card was given as a birthday card, but the colors work for Christmas and I didn't take a picture with the sentiment - so don't tell :-)

Thank you for your kind words and encouragement!

Enjoy!

antonella


Tuesday, November 27, 2012

Throwback Tuesday Quilled Snowman and Birdhouse Ornament

Welcome to Throwback Tuesday!

quilled snowman birdhouse ornament


This is an opportunity for me to re-share something that I've shared with you in the past... This being the holiday season and all, I am going to be sharing some ornaments and Christmas themed items from Christmas past... (did you like that little scrooge reference? lol)

My first re-share with you is an ornament that I have shown you in the past, this time I am also going to share with you the tutorial to explain how I created this little guy (you can tell it is a boy because he is wearing a top hat).  I want you to know that this is more of a guideline, since I created this guy quite a while ago and don't quite remember all the sizes...

First, I cut a Birdhouse shape out of designer scrapbook paper, I chose this paper because it was felted, and brown, and had the most beautiful scrolls on it... Ok, my paper addiction is showing :-)

So, I accented the birdhouse with a nice red roof and base, for the entryway, I added a sparkly red circle....

I hand cut the holly leaves from some wide quilling paper and then quilled some nice, red, berries.  I started with a strip approximately 4 inches long and quilled a tight roll.

The center piece is this sweet, little Snowman:
Large Bottom Snowball
  • 4 full strips of white quilling paper
Snowball Face
  • 1-1/2 full strips of white quilling paper
  • I then punched several black "coal" buttons and eyes
  • Cut a small orange triangle
  • Added 2 wiggle eyes (they do make the snowman)
  • For his top hat, I cut an approximate 1 x 1 inch strip of scrapbook paper
  • ... and then cut a circle out of the same paper for the brim of his stylish hat
  • Cut a strip of ribbon for his scarf
  • ... and of course added lots of glitter

You throw in a little love and there you have it... a friendly snowman ornament!

I hope you are having a wonderful day!


Enjoy!

Saturday, January 07, 2012

Fabulous Filigree Quilled Blue Bird Ornament

quilling quilled blue bird ornament
Hello and Welcome!

I have a new addiction passion... I am in love with my new cutting dies... I now have a small collection of Spellbinders Nestabilities dies and these incredibly detailed Memory Box dies....

I have to share what I have done with them over the holidays... I made these super cute ornaments! It is always a bonus when the fun products you have purchased actually make your handmade gifts even more beautiful and special.

So my plan is to share some of the ornaments that I have made and also embark on my 2012 calendar project, so each month I will show you a new calendar page, I can see where this is taking me already, I cannot decide which images, so I may have more than one calendar - at least this is something useful that I can force my friends to take give to friends! lol

It is a new year, so I have lots of ideas and energy... now if I could just win the lottery so I could do all of them :-)

These dies are so much fun to use! I am really having fun cutting them out of different paper and seeing how they look, what I like best.... Oh, the possibilities - now only if I could get my imagination to catch up to those possibilities!

quilling quilled blue bird ornament
For this lovely Blue Bird Ornament I used the Nestabilities Lacy Ovals  -I picked those specifically because I knew I was going to make ornaments and I wanted to be able to have something so they would hang nicely, and this lovely die did the trick! I also absolutely had to use some of my new Memory Box dies, and this lovely Frosty Border is what I chose.

Well, maybe I should take a step back and tell you how the process works... You see the ornaments are for my son's teachers, so on those years that I think I will be able to make handcrafted ornaments he gets to decide what his teachers get... So, his music teacher needed an ornament with birds and music notes... So with that information in mind, I get to pull my hair out figure out how and what exactly to make... This year he was very specific that they had to be blue birds :-)

Ok, so now that I have birds and music notes, I really did need something for them to be resting on, and did I tell you I absolutely love my Memory Box dies? So you see I had to find a way to include them, I really did! And this lovely "Frosty Border" die arrived and the idea was born.

Now, for my blue lovelies, I could have chosen quilling strips that were blue, but as I was placing my order for Christmas colored quilling strips, I happened upon this lovely paper called "Touch of Blue Gilded on Edge" and I thought, now that will make a statement!  Isn't it pretty? The base paper is white, and on the top edge is this beautiful shimmery blue!

free quilling quilled blue bird tutorial pattern
To make the birds I followed the same process, I just used a little bit more paper for the larger bird!
  • I started with the tail feathers - I really did, and you'll find out why in a sec... So, for the tail feathers...
  • 2 - 2 inch (5 cm) strips of paper, fold them in half, and curl the ends.  
  • Now, I rolled the teardrop for the body of the bird
  • 1 full strip of my Touch of Blue quilling paper, rolled and shaped into a Teardrop
  • Don't glue it just yet... but hold on tight to the pinched end, because this is where the tail feathers go :-)
  • Where you would normally glue your teardrop, you will take those tail feathers and glue them to the bird before you glue that outside strip to hold everything in place.  
  • Squeeze tightly to get a nice set of tail feathers
Beak, Feet, and Wing
  • For these remaining pieces, I took small scrap pieces and added them to the cuties
  • I can't give measurements, because I literally cut small pieces (and didn't measure, just figured what I thought would be proportional)
  • A small piece cut and bent for the beak and glued to the nice rounded end of the teardrop
  • A small piece bent in half, and then bent again for their feet
  • Finally 2 small pieces bent and rolled for the "wing"
I am entering this in the Sentimental Sundays "Snow, Blue, and/or Glitter" and my project has all 3 Yeah :-)

Make It Monday - Anything Goes!

I used the following products on this ornament:

Spellbinders Nestabilities Lacy Ovals and Classic Ovals


Memory Box Frosty Border from Ellen Hutson
Memory Box die Frosty Border

Quilling Paper from Whimsiquills (thanks Pat)

Enjoy the ride!! Copyright for Personal Use Antonella DeFalco

Friday, December 02, 2011

Filigree Friday Cross Ornament

Happy Filigree Friday Everyone!!

quilling quilled spreuer cross dove christmas ornament
I hope that you are enjoying your day! It is too early to know for certain, but I am hopeful today will be nice and sunny (a bit on the colder side, but the sun will definitely go a long way to making it a beautiful day!)

Wow! The holidays are here!!! I cannot believe it, last week was Thanksgiving (for those of you who live in the states) and ourselves with lots of food and goodies... I personally love the goodies - lol!  And now we are almost a week into Advent! Christmas is just around the corner for us!!

I am way, way, way behind in my Christmas ornaments... I am definitely starting to feel worried, because every time I think that I have set aside time to work on them something comes up!! I actually took off yesterday and today (now I didn't have the whole day planned to work on them, but you would think I would have found at least an hour yesterday - nope, didn't happen!) Between running to do something in the morning with my stepdaughter (that was supposed to be 3 hours and ended up being 5 hours - travel time included) and then regular afters school stuff and dinner and yeah, let's not forget the long phone conversation with a friend who moved to Florida, I kinda didn't get anything done... but today will be different... Positive Thinking!!!  and for extra motivation, my friend Lucy will continue to provide the necessary positive reinforcement as she continues to design her awesome Christmas cards this year!!

So, because I have been so bad, I decided I'd share an ornament I made a few years ago.  This is a cross ornament with a sweet dove in the center, the ornament is hanging from an easel card so it could be easily removed or the card itself could be where the ornament was displayed.

quilling quilled spreuer cross dove christmas ornament
Here are some links to similar projects that have more details about the techniques used, if you want specific instructions for this cross, please let me know and I will post them....
Easel Cards and Spreuer Crosses (click on the pictures to go to those posts)
quilling quilled easel card graduation
Easel Card - Graduation

quilling quilled easel card snowman
Easel Card - Snowman

quilling quilled spreuer cross christmas ornament
Quilled Spreuer Cross - Christmas

quilling quilled spreuer cross christmas ornament
Spreuer Cross - Communion

Have a wonderful day and may it be super productive!!!

Hey, I've linked up to this wonderful 26 Day Christmas Craft Marathon Linky Party - http://lisascraftblog.blogspot.com/2011/11/christmas-craft-marathon-linky-party.html

and The Winter Holiday Craft Party - http://www.craftsunleashed.com/index.php/seasonal/holidays/winter-holiday-linky-party/  

Enjoy! Copyright for Personal Use Antonella DeFalco

Monday, January 24, 2011

Free Quilled Angel Pattern

Oh my, are you ready for this? A free quilling pattern!!! Yeah!!!

I know, there has been a real dry spell hasn't there? Well, this pattern is one of my favorites.  I love making Angels and this little sweetie is really special.  I hope you enjoy giving her a twirl.

This angel is made using the Spreuer technique (some people refer to the tool as an Onion Holder)
Follow this link to my previous instructions on the Spreuer Technique. 

I call her My Silvery Angel

Head

  • 2 strips of paper, grape roll (this is a shaped tight roll)
  • Shape the tight roll by gently pushing center up
  • Don't forget her Halo - no self respecting Angel would be found without one :-)
  • The halo is just a scrap - I wrapped it around my thumb to get the shape and then glued it to the back of her head to keep it in place
  • I also created a tight roll with an open center and glued it to her head, this is where you will attach the hanger

Wings (Make 2 of these, refer to photo with numbers)

  • Start at 10 - 9 - 8 - 7 - 5 - 4 - 3
  • Yes this is not a typo, I skipped 6
  • I found that it makes a more realistic wing that way (at least to me)

Body (Only make 1 of these)
  • The body is a little longer than the wing to give it proportion
  • This is another one of my non-traditional Angel bodies
  • Her dress is all the same length
  • Start at 11 in the center
  • Go 11 - 11L - 11R - 11L - 11R
Note that this is a little tricky to get that triangle shape for her dress.  As you wrap your quilling paper around you will need to play with the dress a bit to make sure that the strips don't overlap too much.

The rest is all the fun stuff that adds a bit of bling and personality to the project

Her hands are holding a little red spiral rose (I know hard to tell with the picture because I put a drop of crystal effects in the center and took the picture before it had dried clear)
Her hands are two 8 in Shaped Teardrops

For the spiral rose check out this tutorial that I created a while back.


For the necklace, a scrap strip of Green (maybe about 4 inches) made in the Spiral shape and then wrapped around her neck (this covers the seam where the head and dress attach and also adds a bit more strength to this area)

I used the crystal effects to lightly paint the angel and lightly glittered her

This ornament was attached to a beautiful red card (can't take credit for it, it was in a $1 pack at Michaels)

I hope you like her.

Enjoy! Copyright for Personal Use Antonella DeFalco

Friday, December 18, 2009

Free Quilled Wreath Pattern

free quilling quilled wreath pattern
I love putting up wreaths, don't you? This wreath serves double duty as an ornament too.


For this pattern, I used my quilling to embellish punched items.


I took my 2 and 1-1/2 inch circle punches to create the actual wreath.


Next I punched leaves from various green papers. I arranged the leaves so that the covered the entire wreath.


Punch a small hole in what will be the top of your wreath and put a jump ring through it. This will be where you will attach the ribbon for your ornament. I find it easier to put it in before I add the remaining embellishments.


Make approximately 20 - 3 inch (7.6 cm) Green Shaped Teardrops


This is the fun part, arrange them on the card. For this card I made the following arrangements:


Group 3 spiral roses at the top and place about 5 - 6 green teardrops between and around the spiral roses.


Group 3 spiral roses at the bottom and place approximately 3 green teardrops between the spiral roses.


Add 1 spiral rose with 2 green teardrops to the middle left of the wreath.


Add 2 spiral roses with 3 green teardrops to the middle right of the wreath.


I added a few green spirals for good measure and there you have a beautiful wreath. This wreath is perfect for Christmas in greens and reds. It is the perfect addition to a card with a bonus ornament gift for friends and family.
For some added interest, make your card look like a door so that it appears that the wreath is hanging outside on your door.


Why not give it a try?


Wednesday, December 31, 2008

Free Winter and Christmas Quilling Patterns


Wow! Can you believe how many patterns I have posted on this site? I know that I can't.

In an effort to make life easier for all of us, I am going to try to simplify the pattern lists for everyone. I have found many patterns along the way that I did not have a link to, so this exercise has definitely been worthwhile.

Please find a list of patterns related to Winter and Christmas. Each of these patterns would be the perfect embellishment for a card, scrapbook page, or framed art. Contact me if you have questions:


Trees and/or Christmas Trees (any of these patterns can be modified to be something other than a Christmas tree)
  • Loose Coil Christmas Tree - very easy Christmas Tree design using loose coils (not glued), can be done by children and adults alike.
  • Scroll Christmas Tree - I love the look of this tree. It is made using S-scrolls, a Heart-T-Scroll, double scrolls and kissing s-scrolls. This project will be available for a limited time.
  • Triangle Christmas Tree - basic design, using triangle shaped coils to make trees.
  • Spreuer Christmas Tree - a very clean, basic Spreuer tree with lights and a star on top
Winter and Christmas Patterns:

  • Birdhouse of Love - combines paper piecing with quilling to create a one-of-a-kind winter white and green birdhouse.
  • Winter Wreath - in the spirit of Advent, I have created a wreath to share.
  • Lovebird Birdhouse - This one has a new design of mine, my S-scroll love birds, check them out.
  • Heart throb Snowman - This guy is all dressed up and ready for a night on the town.
  • Gilded Poinsettia - this gilded paper makes this poinsettia breath taking.
  • Poinsettia - a traditional poinsettia with a fringed flower center.
  • Fancy Ornament - his is a small ornament for your scrapbook Christmas layout, or Christmas cards, or possibly for your tree.
  • Christmas Angel - This Angel is red and green and has curly hair. She also wears her heart on her sleeve. You can use this basic pattern for so many things including a baby announcement or any religious event.
  • Christmas Cross - A sweet Christmas cross with a flower in the center. This is a traditional cross shape in a non-traditional spreuer shape.
  • Snowflake Christmas Card - 5-point blue and white snowflake ornament that is attached to a stamped card.

Don't forget to check out the other free pattern links on the left hand side menu.

Enjoy!
Copyright for Personal Use Antonella DeFalco

Technorati Tags:
, , , , , , , , ,

Saturday, December 15, 2007

Free Quilled Christmas Poinsettia

quilled christmas poinsettia
Here is a simple Quilled Christmas Poinsettia project. This is a classic that is perfect to add a string and make an ornament to hang on your tree!


Bottom Layer

  • 6 - 6 inch (15.2 cm) Red Marquise for petals
  • 2 - 6 inch (15.2 cm) Green Teardrop for leaves
  • Arrange 3 red petals then the green leaves and complete with the remaining 3 red petals

Top Layer

  • 5 - 6 inch (15.2 cm) Red Marquise for petals
  • 1 - 3 inch (7.6 cm) Yellow fringed flower
  • Place the fringed flower in the center and glue the red petals around the flower
***UPDATED July 2010:  I am updating this post to address a question I had from one of my blog readers who was having difficulty getting the bottom petals to line up, so I am adding this tip:  Since the top layer covers the bottom layer, you don't have to get the points of the bottom layer to meet exactly in the center.  This is especially true with this flower because the top has the fringed center.  This gives you some play with the actual petals and gives you room to arrange it so that it looks the way you want it.  You will then cover the "hole" with the top layer and no one will ever know.  I hope that this tip helps you, remember, you can use this on any layered flower and no one will ever know!

Have fun with this project. You can replace the red with White and create a white poinsettia, or mix the white and red together to make a nice hybrid.


LinkWithin

Related Posts with Thumbnails