banner


Sunday, January 30, 2011

2011 One World One Heart

Sorry, I jumped the gun a bit and pulled my last post.  Please stay tuned...

My post will come back up at midnight, Sunday, January 30th instead of when it became Jan 30th (sorry)


You will find all the details here, this is a look at some of what is to come:
One World One Heart is an international blog hop whose purpose is to have bloggers from around the world meet and find out a little about each other.

  • I will be participating in this final event... 
  • I will have a giveaway open to anyone with a blog!
  • The only thing you will have to do is make a comment on my official post (not this one - I have turned off comments on this post so that there is no accidental commenting - lol)
  • Make sure I have a way to reach you (your blog information is great as long as you have an email on your profile)
  • Come back on February 17th and I will announce the winner.

See, easy! Again, so sorry for jumping the gun...

If you have a blog, consider joining us, this is a great event.

**Update** Sprinkled throughout are some of the items that I have given away in previous years.... Hopefully it will encourage you to participate this year :-)


Enjoy! Copyright for Personal Use Antonella DeFalco

Saturday, January 29, 2011

Blue Snowman Card

quilled quilling snowman
Can you believe it, I am posting another project this weekend, and don’t forget to stop by on Sunday, January 30th because the final One World One Heart Giveaway starts.

I love this style of quilling.  Just thought I’d share some of my quilling love with you.
Once again, my handsome little boy chose the subject:  “A Snowman” and I put my finger to my head and thought about it, and then thought some more.  I was under the gun on this one, my sister-in-law called me on Friday to say that she was going to have my nephew’s birthday party on Sunday.  So I was a little worried I wouldn’t get one made in time….

The base of the card is a Bazzil blue that is 4” x 12” folded in half to be 4” x 6”.  I then took some snowflake paper and tore it so that the torn edges would be part of the snowdrifts.  I tore 3 pieces and glued the longest directly to the base card, then used a dimensional tape to glue the next two layers.  I used dimensional because I wanted to add a pull out tag.  The tag is also torn and is placed between the 1st dimensional layer against the back of the front of the card.  What you cannot see is that the tag is also a gift card holder.  The tag is cut extra long and folded up in the back which is where the gift card is tucked away.

For the Snowman I took a long strip of 1/4” wide paper and wrapped it around a bottle – approximately 2” in diameter for the body and a smaller bottle for the head.  Then comes the fun part, cut strips of paper (I used blue, green, and purple) and create whatever shapes you want.  I love the coils and scrolls so if you’ll note, this snowman is filled with them.

quilled quilling snowman


I then added a scarf and some matching jewels and he was ready for a birthday bash.  I know that you are thinking that you may be wondering why his scarf is brown, well I wanted to do something with kraft paper since that is everywhere these days and I wanted to use some (if you look closely you will see that it really isn't kraft paper).  He is topped off on both the base tag and on the quilling strips with crystal accents (yes, I love this stuff!)

I have decided to enter this fun fella in the following challenges:

Our Daily Bread Designs “Blue” challenge (as you can see he his really blue)
The Whipperberry  “show us what you have a flair for” challenge – my flair is quilling.


quilled quilling snowman

Enjoy! Copyright for Personal Use Antonella DeFalco

Friday, January 28, 2011

Cupcake Birthday Card

I’m Obsessed I tell ya... I know that is normally not a good thing, but I must be, because almost all of the cards I have created lately have been gift card holders.  Yes, that is true, I am building quite a collection of photos of gift card creations that I have made (I promise to start posting more of them for you)... Most of them inspired by something that I have seen.  

It has been a ton of fun making them and oh so gratifying when the person who received it (or their mom) says something about how much they liked it - yes, I do melt when someone says something nice about something I’ve done (which is why I so love the comments I receive from you).

So, I have decided to enter this card into a challenge.....

This is a cupcake, gift card holder.  My son likes to give me challenges and ideas (especially when the card is for one of his friends or cousins).  He almost always gives me something that will make me scratch my head to try to figure out how to make his request come alive (well, not literally alive).  

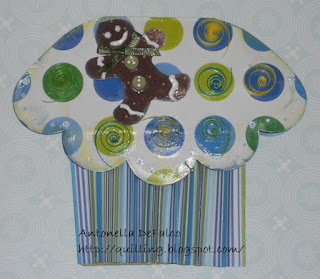
So his challenge for me this time was he wanted a card with a cupcake and he wanted a gingerbread man on the cupcake... I do not remember which cupcake card it was that inspired the cupcake, but I thank all of you who have posted pics of your cupcakes.... I took the idea and drew up a little sketch to make sure I got approval from the requester (lol) and ended up with the following card.


quilled cupcake gift card holder

For the top of the cupcake I used paper that was pre-cut in a scallop design that I got from the bargain bin at Michaels.  After I put the card together I wasn’t thrilled with the colors - the paper didn’t pop enough for me, so I tried to add some embellishments and that helped a little... and in the end it looked better in person than the picture I took shows.

For the cupcake, I created my own pattern.  Take a look at the photo with the cupcake open, and you can see that the base card started with a strip of 4” x 12” paper. I used my circle punch on one end, and folded the paper to get the general shape. I then added the scalloped paper and glued it to the top flap and cut around the top to make it rounded (like the icing on a cupcake).

quilled cupcake gift card holder


I added some quick open coils and placed them on the "dots" - my thought was like the confetti you can get on your cupcakes sometimes.

The Gingerbread man was based on a gingerbread image I printed and then used as a template to cut out of my brown paper. I then added his "icing", a bow, and 2 buttons. I think he is adorable. He is actually placed on the card with dimensional tape.

Finally, I added the "shine" to the project by painting on the crystal effects.

Hey, I am going to be a busy girl this weekend. I am hoping to participate in a quilling blog hop - see the link on my sidebar (I will post tomorrow if I didn't miss the deadline) and Sunday kicks off the final One World One Heart Giveaway... Stay tuned because I will be giving away a quilled item to one lucky winner :-)

Hope you are having a wonderful Friday!

Enjoy! Copyright for Personal Use Antonella DeFalco

Monday, January 24, 2011

Free Quilled Angel Pattern

Oh my, are you ready for this? A free quilling pattern!!! Yeah!!!

I know, there has been a real dry spell hasn't there? Well, this pattern is one of my favorites.  I love making Angels and this little sweetie is really special.  I hope you enjoy giving her a twirl.

This angel is made using the Spreuer technique (some people refer to the tool as an Onion Holder)
Follow this link to my previous instructions on the Spreuer Technique

I call her My Silvery Angel

Head

  • 2 strips of paper, grape roll (this is a shaped tight roll)
  • Shape the tight roll by gently pushing center up
  • Don't forget her Halo - no self respecting Angel would be found without one :-)
  • The halo is just a scrap - I wrapped it around my thumb to get the shape and then glued it to the back of her head to keep it in place
  • I also created a tight roll with an open center and glued it to her head, this is where you will attach the hanger

Wings (Make 2 of these, refer to photo with numbers)

  • Start at 10 - 9 - 8 - 7 - 5 - 4 - 3
  • Yes this is not a typo, I skipped 6
  • I found that it makes a more realistic wing that way (at least to me)

Body (Only make 1 of these)
  • The body is a little longer than the wing to give it proportion
  • This is another one of my non-traditional Angel bodies
  • Her dress is all the same length
  • Start at 11 in the center
  • Go 11 - 11L - 11R - 11L - 11R
Note that this is a little tricky to get that triangle shape for her dress.  As you wrap your quilling paper around you will need to play with the dress a bit to make sure that the strips don't overlap too much.

The rest is all the fun stuff that adds a bit of bling and personality to the project

Her hands are holding a little red spiral rose (I know hard to tell with the picture because I put a drop of crystal effects in the center and took the picture before it had dried clear)
Her hands are two 8 in Shaped Teardrops

For the spiral rose check out this tutorial that I created a while back.


For the necklace, a scrap strip of Green (maybe about 4 inches) made in the Spiral shape and then wrapped around her neck (this covers the seam where the head and dress attach and also adds a bit more strength to this area)

I used the crystal effects to lightly paint the angel and lightly glittered her

This ornament was attached to a beautiful red card (can't take credit for it, it was in a $1 pack at Michaels)

I hope you like her.

Enjoy! Copyright for Personal Use Antonella DeFalco

Friday, January 21, 2011

Do You Love Paper? Enter for Chance to Win!

Hello Everyone,

This is very exciting.... I love paper and I know you must love paper too, I mean who doesn't? And aren't these papers to die for???


There is an exciting giveaway for Core'dinations Color Cardstock - the best part is that if you click my link below it gives both of us a chance to win.... Oh please, please, please, click this link and give us both a chance:

http://pages.email.darice.com/core2/p?eKey=ecl1uIc0umjl4ug4dtElF0XSgE

If the link doesn't work for some reason, copy and paste it into your browser.

I hope you give it a click :-)

Good Luck! Buona Fortuna!
Antonella :-)

Saturday, January 15, 2011

Chance to Win a Blog Makeover

My friend Toni at 3 AM Designs posted about this wonderful opportunity to win a free blog makeover from Serendipity Designs.

VS Button

For a chance to win, you have to click this link and go to her blog.  Read the entire post and follow the instructions to be entered for your chance.  She will announce her winner on Monday, January 17th.

I think that you will agree that this is a very generous giveaway.

Good Luck!
Antonella :-)

Wednesday, January 12, 2011

Angel Wings Card

Angel Card
Yeah! Here is one of the cards that I've created recently. I must admit that this was fun because I have never made a card like this before.  It is free standing with a circle window, peeking from the window is an angel medallion. 

  • I cut 2 pieces of cardstock 6 x 5 inches (DCWV the Street Lace Stack)
  • I scored each piece at 1/4 inch and 1/2 inch on each of the short sides
  • Since this paper was not double sided, I needed to line the inside of what would later become the back piece.  I used some of my paper stash and found Autumn Leaves assorted scrap pack and mounted it on the back.
  • I then punched a 2 inch circle centered in the front piece.
For the angel medallion I used my angel punch (not sure what brand the punch is, it is not labeled on the punch and I don't remember).
  • I punched 7 angels and scored them in the center.  I then glued them to each other, to make a half circle / fan.
  • I used my Fiskars scallop punches and punched one of each size.  
  • Mounted the Angels to the scallops and then centered them so that it could be seen through the window in the front.  
  • It would not be complete without some "bling" so I used my glitter glue for some sparkle.  I placed a dot of glue on each of the scallops.  It really changes the whole look.
 I thought that the circle window opening looked a little plain, so I carefully cut 2 circles and layered them over the hole.

I used another leftover scrap of the background paper and layered it on the front of the card.

I made a pretty bow to layer on the strip

No card is complete without a quote or sentiment, so I used a free sentiment from Rainbow Echo Designs it was Tameko's sentiments #2  "It is the little blessings that help us to see just how lovely life can be."

I again used my scallop punch to punch it out and then punched 1/16 inch circle punches in each of the scallops.  I used the scrap circle cutouts from when I was cutting for the opening.

There are a few challenges that I am entering this card into, they are:

  • Sentimental Sundays ~ "Anything With Wings" (Jan 18)
  • Aly's  Sunday ~ "Things With Wings" (Jan 22)
  • My Time To Craft ~ "Up in The Air"
  • Cupcake Craft ~ "Something New" (this is the 1st time I have attempted this type of card) (Jan 16)
  • Rainbow Lady ~ "It's All New to Me" (this is the 1st time I have attempted this type of card)
  • Allsorts Challenge ~ "Fancy Fold" (this new fold of the card I made)
  • Our Daily Bread ~ "Something Old, Something New" (Something old - my background paper and angel punch, Something new - the card style itself and the sentiment)

Angel Card

Note: This is not my original card design.  I was going to include the link to the tutorial for the card and cannot find the card that inspired it.  I promise to keep looking for it and will update this post with the link. 


Enjoy! Copyright for Personal Use Antonella DeFalco

Whimseys Wednesday Giveaway

You will have to do this one quick.  You have 24 hours from today, Wednesday, January 12th for your chance to win a Whimsey Stamps rubber stamp.  So stop by for a chance to win :-)


Good Luck!
Antonella :-)

Tuesday, January 04, 2011

Giveaway by Lisa Lectura

This is a great opportunity for someone out there.  Lisa Lectura Creations has this beautiful painting that she is offering to one lucky winner for her 3rd year BloGIVErsary.


I love her work and take a peek at her incredible talent when I can.  Click here to pop over to her post and enter for your chance to win.

Good Luck!
Antonella :-)

Giveaway at All Things Paper

Hello Everyone,

Sorry for the dry spell... I will come back and post more later, but I wanted to share an opportunity for you to win something over at Ann's blog "All Things Paper"

She created this adorable card that was published in Card Maker Magazine and she is offering the card and a free copy of the magazine.  The card is called "Chick Chat" isn't that adorable? Click here to Hop on over and comment for a chance.


Hugs,
Antonella :-)

LinkWithin

Related Posts with Thumbnails