
 The shapes we will learn about today are the scroll and spiral shapes.
All of the shapes in the attached picture were made using 4" (10.2 cm) pieces of quilling paper in the 1/8" (.3 cm) width. If you recall, in the previous Quilling Instructions - Coil Shapes, it was recommended that you tear the end that you will glue since the torn edge blends in and is not as visible as the straight cut end. Since you do not glue the end, and in general the end is not visible, you can either tear or cut these strips.
Before we go too far, I wanted to talk about something that you will hear quillers (or any paper artist) talk about and may not know what the reference means. The term is called "conditioning the paper." The best way I can explain this to you is to make you think about what you do to ribbon on a present. With that in mind, you take your finger nail and run it along the end of your quilling paper. The end result is a strip that begins to curve. You can get the same effect by using your needle tool. The reason you want to do this is that it loosens the fibers in the paper and makes it easier to shape.
Now onto our shapes!
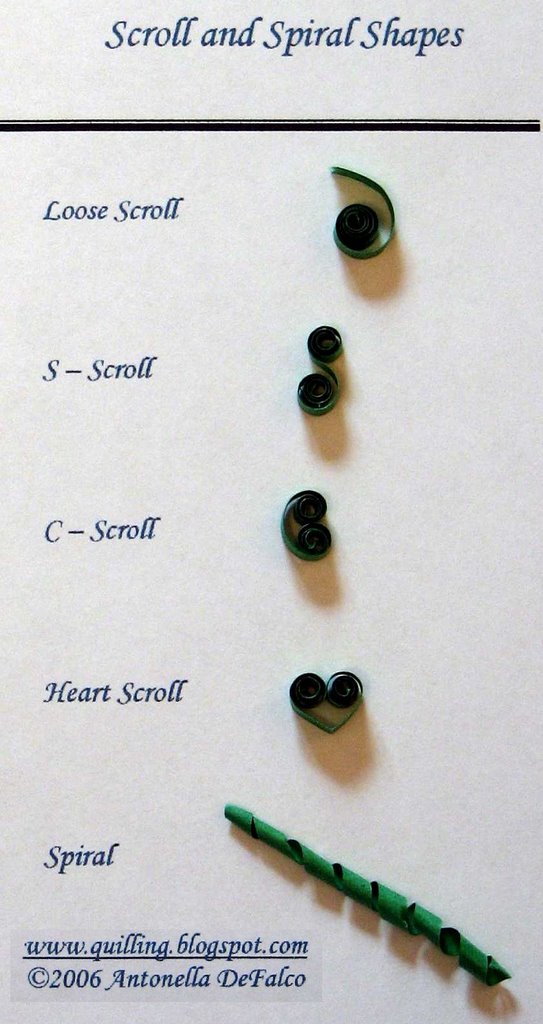
Loose Scroll
- To make this shape, you will notice that it looks a lot like the coil shapes we previously made
- So, start with the coil shape, but don't coil the entire strip
- Leave the last tiny bit so that it remains loose
- This shape is actually kind of neat to use - it gives a very loose look to many patterns that you might use the loose coil for, and if you use your imagination think of waves, clouds, even musical notes, so many options... just with changing the length of the coil
- As you can see, this shape gets its name because it looks like an "S" when you are finished
- For this shape I like to condition both ends of my strip, so I do this so that one end is curved one direction and the other end is curved in the other direction
- Now the paper is ready
- Take your tool and place the paper in the end and begin rolling the paper in toward the center - but in opposite directions!
- The shape that I have both ends are approximately the same size, they do not have to be. One end can be smaller than the other. This is a personal choice and may also depend on what you are going to use the shape for.
- As you can see, this shape gets its name because it looks like a "C" when you are finished
- This shape is very much like the S-Shape above and you prepare your strip in the same way
- When you condition the paper, make sure that the paper curves in toward itself (so both ends are curved toward the center of the paper)
- The difference is that you roll or turn your paper in toward eachother so that they meet in the center
- This shape is also referred to as an Open Heart
- First I take the paper and fold it in half
- Next, you want to condition your paper the same way you do for a C-Scroll
- Finally, roll or turn your paper in toward the center
- I roll it until I get to the bottom and then start on the other end
- This shape is not really a spiral shape, but I have included it here anyway
- You will need to use your needle tool to get this to work
- The key is to moisten the end of the strip - you can do this either by using a moist towel or sponge (this is the politically correct way
- I must admit, that many quillers approach this by and to quote a very funny woman, "donating some dna" and licking the end of the paper
- You take this paper and wrap it around your needle tool
- The trick is that you want to start at the tip and continue to wrap up your tool
- As you approach the handle, you want to start sliding the paper off of the tool so that you can continue to wrap the spiral shape until you reach the end of your strip
- Many people will take very long strips (by attaching them end to end) and will use it to outline a photo mat - not an easy task to do so and keep it even
Copyright Antonella DeFalco

0 comments:
Post a Comment