
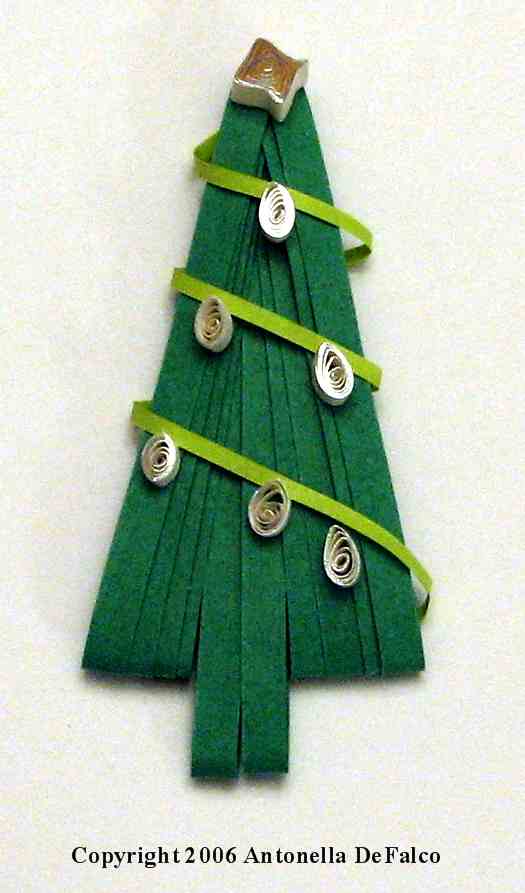
On the 14th Day of Quilling we made a Spreuer Tree and decorated it with some lights.
The pattern for today is a very simple tree with a splash of gilded lights using the Spreuer technique. For this project I started wrapping in the center and then wrapped to the right and then the left. You will see me write R or L to indicate this, please remember that it will turn out the same if you go the opposite sides as long as they are even and you continue to alternate. I am providing my instructions this way, because I needed to pick a direction.
For the basic tree, do the following:
- You will need approximately 24 inches (60.96 cm) of 1/8 inch (.3cm) wide strip
- Start 15 - 15 - R13 - L13 - R13 - L13 - R13 - L13 - R13 - L13 End
- You will notice that I did 2 times around the center 15 to create the tree trunk, and then continued to make the remainder of the tree by alternating along the 13th tooth.
To make the lights I used 1/16 inch (.15 cm) wide strip
- I simply wrapped it around the tree 3 times and glued it to the back at the top and bottom
- For added support I glued at a few points to anchor it to the tree
- 6 - 3 inch (7.62 cm) 1/16 inch (.15 cm) teardrops for the lights
Finally, 1 - 3 inch (7.62 cm) diamond for the star at the top.
The trees themselves are relatively quick to make. The lights can take a little bit of time. I took my 1/8 inch (.3 cm) strips and cut them in half to get the 1/16 inch (.15 cm) wide strips.
Enjoy!
Copyright Antonella DeFalco
Technorati Tags: quilling, spreuer, paper filigree, filigrana, free quilling pattern, christmas quilling, free pattern, naqg, childrens crafts, spreuer Christmas tree

1 comments:
very cute, thanks for sharing!
Nati from Brazil
http://natiquill.blogspot.com
Post a Comment