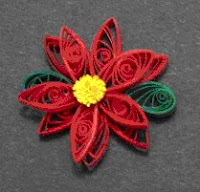
Here is a simple Quilled Christmas Poinsettia project. This is a classic that is perfect to add a string and make an ornament to hang on your tree!
Bottom Layer
- 6 - 6 inch (15.2 cm) Red Marquise for petals
- 2 - 6 inch (15.2 cm) Green Teardrop for leaves
- Arrange 3 red petals then the green leaves and complete with the remaining 3 red petals
Top Layer
- 5 - 6 inch (15.2 cm) Red Marquise for petals
- 1 - 3 inch (7.6 cm) Yellow fringed flower
- Place the fringed flower in the center and glue the red petals around the flower
***UPDATED July 2010: I am updating this post to address a question I had from one of my blog readers who was having difficulty getting the bottom petals to line up, so I am adding this tip: Since the top layer covers the bottom layer, you don't have to get the points of the bottom layer to meet exactly in the center. This is especially true with this flower because the top has the fringed center. This gives you some play with the actual petals and gives you room to arrange it so that it looks the way you want it. You will then cover the "hole" with the top layer and no one will ever know. I hope that this tip helps you, remember, you can use this on any layered flower and no one will ever know!
Have fun with this project. You can replace the red with White and create a white poinsettia, or mix the white and red together to make a nice hybrid.
10 comments:
WOW! I am loving your quilling. You are tempting me to try this. The turkey is so cute too.
I hope you do give this a try! Would love to see it if you do! hugs, antonella :-)
I am just learning to do quilling. Your instructions are very easy to follow. Thankyou. - Jan, New Zealand
I have had a go at your Poinsettia and made a card. How do I post it on here? Thankyou - Jan
Jan,
Thank you for your comments. This is so flattering!
I would love to share your picture. If you send me a picture and some information about you I will post it to my blog!
Hugs and Happy Quilling!
Antonella :-)
A couple of years ago, I decided to do quilling for a 4-H project. All I had as far as how to do quilling was pictures...no instructions. I did ok with the easy stuff like butterflies and ducks, but that's easy. I've been looking into some harder things for this year's quilling project. I will definitely use a couple of your designs; you have pictures AND instructions for cute designs!!!
You are so welcome!!! I am always happy when people are able to use my patterns to help share and spread the news about quilling!!!! I hope you let me know how the 4H fair goes.
Hugs,
antonella :-)
Just came across your blog. I am new at quilling!!!! Loved the patterns!!!!
Hello Sue and Bill... would love to hear from you and see what you've done. best wishes! Hugs, antonella :-)
Quilling is a brand new paper hobby for me and I am really enjoying the information and patterns here. Thanks, Tamara
Post a Comment