banner


Showing posts with label thanksgiving quilling. Show all posts

Thursday, November 27, 2014

Happy Thanksgiving!


A special "Happy Thanksgiving" wish for all my friends in the US

We have a snowy Thanksgiving this year, very unexpected.. looks so pretty, but definitely made traveling a bit of a challenge yesterday. We will be traveling today to visit with family.

Here are some previous projects, may you be safe and happy today!

Gobble til you Wobble Free Printable from Antonella at www.quilling.blogspot.com
Click here for the Free Gobble til you Wobble Printable


Thankful for Every Moment that has Passed free printable from Antonella at www.quilling.blogspot.com
Click here for the free Thankful for Every Moment that has Passed printable

Quilled Turkey pattern from Antonella at www.quilling.blogspot.com
click here for free Quilled Turkey pattern

Quilled Turkey pattern from Antonella at www.quilling.blogspot.com
click here for free Quilled Turkey pattern

 Check out my Link Parties to see the badges of all the lovely places where I am linking to.

I hope you have a wonderful day!
Antonella Quilling Art

Thursday, November 24, 2011

Happy Thanksgiving!

A quick note to wish you a Happy Thanksgiving!  If you are not in the states, I wish you a day of comfort and family!

Thanksgiving is one of those holidays where the focus is on family and giving thanks for all that we have! I hope that everyone out there can find both today!

From our home to yours - have a Wonderful Day!

If you are interested, the poem from yesterday in a printable format!

free printable thanksgiving


As always.... I am happy to share my tutorials and freebies / printables with you, I only ask that you do the following:


  • Please leave a comment if you download one of my freebies / printables, I would love to hear from you and get to know what everyone likes
  • If you enjoy the things I share with you, please become a follower so that you will see all the new stuff when it is posted (no pressure, join only if you want)
  • Please do not share any of my digital images, printables, or tutorials directly with others, but please do send them on over to me so that they can peruse and collect the images themselves.
  • I would be thrilled and honored if you would send me links to any images or posts that you've done using something that I have shared with you.  If you say it is ok, I will even feature your work here!
  • If you want to recolor an images, feel free! 
  • If you have a special request, please let me know and I will see what I can do.
  • Most importantly - HAVE FUN!!

Enjoy! Copyright for Personal Use Antonella DeFalco

Wednesday, November 23, 2011

Be Thankful

I received this poem from a friend in email and thought it was perfect for Thanksgiving and so I am sharing it here with you!

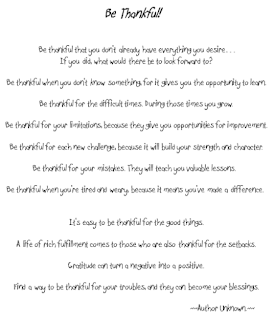
BE THANKFUL 

Be thankful that you don't already have everything you desire. If you did, what would there be to look forward to? 
Be thankful when you don't know something, for it gives you the opportunity to learn. 
Be thankful for the difficult times. During those times you grow. 
Be thankful for your limitations, because they give you opportunities for improvement. 
Be thankful for each new challenge, because it will build your strength and character. 
Be thankful for your mistakes. They will teach you valuable lessons. 
Be thankful when you're tired and weary, because it means you've made a difference. 

It's easy to be thankful for the good things. 
A life of rich fulfillment comes to those who are also thankful for the setbacks. 
Gratitude can turn a negative into a positive. 
Find a way to be thankful for your troubles, and they can become your blessings. 
~~Author Unknown.~~  

Isn't that a beautiful poem? Such an awesome thought and something that I hope to impart on my children!

So, as you prepare to sit down to your Thanksgiving feasts tomorrow, be thankful!

Have a Blessedly Thankful Day!


Enjoy! Copyright for Personal Use Antonella DeFalco

Thursday, November 25, 2010

Happy Thanksgiving Free Quilling Patterns

Happy Thanksgiving may you have a happy and healthy holdiay!  I would like to take this opportunity to extend a special Thank You to everyone who has stopped by to check out the postings over the years.  This photograph was taken in October while we were pumkin picking, but I just loved the colors, don't you?

Here are two Turkey Patterns for you this day:


I used full-length strips, in this case they were 24 inch (60.96 cm) strips. You can use any manufacturer and they don't have to be this long.


For the Turkey's body and curled "feather" tail:

* 10 - 24 inch (60.96 cm) strips, rolled into a tight coil. Roll all strips together. I took the strips and slightly offset them to make it easier to start the coil.Do not roll all the way to the end of the strips. Leave approximately 6 in (15.24 cm) free.

* Glue all the strips at this point to keep the body tightly coiled while leaving the ends loose.

* Take the free ends and create loose open coils, coiling them in different directions as the "feathers" of your turkey.

For the head:

* 1 - 12 in (30.48 cm) brown teardrop for the head

* 1 - 6 in (15.24 cm) black triangle for the beak

* 1 - 6 in (15.34 cm) modified red teardrop, with a dangling spiral. This is made by curling the first half of the strip into a teardrop and glueing it where you pinch it to make the teardrop. Then take the remaining strip and create a spiral. This is for the fleshy carbuncle that hangs from the beak, called a snood.

To make the eye:

* Take Black, White, and Black strips glued together and roll together to make the eye.  You may alternately use one of those google eyes / wiggle eyes that you use on kids crafts.


Body:


* 2 strips of brown

* 1/2 strip of cream

* I let my strips overlap so that there is very little cream showing only in the center

* Make a teardrop shape

Head:

* 12 in (30.5 cm) tight coil

* Cut small triangle for beak

* Approximately 1 in (2.5 cm) of 1/16 in ( cm) wide paper for the red wattle (this is the part that hangs down from the beak)

Tail Feathers:

* 6 in (15.2 cm) Alternate side looping in various fall colors

* Attach to bottom of teardrop

Wing:

* 4 in (10.2 cm) Yellow, 6 in (15.2 cm) Red, and 12 in (30.5 cm) Brown strips - glue them end-to-end and make a shaped teardrop

* Attach to center of body

Feet:

* Scrap of Yellow

Looks like he is running away - "Don't eat me!"
 
Please share some of your thoughts and hopes about the holidays, or if you would like me to try to create a special tutorial just for you....

P.S. - Yes, you do recognize these tutorials, I guess I re-gifted :-)  Actually, my hubby was worried I would forget to finish cooking.  Stay tuned for some fresh, new tutorials for December.

Enjoy! Copyright for Personal Use Antonella DeFalco

Sunday, November 15, 2009

Free Quilled Turkey Project

free quilled turkey


For those of you who have young children, you will appreciate the family turkey project we had to complete.

Each family was given a photocopied turkey to cut out and decorate. Each turkey will be given an award and posted in school on the bulletin board for the class. Every family member was asked to contribute to the project, and we were encouraged to look for things to add to our turkey.

The base of our turkey was colored with crayons. Much thought went into the color selection and what a beauty he is. We kept the "decorations" to a minimum, sticking to a collection of stickers. Daddy added some orange peel and we added some texture by cutting the webbing on our clementine crate and adding it to his belly. The final addition was Mommy's quilled turkey (I love any opportunity to share quilling with everyone).

Please find the instructions for the Turkey Pattern here:


free quilling turkey

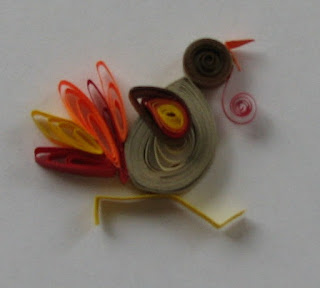
Body:
  • 2 strips of brown
  • 1/2 strip of cream
  • I let my strips overlap so that there is very little cream showing only in the center
  • Make a teardrop shape
Head:
  • 12 in (30.5 cm) tight coil
  • Cut small triangle for beak
  • Approximately 1 in (2.5 cm) of 1/16 in ( cm) wide paper for the red wattle (this is the part that hangs down from the beak)
Tail Feathers:
  • 6 in (15.2 cm) Alternate side looping in various fall colors
  • Attach to bottom of teardrop
Wing:
  • 4 in (10.2 cm) Yellow, 6 in (15.2 cm) Red, and 12 in (30.5 cm) Brown strips - glue them end-to-end and make a shaped teardrop
  • Attach to center of body
Feet:
  • Scrap of Yellow
Looks like he is running away - do you think he's worried about Thanksgiving?

I hope you have fun with this little fellow. Here are some ideas:

  • Make a Thanksgiving card with him holding a sign that says "Eat Tofu" or "Eat Pork, the other white meat"
  • Add him to your Thanksgiving scrapbook page as an embellishment
  • Add him to a framed photograph of your thanksgiving feast
The possibilities are endless... I'd love to see what you can do...
If you use this guy, please post a comment here with a link to your post so that everyone can find your project too :-)

quilled quilling turkey thanksgiving

Enjoy!
Copyright for Personal Use Antonella DeFalco

Technorati Tags: , , , , , , , , ,

Monday, December 29, 2008

Free Fall Quilling Patterns


Wow! Can you believe how many patterns I have posted on this site? I know that I can't.

In an effort to make life easier for all of us, I am going to try to simplify the pattern lists for everyone. I have found many patterns along the way that I did not have a link to, so this exercise has definitely been worthwhile.

Please find a list of patterns related to Fall, Halloween, and Thanksgiving. Each of these patterns would be the perfect embellishment for a card, scrapbook page, or framed art. Contact me if you have questions:

School:


Fall / Autumn:

  • Autumn Basket - 2 patterns in one; a functional quilled basket filled with fringed flowers

Halloween:

  • Witches Hat - A zany pattern for a witches hat with green hair flowing.

Thanksgiving:

  • Turkey - Gobble Gobble... just in time for your Thanksgiving feast
Don't forget to check out the other free pattern links on the left hand side menu.

Enjoy!
Copyright for Personal Use Antonella DeFalco

Technorati Tags:
, , , , , , , , , ,

Tuesday, November 06, 2007

Free Quilled Turkey Pattern

quilled turkey pattern
Gobble, Gobble!

With Thanksgiving on the way I thought it would be fun to post a slightly revised Turkey pattern. This is done in the style of "Creative Quilling Traditional and Modern Designs" By Trees Tra and Pieter Van Der Wolk

I used full-length strips, in this case they were 24 inch (60.96 cm) strips. You can use any manufacturer and they don't have to be this long.
For the Turkey's body and curled "feather" tail:
  • 10 - 24 inch (60.96 cm) strips, rolled into a tight coil. Roll all strips together. I took the strips and slightly offset them to make it easier to start the coil.Do not roll all the way to the end of the strips. Leave approximately 6 in (15.24 cm) free.
  • Glue all the strips at this point to keep the body tightly coiled while leaving the ends loose.
  • Take the free ends and create loose open coils, coiling them in different directions as the "feathers" of your turkey.
For the head:
  • 1 - 12 in (30.48 cm) brown teardrop for the head
  • 1 - 6 in (15.24 cm) black triangle for the beak
  • 1 - 6 in (15.34 cm) modified red teardrop, with a dangling spiral. This is made by curling the first half of the strip into a teardrop and glueing it where you pinch it to make the teardrop. Then take the remaining strip and create a spiral. This is for the fleshy carbuncle that hangs from the beak, called a snood.
To make the eye:

  • Take Black, White, and Black strips glued together and roll together to make the eye.
I hope you enjoy this little fella!

LinkWithin

Related Posts with Thumbnails