banner


Showing posts with label Filigree Friday. Show all posts

Friday, December 07, 2012

Filigree Friday Christmas Card

Merry Christmas! 

filigree quilling quilled christmas card

I love making homemade cards, don't you? C'mon, admit it. I mean, how else are we going to attempt to use up all that lovely paper that is starting to take over your home one room at a time?

I love the crisp white and green against the red background.  The flowers are made using alternate side looping.  Alternate side looping is a technique where you don't use a tool, instead you fold your quilling paper  and wrap it to create the flowers.

I was going for a more modern look to this card, and placed a less traditional butterfly on the large flower... and let's not forget my scrolls, they are simple and easy to make and are so pretty.

The red card base is one that I bought at Michaels (a few years ago, when their $1 bin was actually a dollar).. yeah, what were they thinking when they made them $1.50? The cards were purchased embossed.

As I searched for a project to post, I selected this one because I really like these types of flowers and scrolls too :-)  I have to admit that this card was given as a birthday card, but the colors work for Christmas and I didn't take a picture with the sentiment - so don't tell :-)

Thank you for your kind words and encouragement!

Enjoy!

antonella


Friday, December 02, 2011

Filigree Friday Cross Ornament

Happy Filigree Friday Everyone!!

quilling quilled spreuer cross dove christmas ornament
I hope that you are enjoying your day! It is too early to know for certain, but I am hopeful today will be nice and sunny (a bit on the colder side, but the sun will definitely go a long way to making it a beautiful day!)

Wow! The holidays are here!!! I cannot believe it, last week was Thanksgiving (for those of you who live in the states) and ourselves with lots of food and goodies... I personally love the goodies - lol!  And now we are almost a week into Advent! Christmas is just around the corner for us!!

I am way, way, way behind in my Christmas ornaments... I am definitely starting to feel worried, because every time I think that I have set aside time to work on them something comes up!! I actually took off yesterday and today (now I didn't have the whole day planned to work on them, but you would think I would have found at least an hour yesterday - nope, didn't happen!) Between running to do something in the morning with my stepdaughter (that was supposed to be 3 hours and ended up being 5 hours - travel time included) and then regular afters school stuff and dinner and yeah, let's not forget the long phone conversation with a friend who moved to Florida, I kinda didn't get anything done... but today will be different... Positive Thinking!!!  and for extra motivation, my friend Lucy will continue to provide the necessary positive reinforcement as she continues to design her awesome Christmas cards this year!!

So, because I have been so bad, I decided I'd share an ornament I made a few years ago.  This is a cross ornament with a sweet dove in the center, the ornament is hanging from an easel card so it could be easily removed or the card itself could be where the ornament was displayed.

quilling quilled spreuer cross dove christmas ornament
Here are some links to similar projects that have more details about the techniques used, if you want specific instructions for this cross, please let me know and I will post them....
Easel Cards and Spreuer Crosses (click on the pictures to go to those posts)
quilling quilled easel card graduation
Easel Card - Graduation

quilling quilled easel card snowman
Easel Card - Snowman

quilling quilled spreuer cross christmas ornament
Quilled Spreuer Cross - Christmas

quilling quilled spreuer cross christmas ornament
Spreuer Cross - Communion

Have a wonderful day and may it be super productive!!!

Hey, I've linked up to this wonderful 26 Day Christmas Craft Marathon Linky Party - http://lisascraftblog.blogspot.com/2011/11/christmas-craft-marathon-linky-party.html

and The Winter Holiday Craft Party - http://www.craftsunleashed.com/index.php/seasonal/holidays/winter-holiday-linky-party/  

Enjoy! Copyright for Personal Use Antonella DeFalco

Friday, May 27, 2011

Filigree Friday Free Quilled BookmarkTutorial

Another Fabulous Filigree Friday!

I hope that today finds you well.  I am excited because here in the US we have a long weekend.  Monday is a holiday and the office is closed - Yeah!!

This is a Quilled Bookmark that I made last year as a teacher's gift.  I love the papers and the bright flowers!

Bookmark:
I cut 2 pieces of cardstock 2.5 in (6.35 cm)  x 5.5 in (14 cm) (patterned and black)
I also punched a circle of coordinating cardstock
I glued them together - placing the circle near the top for just a little more texture and, as luck would have it, a guide for placing my flowers
I then used a ribbon spool to trace a half circle at the top
Cut the top to make it round
I am going to skip the next part - As you can see, I attempted to cut a flap however, I don't think I needed to do that.

I also cut a strip of black cardstock and stamped Thank You in silver
I love angles, so I attached it at an angle across the front


Red and Yellow Quilled Flower:
Petals
  • 4 in  (10.2 cm) Yellow 
  • 6 in (15.2 cm) Red
  • To make 2-colored petals you can either glue the red strip to the end of the yellow strip or roll first the yellow strip and then the red strip (gluing them is easier)
  • Starting with the Yellow end, roll the Yellow and Red strips and shape them into a Teardrop shape (click here for instructions)
  • Make 5 of these teardrops and glue them so that the point is in the center
  • Add a red gem to the center (gotta have bling!)
For the Stem,
  • I took a strip of green and used a technique called alternate side looping.
  • Basically, I created a loop, then came around and created a larger loop, and came around one more time to create a 3rd loop and glued it at the bottom and then pulled it thin so that you can barely see the loops.  
  • I did it for extra sturdiness because I am hoping this will get regular use :-)
For the Leaves
  • 2 shades of green, one 4 in (10.2 cm) and 6 in (15.2 cm)
  • I rolled them the same as the petals, I started with the lighter green

Yellow Flowers
These are a little smaller than the Red/Yellow flowers
  • 2 shades of Yellow, both 4 in (10.2 cm)
  • Roll the lighter then darker Yellow and shape into a Teardrop
  • Make 5 for each flower
  • Glue with the tips in the center
  • Add a pretty gem in the center
For the leaves
  • 3 shades of green this time, 3 in (7.6 cm), 3 in (7.6 cm) and 6 in (15.2 cm)
  • I rolled lightest to darkest, shaped into teardrop and then glued between 2 of the petals

Some thoughts/tips:
  • You could add more petals to the Yellow flowers if you wanted, I would not have more than 2 per flower.
  • I like rolling my coils with a lighter color in the center, but it looks pretty if you do the darker color in the center too - that is the fun part about quilling! The more you play, the more fun you will have!

I am Linking here:

Cupcake Craft Challenges - Bookworm - http://cupcakecraftchallenges.blogspot.com/

Have a great Friday and if you decide to create something, let me know!

Enjoy! Copyright for Personal Use Antonella DeFalco

Thursday, May 19, 2011

Filigree Friday Free Tutorial

Fabulous Filigree Friday!


I hope all of you are having an excellent week.  I don't know about you, but I am so glad it is Friday!!!

Since this is the time of year for Communions, I am sharing with you a card I made recently for Communion.  The card base that I started with is actually from a set of $1 cards I bought at Michaels.  I picked it because I loved the little window, and then while I was working on laying out the card I had this moment of inspiration and as you can see I used it so that the recipient's name would peak through.  I was inspired :-)

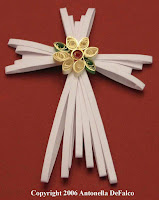
For my quilling I chose to create a cross, as I felt that would be fitting this event.  Since this was for a boy, I used blue quilling paper.  I used the Spreuer, or onion holder, techniqueFollow this link for more detailed instructions regarding using this technique.  This cross is another of my non-traditional designs, I really love this look, can't explain why but I am drawn to it :-)

For the cross you will need to do the following:
  • Start at 7, then go up to 9-Right and 9-Left
  • Yeah, I went up 2 instead of the usual 1 - I was feeling adventurous - lol
For the final part of the cross you will need to do the following:
  • Start at 11, then go up to 13-Right and 13-Left
 Glue all 4 together making the cross shape.  I added crystals because I really love the way they look.  Believe it or not, the dove is not a punch, I hand drew the bird and cut it out (I know I have a dove punch somewhere in my house, but simply could not find it - you know the saying, necessity is the mother of invention).  Under the dove I used a Martha Stewart punch, and then punched the Angels (I've included a photo of the punches I used).

For the inside of the card I printed out a sentiment that I thought was appropriate, besides, it gave me the opportunity to play with fonts (I love all those cool fonts)!


As an added bonus I am also including a free printable (this is a PDF document for those of you who simply want to print the sentiments) and I am also providing "PNG" files with each of the individual sentiments for those of you who want to use them as digital stamps.  If you download one of these freebies, I ask that you do the following:

  1. Become a follower
  2. Leave a message letting me know you liked them
  3. I'd love to see what you make, so please link back with a picture of the project you make :-)


Oh yeah, these are the punches I used :-)

Updated: I am Linking Up to the following:
Make It Monday - Anything Goes - http://ppp-makeitmonday.blogspot.com/
Stamp Fairy - 3 Embellishments (cross, bird, angel) - http://stampfairychallenge.blogspot.com/
One Stitch at a Time - Anything Goes - http://onestitchatatimechallenge.blogspot.com/
Update (5/22): Thrifty Nifty:  http://niftythriftythings.blogspot.com/2011/05/nifty-thrifty-sunday-6.html


Enjoy! Copyright for Personal Use Antonella DeFalco

LinkWithin

Related Posts with Thumbnails