banner


Thursday, December 14, 2006

On the 14th Day of Quilling - Spreuer Tree


On the 14th Day of Quilling we made a Spreuer Tree and decorated it with some lights.

The pattern for today is a very simple tree with a splash of gilded lights using the Spreuer technique. For this project I started wrapping in the center and then wrapped to the right and then the left. You will see me write R or L to indicate this, please remember that it will turn out the same if you go the opposite sides as long as they are even and you continue to alternate. I am providing my instructions this way, because I needed to pick a direction.

For the basic tree, do the following:
  • You will need approximately 24 inches (60.96 cm) of 1/8 inch (.3cm) wide strip
  • Start 15 - 15 - R13 - L13 - R13 - L13 - R13 - L13 - R13 - L13 End
  • You will notice that I did 2 times around the center 15 to create the tree trunk, and then continued to make the remainder of the tree by alternating along the 13th tooth.

To make the lights I used 1/16 inch (.15 cm) wide strip
  • I simply wrapped it around the tree 3 times and glued it to the back at the top and bottom
  • For added support I glued at a few points to anchor it to the tree
  • 6 - 3 inch (7.62 cm) 1/16 inch (.15 cm) teardrops for the lights

Finally, 1 - 3 inch (7.62 cm) diamond for the star at the top.

The trees themselves are relatively quick to make. The lights can take a little bit of time. I took my 1/8 inch (.3 cm) strips and cut them in half to get the 1/16 inch (.15 cm) wide strips.

Enjoy!
Copyright Antonella DeFalco

Technorati Tags: , , , , , , , , ,

On the 13th Day of Quilling - Triangle Trees

quilled triangle christmas tree
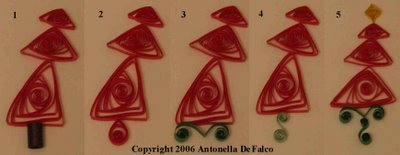
On the 13th day of quilling we made something really simple... Triangle Christmas trees.

If you have ever done any scrapbooking or paper crafting, chances are that you will have run across one or more variations of this design. It is one of the simplest tree designs out there and it uses the rule of threes. Quite simply you take 2 triangles, each progressively larger than the last and construct a tree.

For this particular set of trees I used the following:
  • 1 - 6 inch (15.24 cm) coil triangle
  • 1 - 12 inch (30.48 cm) coil triangle
  • 1 - 24 inch (60.96 cm) coil triangle

You will see that the picture I have attached shows 5 different variations of the tree.
Tree 1:
  • 1- 3 inch (7.62 cm) tight coil
  • I used 3/8 inch (.95 cm) width paper
Tree 2:
  • 1 - 6 inch (15.24 cm) teardrop
Tree 3:
  • 1 - 4 inch (10.16 cm) V-scroll
Tree 4:
  • 1 - 3 inch (7.62 cm) S-Scroll
Tree 5:
  • 1 - 6 inch (15.24 cm) diamond scroll
  • 1 - 4 inch (10.16 cm) V-scroll
  • 1 - 3 inch (7.62 cm) S-Scroll
See the pictures for placement and to see the various options.

Enjoy!
Copyright Antonella DeFalco

Technorati Tags: , , , , , , , ,

Wednesday, December 13, 2006

On the 12th Day of Quilling - Spreuer Cross


On the 12th Day of Quilling we made a Spreuer Cross.

Click for help on Spreuer Instructions. For this project I started wrapping in the center and then wrapped to the right and then the left. You will see me write R or L to indicate this, please remember that it will turn out the same if you go the opposite sides as long as they are even and you continue to alternate. I am providing my instructions this way, because I needed to pick a direction.

The fun thing about Spreuer is that it is really a lot of fun and just like all quilling, it is something you can experiment with and find new ways to use it... I hope you give this a try!

So, for the cross you need the following:
You need to make 3 of these:
  • Start 6 - R7 - L7 - R8 - L8 End

For the longer part of the cross, make 1 of these
  • Start 12 - R13 - L13 - R14 - L14 - R15 - L15 End

  • Glue the long piece to one of the short pieces (top to bottom)
  • Glue each of the remaining short pieces to either side of where you joined together the top and bottom pieces

Center flower:
  • 6 - 3 inch (7.62 cm) white teardrops
  • 1 - 3 inch (7.62 cm) red loose coil
  • 3 - 3 inch (7.62 cm) green marquis
  • Arrange to make flower as shown
  • Attach to Cross where all pieces are joined together


Enjoy!
Copyright Antonella DeFalco

Technorati Tags: , , , , , , , , ,

Tuesday, December 12, 2006

On the 11th Day of Quilling - Spreuer Angel

spreuer angel
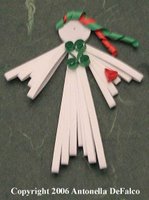
On the 11th Day of Quilling we made a Spreuer Angel.

If you need help, please click for Spreuer Instructions. Please note: I was trying different things when I was trying out how to Spreuer, and for this project I worked from right --> left, and that will be reflected in the numbers I give you.

For this Angel, we do the following:
Wings (make 2 of these)
Wrap your strip, right --> left
Start 8 - 7 - 6 - 7 - 8 End
1 - 3 inch (7.62 cm) coil heart, attach to wing

Bodice (only 1 of these)
Wrap your strip, right --> left
Start 15 - 14 - 13 - 12 - 13 - 14 - 15 End
2 - 3 inch (7.62 cm) S-scrolls to make a Kissing S-scroll, attach to top of bodice

For her face
1 - 24 inch (60.96 cm) tight coil
1 - red and 1 - green approximate 3 inch (7.62 cm) each strip
Start by wrapping the red and green in Spiral shape together, approx 3/4 of the way
For remaining 1/4 of the way Spiral individually
Attach to top of tight coil
Attach face to bodice and wings

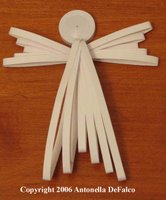
Please use picture for placement and guidance. I have also provided a picture before the decorative elements were placed for assistance.
spreuer angel

Enjoy!
Copyright Antonella DeFalco

Technorati Tags: , , , ,, , , , ,

LinkWithin

Related Posts with Thumbnails