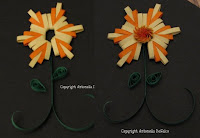
This is a neat flower I made using 2 strips of coordinating quilling strips. The pictures have instructions for each of the steps in creating the Spreuer Flower Petals.
Follow these instructions and make 6 flower petals.

Step 1: Take 2 strips of 1.8 in (.3 cm) quilling strips. I selected Yellow and Orange for this project. I then glued the bottom of the strips together. I placed the yellow against the back of the Onion Holder Tool (refer to picture).
Step 2: Take the Yellow and go up to prong #5 and wrap the Yellow around the front and down to the starting point and glue at the bottom.
Step 3: Take the Orange and go up to prong #4, bringing it around the front and down to the starting point and glue at the bottom.

Step 4: Continue with the Orange and on the opposite side go up to prong #4, bringing it around the front and down to the starting point. Before you glue it at the bottom, cut or tear the orange near where it will be glued.
Step 5: Take the Yellow and go up to prong #3, bringing it around the front and down to the starting point and glue at the bottom.
Step 6: Continue with the Yellow and on the opposite side go up to prong #3, bringing it around the front and down to the starting point. Before you glue it at the bottom, cut or tear the Yellow near where it will be glued.
Repeat Steps 1 - 6 for each of the 6 Flower Petals.
Next, make the STEM:
- Take an approximate 8 in (20.3 cm) length of 1/8 in (.3 cm) Green quilling strip.
- Fold it in Half, gluing at the top where the strip is folded.
- Take the strip and condition the ends so that they curl slightly, you can do this by running your fingernail over the end of the strip to create the curl.
- TIP: Cut the ends at a slight angle, it makes the strip more delicate.
- 2 - 6 in (15.2 cm) 1/8 in (.3 cm) Green Teardrops
Enjoy!
Copyright Antonella DeFalco
Technorati Tags: spreuer,quilling, paper filigree, filigrana, free quilling pattern, spreuer flower, free pattern, naqg
0 comments:
Post a Comment