banner


Tuesday, March 20, 2007

Free 3D Quilling Pattern Spinning Top

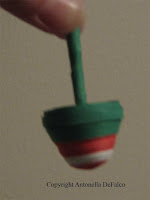
quilled 3d spinning top

Do you remember those Spinning Tops from when you were a child? They are a perrenial favorite. I can attest to this based on the fact that after I completed my current project the spinning top was quickly taken away. Unfortunately, somehow it has managed to get lost, but I am hopeful that it will show up soon. Luckily, they are not difficult to make so I can always make another one!

Several of my quilling friends have made these spinning tops in the past and the following is my interpretation. I have elected to use 6 full-length strips to make the spinning top that you see here (I have included a quarter in the picture for reference to the size). Note: you can use as many or as few strips as you would like. The fewer strips the smaller the spinning top.
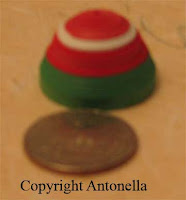
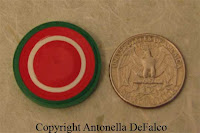
quilled 3d spinning top
quilled 3d spinning top To make the base:

Take 6 strips, glued end-to-end, and roll a tight roll
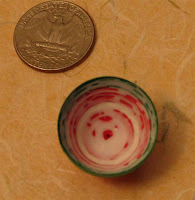
Gently push the center out, creating a cup-like shape
Glue the inside to maintain the shape
Tip: You do not need to glue all 6 strips together at the same time. It is easier to glue them as you approach the end of your current strip.

One more tip: If you notice the basic shape of the base, you will see that it could easily become a skirt for a doll, or if you place 2 together you can make an egg-like shape... hmmm, think Easter!

Make a Spinning Stick (now, I do not know if this is the "official" name for this, but I didn't know what else to call it):
Take a 3 inch ( cm) square and cut it in half at an angle creating 2 triangles
Take one triangle and roll it to create the stick-shape
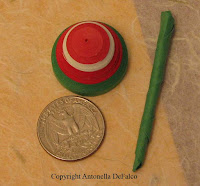
quilled 3d spinning top

To complete the top:
Place one end of the stick in the base of the top
Do this to position where you want to begin creating the top
Use the same number of strips as for the base
Continue to roll until you create a tight coil top
Glue the top to the base
Take a strip of paper and glue it around the seam of the top and bottom
Go around once or twice

Once everything is dry... spin your top!

Happy Spinning!
Copyright Antonella DeFalco

Technorati Tags: , , , , , , , ,

Did you know that today is the First Day of Spring? Today is one of those pivotal days where there is an equal amount of day as there is night. Of course, that does not mean that it is warm, but those days are around the corner (for us at least).

The official term for the first day of Spring is the "vernal equinox". As the Earth make its journey around the sun, this is the time where the Northern Hemisphere is tilted more towards the sun. So, for those of us in the Northern Hemisphere it is spring, for those of you in the Southern Hemisphere it is fall. On this day (generally around the 20th or 21st of March each year), sunrise and sunset are approximately 12 hours apart. Those scientific sites tell me that the day is actually a little bit longer, so it isn't quite equal, but that is ok with me.

Ok - let's debunk a myth.... Rumor has it that you can balance a raw egg on the first day of spring. In fact, there were some 100 egg-crazy New Yorkers who got together in 1983 to balance eggs, and in 1984 the number grew to about 5,000 to try this again. The theory goes that on this day, the pull of gravity is more equal because the sun is more directly overhead. Truth is there is no scientific evidence to prove this. So, although this may be something fun to try, if you can balance a raw egg today, you can balance one any day of the year.

But, go ahead and try, why not?

Some websites with family friendly crafts and information:


Happy Spring!
Copyright Antonella DeFalco

Technorati Tags: , ,

Sunday, March 18, 2007

Corned Beef and Cabbage - Fact or Fiction?

So, you think that Corned Beef and Cabage is the traditional Irish meal at St. Patrick's day? I have it on good authority that this just is not true. Corned Beef is apparently more of an English meal, not Irish. A meal that is eaten in Ireland is boiled bacon and cabbage.

So there you have it, and lest you forget, here is a funny poem by Frances Shilliday to help us remember:

GOOD GRIEF - NOT BEEF!
I just want to put something straight
About what should be on your plate,
If it's corned beef you're makin'
You're sadly mistaken,
That isn't what Irishmen ate.

If you ever go over the pond
You'll find it's of bacon they're fond,
All crispy and fried,
With some cabbage beside,
And a big scoop of praties beyond.

Your average Pat was a peasant
Who could not afford beef or pheasant.
On the end of his fork
Was a bit of salt pork,
As a change from potatoes 'twas pleasant.

This custom the Yanks have invented,
Is an error they've never repented,
But bacon's the stuff
That all Irishmen scoff,
With fried cabbage it is supplemented.

So please get it right this St. Paddy's.
Don't feed this old beef to your daddies.
It may be much flasher,
But a simple old rasher,
Is what you should eat with your tatties.

©Frances Shilliday 2004, please visit her website which debunks other myths including this little ditty.

Although it may not be the traditional meal, I must admit to you that I had Corned Beef and Cabbage on St. Patrick's day. Yes, it is true. I was first introduced to this meal by my husband and I have to say that I truly enjoy it with a nice side of spicy brown mustard. Shhh, don't tell, lest someone be angry, but I think that we will have some again next year.

Cheers!
Copyright Antonella DeFalco

Technorati Tags: , , , ,

Saturday, March 17, 2007

Happy St. Patrick's Day

Happy St. Patrick's Day!!!

I was interested in doing a bit of research into this green, shamrock filled day! So, here are the results.... some fun, interesting facts about this holiday.

St. Patrick's day is a day filled with the "luck of the Irish" and much green. Saint Patrick was the patron saint of Ireland who is credited with bringing Christianity to Ireland.

Would you like to hear some folklore? This is one of the most well know (at least I have heard of this before). The story goes that Saint Patrick Patrick stood on a hilltop (Croagh Patrick), and with only a wooden staff, drove all the snakes from Ireland. Apparently, no snakes were ever native to Ireland so this could not have happened, but it does make for a fun story. Many people believe this story is a a metaphor for the conversion of the pagans to Christianity.

The shamrock is one of the most identifiable Irish symbols. The shamrock, which was also called the "seamroy" by the Celts, was a sacred plant in ancient Ireland because it symbolized the rebirth of spring. It is believed that Saint Patrick used the three-leafed shamrock to explain the Trinity. The shamrock represented how the Father, the Son, and the Holy Spirit could all exist as separate elements of the same entity.

Have you heard what they do in Chigago? They dye the Chicago River green every year on St. Patrick's day. The first time they did this was in 1962. They used enough green vegetable dye to dye the river green for a week! Today, for environmental reasons, they only put enough in to keep it green for a few hours.

Some good Irish sayings while you make a toast today:

May you live to be a hundred years, with one extra year to repent.

As you slide down the banisters of life may the splinters never point the wrong way.

May your blessings outnumber the shamrocks that grow,
And may trouble avoid you wherever you go.

May you have warm words on a cold evening,
A full moon on a dark night,
And the road downhill all the way to your door.

May your neighbors respect you,
Troubles neglect you,
The angels protect you,
And Heaven accept you.

An old Irish recipe for longevity:
Leave the table hungry.
Leave the bed sleepy.
Leave the bar thirsty.

Green may be the color of the day, but did you know that blue was once the color associated with this day?

I hope you have found this entertaining.

This information was found on many websites by performing a search for "st patrick's day", including: www.history.com, wilstar.com/holidays/patrick.htm, http://www.st-patricks-day.com/index.asp, and wiki-pedia to name a few.

Enjoy!
Copyright Antonella DeFalco

Technorati Tags: , , ,

Sunday, March 11, 2007

Free Quilling Pattern Pink Dogwood with Butterfly


I am attaching a picture of a card that I made using a photograph that I took of a Pink Dogwood. I started with my original photograph and then focused on a particular portion of the photograph to create the attached magnet.

This post is for my friend Lynn. I like this idea
My supplies for this project are:
  • 4x6 photograph of Pink Dogwood (follow this link to my Flickr! account)
  • Business Card - Magnet size photograph (follow this link to my Flickr! account)
  • Business Card Magnets (purchased from office supply store, like Staples)
  • Quilling strips (please feel free to use any color you like - Paplin pearlized papers have been used in this photograph)
  • Rhinestones
  • Clear photo corners to attach the magnet
  • White Glue to affix quilling (Elmer's or any clear drying scrapbooking glue)

Instructions:
  1. Print the 4x6 photograph and attached it to a card blank (approximately 5 x 6-7/8 inches or A-7 size).
  2. Cut apart the business card size photographs.
  3. Removed the paper from the business card magnet exposing the tape and affixed the photo. Note: for more durability and a stronger bond, you may add additional adhesive to the photo.
  4. Quill the flower following attached instructions
  5. Quill the butterfly following attached instructions
  6. Affix flower and butterfly to magnet (use photo as a guide)

To make the flower:
  • 5 - 6 inch (15.24 cm) Teardrops
  • Glue teardrops with pointed ends touching
  • 1 rhinestone place on top of center where teardrops meet

Butterfly
Butterfly wings:
  • 1 large wing using the Spreuer Technique - 7up-6L-5L-4L (For this wing, begin wrapping with the longest length going straight up and then each subsequent smaller length continuing to the left (L) to create the shape)
  • 1 large wing using the Spreuer Technique - 7up-6R-5R-4R (For this wing, begin wrapping with the longest length going straight up and then each subsequent smaller length continuing to the right (R) to create the shape)
  • 2 small wings using the Spreuer Technique - 5-3R-3L (for these smaller wing sections, begin wrapping in the center and then wrapped to the right (R) and then the left (L))
  • Place the bottom (glued end) of the small wing into the space at the bottom of the large wing. This allows the small wing to lay against the body of the butterfly.


Butterfly Body:
  • Take a purple triangle of paper, beginning at the wide end, start rolling the paper.
  • Note: Roll the paper several times until the body is a width that is pleasing, then apply glue to the inside of the triangle so that the paper retains its shape.


Special Notes:
  • Links have been included to previous posts that contain instructions for making the teardrop shape referenced in these instructions. Please read the Spreuer Instructions if this is the first time you are attempting this technique. I also have a PDF file that contains the Spreuer Instructions if that is easier for you.
  • I have sized the dogwood photograph and the business card photos so that they are 4x6. I have done this so that you can take the file and print it on your home computer or send it out to have it printed. Please let me know if you are having any problems with the photos on Flickr!
  • Please send me a note with your email address and I will send you the files or answer any questions directly. Please look on my profile to find the link to send me email.


Enjoy!
Copyright Antonella DeFalco

Technorati Tags: , , , , , , ,

LinkWithin

Related Posts with Thumbnails