Now that the New Year is here have you thought about how you are going to find time to pick out patterns for all those cards you want to make for everyone this year? I have just the thing for you, why not buy the Quilling Pattern-A-Day 2007 calendar?
It is jam packed with free patterns for every day of the year. You don't have to worry about what kind of card to make for the holidays, there are season appropriate crafts throughout the year to help you with this process. If you are a scrapbooker looking for those neat embellishments to spruce up your page, this is for you. You can make your own and it will match your layout. This is perfect for anyone (you or friend of yours) who loves to make cards, scrapbooks, or has become addicted to any of the paper crafts. The possibilities you can find inside are endless.
Best of all, for one price you get the basic slotted quilling tool and all the paper strips you need to make every project in the calendar. If you are a teacher looking for ideas you have an entire years worth of ideas. Looking for something to do with the kids, quilling is an easy craft that everyone can do together.
Enjoy!
Copyright Antonella DeFalco
quilling, paper filigree, filigrana, calendar
Sunday, January 28, 2007
Free Quilling Pattern - Flowers of Love

This beautiful quilled "Flowers of Love" Valentine heart is the perfect thing to add to your Valentines Day Card to your special someone.
All paper is 1/8 inch (.3 cm) wide unless otherwise noted.
Look for this pattern in the 2008 Accord Quilling-A-Day Calendar.
To make the heart shape do the following (please use the picture for placement):
- 14 - 3 in (7.62 cm) S-Scrolls – Arrange in heart shape.Tip: Draw, cut, or punch out heart shape and use as a pattern to get the heart shape.
Flowers:
- 7- 3 in (7.62 cm) Heart shaped coils – Arrange as shown
- 4 - 1 in (2.54 cm) Spirals – I have cut the 1/8 inch (.3cm) quilling strip in half, for a more delicate look.
Enjoy!
Copyright Antonella DeFalco
Technorati Tags: quilling, paper filigree, filigrana, free quilling pattern, quilled heart, free pattern, naqg, childrens crafts, scrapbooking, embellishment, valentines crafts, Valentines heart
Thursday, January 25, 2007
Free Quilling Pattern - Lovey Dovey Birdhouse
 Our free quilling pattern today is our "Lovey Dovey Birdhouse"
This is done in a very perky Spring-like design and is done in a style that I like to call "adornment quilling". Adornment quilling on this project refers to the fact that I have added quilling to my paper pieced birdhouse embellishment.
If you are new to quilling, please click to learn the basics of quilling and to learn to make the basic quilled shapes that are assumed you know how to do in creating many of these designs.
I simply cut a 1.5 inch x 2 inch yellow rectangle and added a pretty pink roof. For added design, I added a strip of pink in the center to make this a 2 story birdhouse. I glued these elements in place before I added the quilling.
Starting at the roof-top and working our way down, this is what I've done.
Roof:
- 3 - 3 inch (7.62 cm) teardrops
- 1 - 3 inch (7.62 cm) tight coil
- 2 - 3 inch (7.62 cm) loose coil (like a quotation mark)
- 2 - 3 inch (7.62 cm) open hearts
- 1 - 3 inch (7.62 cm) tight coil
- 2 - 3 inch (7.62 cm) S-Scrolls
- 2 - 3 inch (7.62 cm) open hearts
- 1 - 3 inch (7.62 cm) tight coil
Enjoy!
Copyright Antonella DeFalco
Technorati Tags: quilling, paper filigree, filigrana, free quilling pattern, quilled palm tree, free pattern, naqg, childrens crafts, scrapbooking, embellishment, valentines crafts, birdhouse
Valentines Day Quilling
Are you ready for lots of free quilling patterns? I had so much fun with my December Days of Quilling that I thought we'd have some fun with Valentines Day around the corner. So let's have some fun with hearts and hugs and lots of love.
As I add patterns I will keep updating this list, so stay tuned.
Happy Quilling!
Enjoy!
Copyright Antonella DeFalco
Technorati Tags: quilling, paper filigree, filigrana, free quilling pattern, quilled palm tree, free pattern, naqg, childrens crafts, scrapbooking, embellishment, valentines crafts
As I add patterns I will keep updating this list, so stay tuned.
- Day One - Lovey Dovey Birdhouse. A bright pink birdhouse with hearts and more hearts, just waiting for birds to visit.
Happy Quilling!
Enjoy!
Copyright Antonella DeFalco
Technorati Tags: quilling, paper filigree, filigrana, free quilling pattern, quilled palm tree, free pattern, naqg, childrens crafts, scrapbooking, embellishment, valentines crafts
Wednesday, January 24, 2007
Palm Tree and Sunshine in Winter

Brrr.... It has gotten colder here, and I was thinking that something that reminded me of warmer days would be nice...
Here is a Palm Tree that you can add to a card or to a scrapbook page. It is very easy to make.
For the Tree Trunk:
4 - 3 in (7.62 cm) C-Scrolls
1 - 2 in (5.08 cm) C-Scroll
Leaves:
1- 12 in (30.48 cm) Alternate side looping palms (refer to photo)
Alternate Side Looping: Start with Center loops, first loop approximately ½ inch, second loop larger, bring strip to left and loop then to right and loop. Continue left loop, then right loop, and final left loop then right loop. Place a dab of glue at the bottom each time you pass by.
Coconuts:
1 - 2 in (5.08 cm) Tight Roll
1 - 3 in (7.62 cm) Tight Roll
 This is a picture of how I incorporated this design on a card. I could have added a similar embellishment to a summer scrapbooking page or if you are feeling a bit mischievous you can add this to a Christmas page with Santa hanging out at the beach for a well deserved vacation.
Happy Quilling!
Enjoy!
Copyright Antonella DeFalco
Technorati Tags: quilling, paper filigree, filigrana, free quilling pattern, quilled palm tree, free pattern, naqg, childrens crafts, scrapbooking, embellishment
Monday, January 22, 2007
Fringed Flowers - more pictures

This picture shows the fringed strips and the narrower strips and some examples of what the completed flowers look like.

Here are several examples of various fringes and angles.
Enjoy!
Copyright Antonella DeFalco
Technorati Tags: quilling, paper filigree, filigrana, free quilling instructions, fringed flowers, free instructions, naqg
Quilling and Fringed Flower Design
As mentioned in previous posts, a combination of the width of your fringes and the angle of your cuts changes the appearance of the final flower. When fringing by hand, you may find differences if you fringe many different strips. When using a Fringer machine, this does not happen because the machine maintains the tension and evenly pulls the strip through as it cuts the strip of paper.
Tip for those of us who fringe by hand: When working on a large project where you want to ensure more consistency with your fringed flowers, use more than one strip of quilling paper back to back. As you cut through the strips they will each have the exact same width and angle because you have cut them at the same time. As you select your strips to wrap, your fringed flowers will be similar in appearance.
This post is primarily a pictorial explanation, with the pictures containing written text and arrows to highlight what I am attempting to show. Words are wonderful, however, in this situation I think that the pictures will help to demonstrate more clearly what is being described.
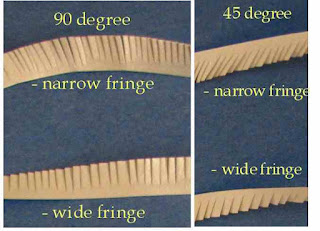
This photograph shows 4 examples, all using the same width quilling strips. The difference is in the size of the fringe and the angle of the cuts. This where we start. The pictures that follow show the steps you take in creating your fringed flower. I am demonstrating with a slotted tool because it is easier to take the pictures. Use whichever method is most comfortable for you when you wrap / roll your strips.


You will gently press the fringes down to create the final fringed flower. You can use your fingers or you can also use a needle tool or similar device to get more of a curled effect.
The pictures that follow show the same fringed flower. In one example, the flower is made using only the fringed strip. In the second example, you see the flower with what I have called a center strip. I have taken a narrower strip and glued it (front to back) with the fringed strip. I then begin rolling with the narrower strip and continue until reaching the end of the fringed strip. As you can see, it gives your flower a nice center.
I have included more pictures of fringed flowers so that you can see the effect of using different widths and angles in your cuts. I have also previously posted a basic example of making fringed flowers.
I hope you enjoy making fringed flowers!
Enjoy!
Copyright Antonella DeFalco
Technorati Tags: quilling, paper filigree, filigrana, free quilling instructions, fringed flowers, free instructions, naqg
Sunday, January 07, 2007
Fringed Flowers - more about them

I have previously posted instructions about the basics of making fringed flowers. For more information about Fringed Flowers also check out the detailed instructions for making fringed flowers. I have included more pictures of fringed flowers so that you can see the effect of using different widths and angles in your cuts.
There are a multitude of options for your fringes and they type of flowers you can make, this post will explain some of these differences and show you how it affects the way your "fringes" look.
The basic components to making a fringed flower are:
- The actual "fringe" on your strip - how wide are your cuts? If they are close together the flower is more delicate and wispy looking
- The angle of the "fringe" - the look of the fringed flower changes as the angle of your cut deepens
- There is one other aspect and that is the length of the strip. I have found that for many fringed flower designs you do not necessarily need long strips. I use mostly 4 - 6 inch strips.
- Will you use only the fringed strips?
- Will you use one or more colors?
- If you use more than one color will you keep the strips end to end or will you roll them together so that the colors mix and create a shading in the fringe.
- Will all of your strips be the same width?
- Will you add a thinner width strip to the front of your flower to create a center?
Relax, remember that this is fun!
Please write to me!
Copyright Antonella DeFalco
Technorati Tags: quilling, paper filigree, filigrana, fringed flower, quilling instructions, naqg
Subscribe to:
Posts (Atom)