 How long should my quilling strip be? What size should I use?
This is an age old question that there is no easy answer. Ok, this is going to sound like such a non-committal answer, but I will explain why and then I will offer you a printable tool to help you through the process. :-)
Let us start with this thought... If you have a roomful of quillers and gave each of them a 4" strip of quilling paper, you will find that each coil, although similar, will be a little different. Ok, perhaps this is a bit of an exaggeration, but you get the point. So the question is why? The following is a list of things that you do as a quiller that have an impact on the size of your coil and helps explain why the same shapes can and are different among quillers. It also gives you permission to be yourself and just enjoy the process and learn your own quilling style :
Let us start with this thought... If you have a roomful of quillers and gave each of them a 4" strip of quilling paper, you will find that each coil, although similar, will be a little different. Ok, perhaps this is a bit of an exaggeration, but you get the point. So the question is why? The following is a list of things that you do as a quiller that have an impact on the size of your coil and helps explain why the same shapes can and are different among quillers. It also gives you permission to be yourself and just enjoy the process and learn your own quilling style :
- If you use a slotted tool, you will have a larger hole in the center than if you use a needle tool or pin or finger roll your paper.
- When you make your coils the amount of tension that you apply to the paper as you are turning it has an effect on how much the coil loosens, or how big it becomes, when you let go.
- The paper that you use has an effect. I will even tell you that I have found differences in using a multi-pack of quilling paper. Yes, even though it is the same manufacturer, I find that some strips roll easier than others.
- As obvious as this may sound, if you are tired when you are rolling your strips (come on now admit it, you were up past your bedtime because you just had to get some quilling done) your own coils and shapes will look different.
- I have mentioned this before, but everyone develops their own style and this too will change over time. Think of how you pinch your coil to make a shape, chances are you may hold it and pinch it using a different combination of fingers than your neighbor.
So, the next time you have a pattern and you are diligent and use the exact size specified in the pattern, don't be surprised that yours looks different. This is good! Quilling is a personal experience and these differences are what allow you to make this art your own. This is what handmade means, no two items are the same! Looking for ideas? Don't forget to check out the links on the left hand for lots of free patterns and instructions to making quilling to embellish cards and scrapbook pages, frames, announcements, and invitations.
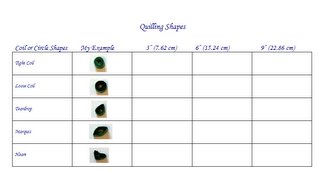
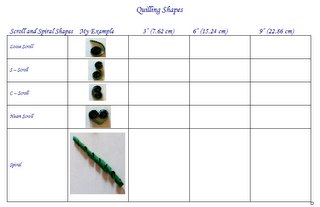
The attached photo is a quick way to practice your shapes and be able to have a visual to gauge your rolling style. This file will allow you to create your own personal "Quilling Guide" I recommend starting with the 1/8" (.3cm) wide quilling paper. Feel free to do this for the different widths of paper that you use the most. I have included an example of each shape for your reference, now do the following:
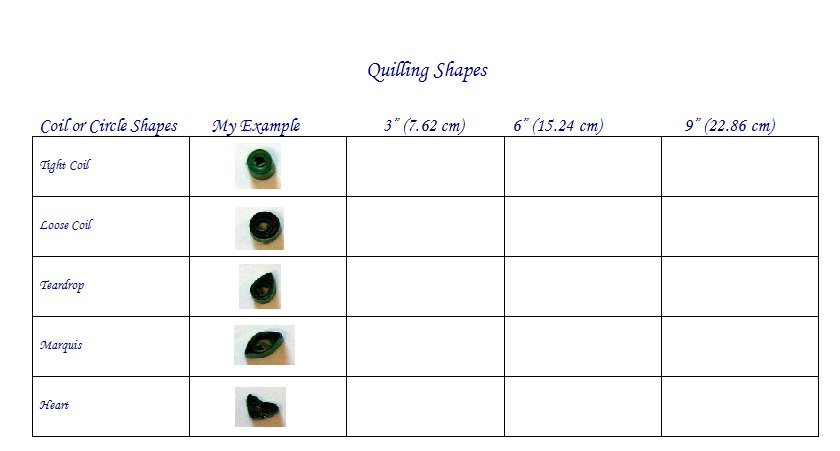
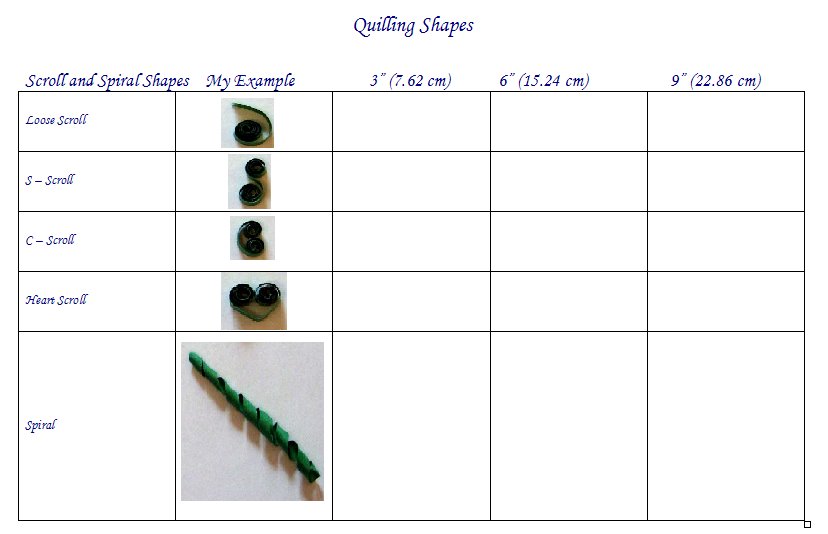
The attached photo is a quick way to practice your shapes and be able to have a visual to gauge your rolling style. This file will allow you to create your own personal "Quilling Guide" I recommend starting with the 1/8" (.3cm) wide quilling paper. Feel free to do this for the different widths of paper that you use the most. I have included an example of each shape for your reference, now do the following:
- Print the image above, preferrably on a thicker paper or cardstock.
- Select a specific width of quilling paper. Cut quilling paper into various lengths 3" (7.6 cm), 6" (15.2 cm), 9" (22.9 cm) as identified in the printout.
- Roll each of the shapes. Click these links for instructions to making the Coil Shapes and Scroll Shapes if you are uncertain how to make a particular shape.
- Glue the shape to the paper and store this with your quilling supplies. The next time you are quilling, take this out as a handy reference guide for selecting the best size strips for the project you are working on.
This is a fun exercise and is good to let you know that you can quill. Now you can use these shapes and compare them to the patterns that you see. This can be helpful to get the correct proportions when you make the pattern.
As you continue to quill, you may want to repeat this exercise and see how much you and your quilling style has changed.
Please be certain to keep a few of your early quilled pieces, you will want to remember them and treasure them in years to come. If you are like so many of us, your quilling will be shared with all your friends and family and you will find that you have none to enjoy for yourself. Everyone will be quite pleased that you did! :-)
Enjoy!
Copyright Antonella DeFalco
Technorati Tags: quilling, paper filigree, filigrana, free quilling pattern, scrapbooking, tarjetas, card making, childrens crafts
1 comments:
Thank you for this template!
I think what you have advised is an excellent and idea and although it will take (fun) time to create, it will save a lot of time and consternation down the line. :)
I have been thinking of creating something like this as well and so I am delighted to see the kinds of charts you recommend. My own ideas have not yet congealed into actual form, but now that I have come across your blog post I have something definite and concrete to go by.
I also plan to make charts that compare differences in color, weight, texture, length, widths available, price difference, and variety in quilling strips from quill paper strip manufacturers. As a new quiller, these kinds of references will be very helpful as I don't yet know without thinking what kind of strip I should use-where and when.
The above would be more than one chart, obviously. I want to have noted references as well for quilling stores in terms of prices, products, sales and discounts, newsletters, links, etc.
I think I'll be writing my own blog soon! :)
Post a Comment