On the second day of quilling we Adorned a Birdhouse.
This will not be the only birdhouse that we see during this Quilling month of December.
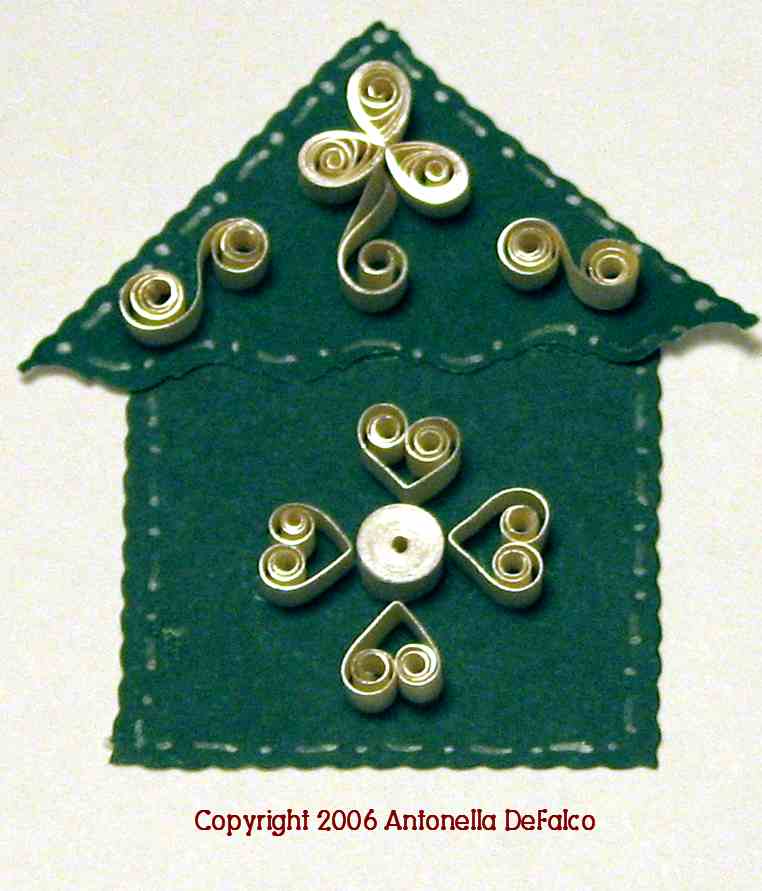
For this Birdhouse, I started with creating the basic birdhouse shape by taking green paper and decorative scissors and did the following:
- Cut a 1-/12 inch square for the base
- Cut another 1-1/2 inch square and cut it in half at an angle to make a triangle for the roof
- I then took a gel pen and made a dash-dot (-.-.-.) pattern around the outside edge. I did this so that it is easier to see the delineation between the roof and the base.
I had some new English quilling paper that has a beautiful gilded edge. I love it, it is so beautiful and I will tell you that the pictures don't do it justice.
The next step is to make quilling to adorn our new birdhouse. For this design, I used a shape called a "flag" that I have not previously described. Use this picture as your guide and do the following:

- Take your strip of quilling paper (width does not matter) and fold it in half length-wise
- Do not glue the strip
- Starting from the end that is open, start a coil
- You only want to make a few turns and as you turn you will see the end where the fold is will start to push out, like a flag
The instructions for putting together the birdhouse are as follows:
Roof
- 3 - 3 inch (7.62 cm) teardrops
- 1 - 3 inch (7.62 cm) flag
- Arrange the 3 teardrops with points glued together and attach flag to the glued points
- 2 - 3 inch (7.62 cm) S-scrolls are added for additional decoration
- 1 - 9 inch (22.86 cm) tight coil
- 4 - 3 inch (7.62 cm) heart scrolls
- Arrange as shown in picture
Technorati Tags: quilling, paper filigree, filigrana, free quilling pattern, christmas quilling, free pattern, naqg, childrens crafts, quilled birdhouse
Enjoy!
0 comments:
Post a Comment