banner


Tuesday, October 31, 2006

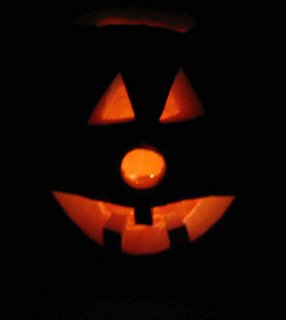
Happy Halloween


Happy Halloween Everyone!

Tonight we went Trick-or-Treating. It was a great night, the weather was so mild. We went around with a few of the neighbors, left our candy out on the porch and walked around for over an hour. It was a great night!

One last thing before we part, a quick little song my son learned in school.

One Little, Two Little, Three Little Witches
Fly over haystacks, fly over ditches,
Slide down the moonbeams without any hitches
Heigh Ho! Halloween is Here!

Tricks and Treats!
Saturday, October 28, 2006

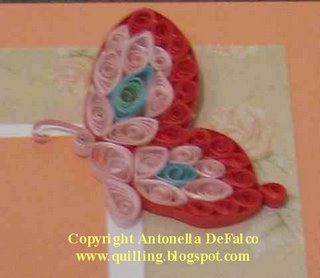
Quilled Butterfly - Free Pattern

free quilling pattern butterfly
Hello Everyone,

A friend of mine was asking for instructions to make a butterfly and I sent her a photo and instructions and thought that it would be a great addition to this site. Just in case you have not visited before, here are links to the Basic Coil Shapes and Spiral Shapes.

The butterfly that I have attached is red and pink - she was specifically requested. I have not identified the specific colors you would use because you can make your butterfly any colors you would like. I have used 1/8" (.3cm) width strips. Have fun with it and feel free to ask any questions you may have:

Body
  • 1 - 3" (7.62 cm) tight coil (for the head)
  • 1 - 6" (15.2 cm) Marquise (for her body)
  • 1 - 4" (10.2 cm) Teardrop (For this butterfly I made it flat on one side - I do a lot of work by "feeling" my way around, ant thought that flat looked better for this particular butterfly)
  • 1 - 1-1/2" strip cut in half for the feelers (I usually cut almost to the end and glue the end to the head)
When I refer to wings I think of the "Top" and "Bottom" of a single wing. If you look closely, you will see that I wrap a strip around each of these separately. I do this because I think it makes the final piece more finished and helps with getting the wing in the shape I want for the project.

Top Wing
  • 7 - 4" (10.2 cm) Teardrops (I make this the darker color and arrange them on the outside)
  • For the multi-colored center point I take 2 different color strips one 3", I coil this tightly with the second 6" strip glued to the end. When I coil the 3" tight coil I glue it before I continue with the outside color.
  • 5 - 6" (15.2 cm) Marquise
  • 2 - 4" (10.2 cm) Marquise
  • I may add or take away coils based on how I want it to look and how the coils fit together. As I mentioned, by adding the strip on the outside and gluing it, it gives me another opportunity to get the wing shape better.
Bottom Wing
  • 7 - 4" (10.2 cm) Teardrops (I make this the darker color and arrange them on the outside)
  • I added a little more color by adding a 4" marquise in a different color
  • 2 - 6" (15.2 cm) Marquise
  • 1 - 6" (15.2 cm) Triangle (to get the wing shape - you may not need this)
  • 2 - 4" (10.2 cm) Marquise
  • Again, I may add or take away coils based on how I want it to look and how the coils fit together. By adding the strip on the outside and gluing it, it gives me another opportunity to get the wing shape better.
  • One final thing on this bottom wing, I added a 4" (10.2 cm) Teardrop to the outside. Many of the pictures of butterflies show that they have what I refer to as a little extra wing. I do not know what to call it, but they have such beautiful shapes to their wings and this was an attempt to capture some of that.
You can take this picture, print it out and place wax paper over it. You can then quill directly over the wax paper for placement of the coils. You can either make 2 of each of the wings and arrange a butterfly in flight, or you can do what I have done here which is use a coil (in this case I used a 4" / 10.2 cm tight coil) and placed it behind the top wing to lift it off the page thereby adding dimension.

I hope that you have enjoyed this butterfly.

Technorati Tags: , , , , , ,

Copyright Antonella DeFalco

Sunday, September 17, 2006

Blogging and Some Cleanup

Inspiration! New Ideas, and Spring Cleaning in the Fall...

I have been inspired. This inspiration is driven by my need to find organization. My current inspiration has been about how I would like this site to move forward.

This site has a lot of information about quilling and tools and techniques that can be found within my Quilling Blog. The reason for trying to organize this information is that I have found that it is not easy to find unless you know where it is. Since many people who visit are new to the site, they may not know where to look. So, I have undertaken a huge effort (at least on my part since I am not a webmaster) to reorganize this website and make finding the information much easier.

I am adding some links on the Left Sidebar for the following items:
  • Quilling Information - - This is all about this site. I am organizing my information so that you will be able to easily find things like instructions for making the Quilling Shapes and links to the Free Patterns.
  • Artist Spotlights - This is a monthly series where I select an artist in various genres and share them and their work with you. As I add new articles, I will post a link here so that you can easily find your favorite artist!
  • Blogs I Read - The web is a fun place, find about some of the neat blogs I like to read.
  • Subscribe Here - If you would like to be notified of changes to this blog you can get updates every time I add new content. You can get email updates by entering your email address (don't forget to reply to the email FeedBurner will send you so that you can complete the transaction) or you can receive an RSS feed by clicking on the orange RSS button. If you have a Google Home Page you can click on the Add to Google button.
  • Recent Posts - A list of the last 10 posts that I have made
  • Archives - A link for each month that I have added information to this site. Please click on the month to see everything for that month.
I sincerely hope that making these changes will help make finding the information you are looking for easier to find. You will see several posts today as I create additional posts that will help with this organization process.

Please comment on this post or send me an email if you have any suggestions or ideas.

Thank you,
Antonella :-)

Technorati Tags: , , , , ,

Copyright Antonella DeFalco

Free Quilling Patterns

I have been adding Free Quilling Patterns to this site so that everyone can see how easy quilling is. These patterns are free for personal use. You can use them in any non-commercial way. You may not represent these patterns as your own nor sell them commercially. If you would like to use these patterns or sell them, please contact me and we can discuss your specific details.

Please click to learn the basics of quilling and to learn to make the quilled shapes.

Beginner Patterns (these patterns use only the basic coil and spiral shapes):


  • 7 Petal Daisy - This is your basic Daisy pattern, quick and easy. A classic quilled design.
  • 4 Daisy Patterns - In this post, I provide photo and instructions for 4 basic daisy patterns.
  • Daisy Pattern - yet another daisy pattern. This one is shown on a card to demonstrate how you can combine quilling with card making.
  • Turkey Pattern - this uses simple techniques, but was something new for me. A bit of an abstract attempt.
  • Christmas Poinsettia - Here is a simple Quilled Christmas Poinsettia project. This is a classic that is perfect to add a string and make an ornament to hang on your tree!

  • These patterns use a variety of techniques and shapes and are fun to try:


    • Hot Air Balloon - Shows you how to use the fill-in technique to create a Hot Air Balloon
    • Wedding Cake - Uses fringed flower and alternate side looping techniques to create some really beautiful flowers that adorn a wedding cake. Suitable for a Wedding Card or as an embellishment on your scrapbook page.
    • Butterfly - This is an intermediate pattern that uses only the basic shapes.
    • Flowers of Love - This pattern uses S-scrolls to make a heart and accents this with white coil hearts. Lots of love for all of your Valentine's and Anniversary needs. This pattern was published in the Accord Quilling Calendar!
    • Lovey Dovey Birdhouse - This is a birdhouse pattern - very bright and springy.
    • Palm Tree and Sunshine - This is a very simple Palm Tree design. Perfect for that summer scrapbook page or a touch of humor for Christmas with Santa hanging out at the beach.
    • New Home Magnet - This is a great idea for a house warming gift.
    • Butterfly and Dogwoods - This is a perfect combination, a Spreuer Butterfly perched on a beautiful picture of a Pink Dogwood. This includes instructions and a link to the actual photograph so you can make the entire project on your own!
    • Easter Cross - This is a Spreuer Cross using the Patriarchal Cross design. It is augmented with delicate roses. Perfect design for Baptism, Weddings, Communions, Confirmations, Sympathy, or any religious gift or event.
    • Wedding Dress - A beautiful pattern of a Wedding Dress that is suitable for a scrapbook page, bridal shower, or wedding card. This pattern was published in the Accord Quilling Calendar!
    • Flower Girl Dress - This is a quick and easy pattern and can be used for a Flower Girl, Communion, Baptism, you name it. Just change the color and you can have any type of little girl event! This pattern was published in the Accord Quilling Calendar!
    • Red, White, and Blue Ladybug - Quick little ladybug for you to try. Remember, part of the fun is to play with the colors and make quilling truly your own. Here is the lady bug on a Sunburst flower too.
    • Pink Flamingo - this sweetie is made with roses and she is ready to fly away.
    • Happy Song Birds - this is a happy couple on a crackle painted background. The birds are perched on a branch enjoying the beautiful day.
    • Trellis with Yellow Flowers - Have you ever wanted to make a trellis and have flowers growing on the trellis, here is a simple pattern for you to try.
    • Flower Power Girl - This is a happy pattern inspired by my friend Toni, she literally leaps off the page.
    3D Quilling Patterns:

    • Spinning Top - This is made completely out of paper, including the spinning stick! Great idea for the kids.
    • Patriotic Spinning Top - Who knew a toothpick could be so useful. For tons of fun, try out this spinning top.

    Some Special Card Patterns:


    More Patterns and Techniques:
    Click here for my special December Days of Quilling series. I have several winter patterns that are fun and easy to make.

    Click here for Spreuer Free Patterns.

    Want to make ATCs (Artist Trading Cards)? Click here for a tutorial.


    Please send me a comment on this post or email me with any specific patterns you would like to see. There is a really good chance that I have the pattern or can make one for you.

    Technorati Tags: , , , , ,

    Copyright for Personal Use Antonella DeFalco


    LinkWithin

    Related Posts with Thumbnails